
6 Bacterial Transformation with Recombinant Plasmid DNA
Following this lab, students will be able to:
- Compare and contrast plasmid and genomic DNA
- Perform a bacterial transformation
- Explain selection media and reporter genes and their significance in transformation
- Week 7: Describe observations following bacterial growth and assess the efficiency of transformation
Contribution Points:
 Consult with your TA to receive a stamp at the end of your lab period.
I have completed the necessary tasks required during this week’s lab to earn Contribution Points. I am aware that I may have point(s) deducted from my Contribution Points if my workspace is not appropriately clean at the conclusion of lab.
Resources
- Biological Science (8th ed.), Freeman et al. 2024, DNA and genes (pp. 334–350), Chapter 15
- The Molecular Revolution (pp. 422–442), Chapter 20
- Canvas resources
Introduction to DNA and Plasmids
For this lab, you should know the basics about DNA function and structure. DNA encodes the genetic information required to build the proteins that make up the biochemical machinery of every cell. This week we will be investigating DNA using bacteria. Bacteria contain a single large DNA molecule called genomic DNA which includes the genes necessary to code for most proteins needed by a cell. Some bacteria also contain smaller circular plasmid DNA molecules: accessory DNA that carry relatively few genes. These genes can be passed from one cell to another in conjugation and if released by one cell, through cell death or injury, can sometimes be taken up by another bacterium. The process of uptake of DNA by a bacterial cell from solution is known as transformation that may result in genetic change.
Transformation
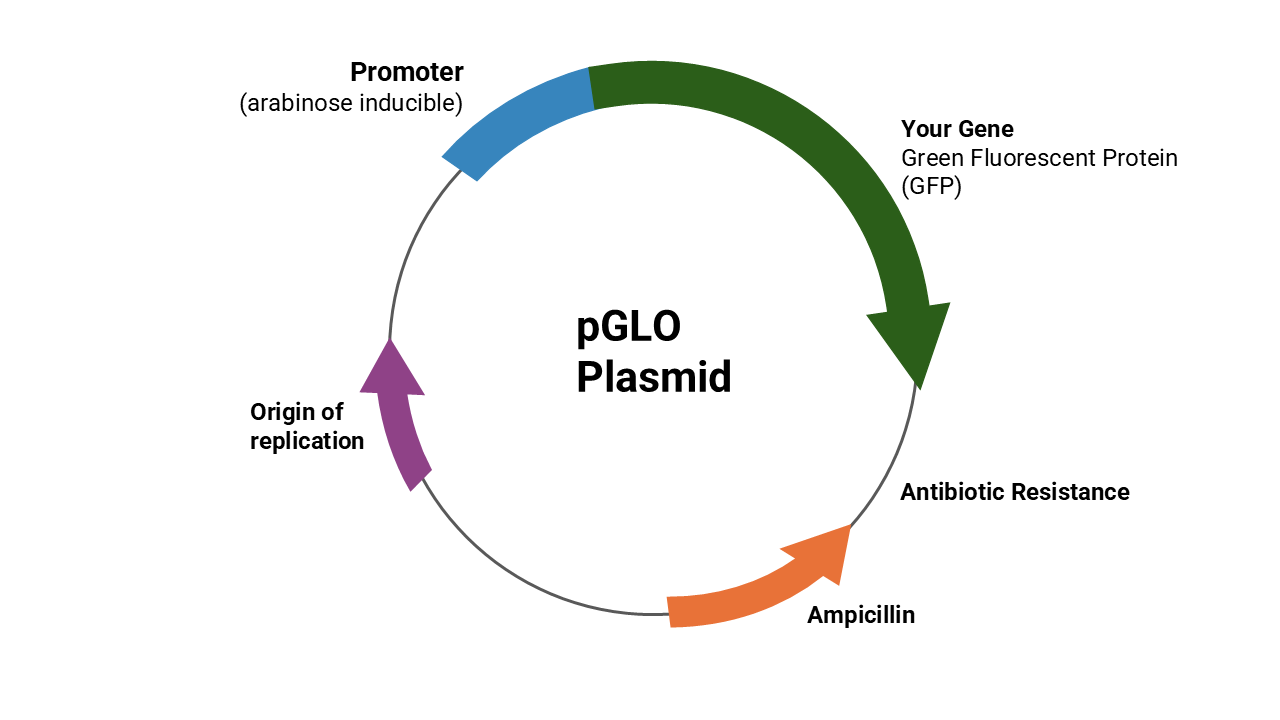
Any gene in a plasmid can be transferred during transformation. The plasmid that you will transform carries two genes. The two genes we’ll be studying in lab this week — green fluorescent protein and antibiotic resistance. The gene expression of antibiotic resistance in the bacterium indicates a successful transformation. A selection medium is a growth medium that will allow a bacterium with the targeted gene (from the plasmid) to survive, but will not allow bacteria without that gene to grow. The expression of the green fluorescent protein gene on the plasmid provides another way to confirm transformation. Green fluorescent protein (GFP), originally identified in jellyfish, absorbs ultraviolet light and emits green light (longer wavelength, lower energy photons), but doesn’t affect the survival of the bacteria on a selection medium. The gene coding for GFP was isolated, and GFP is now widely used as a marker for genetic studies. Normal bacteria do not express GFP, so expression of GFP shows which bacteria were transformed. We call such a marker a reporter gene. It cannot, however, be used like an antibiotic resistance gene to select just the bacteria which were transformed.
Adding new genes to a plasmid (= recombinant DNA) and inserting the plasmid into a bacterium is one kind of genetic engineering. In the lab, we can treat the bacteria with calcium chloride and heat shock to make the bacteria’s membranes leaky, making plasmid uptake more likely.
If you insert a new gene into a plasmid, you can use it to change the genetics of the bacterium and get it to make proteins that it does not normally make. The drug industry has utilized this technique to get bacteria to make human growth hormone, insulin, clotting factors, interferons, erythropoietin, and other human proteins. However, plasmid transfer and recombination also occur naturally, which is the basis of rapid evolution of multi-drug resistant bacteria. Any plasmid incorporating an antibiotic-resistance gene spreads rapidly through bacterial populations where antibiotics are frequently used, including those in hospitals and some animal husbandry operations.
In today’s lab, you will do a simple transformation using Escherischia coli (E. coli) bacteria and plasmids that carry 2 genes. One plasmid gene blocks bacteria-killing effects of the antibiotic ampicillin. A second plasmid gene codes for synthesis of green fluorescent protein (GFP), a jellyfish protein that fluoresces green light when excited by ultraviolet light. In these plasmids, the GFP DNA has been linked to other DNA that normally functions as a promoter for expression of a gene used to metabolize the sugar arabinose, so GFP expression requires presence of arabinose in the culture medium. The plasmids (from another bacterium) can act as a vector for ampicillin resistance and green fluorescent protein expression. In genetic engineering, a vector is a biological tool (plasmid, virus, etc.) used to facilitate gene transfer. Either trait, in connection with an ampicillin selection medium or ultraviolet light, permits fast identification of successful transformations.
Transformation experiments depend on:
- a host in which to transform gene (E. coli);
- ensuring that selected host is competent (treatment with calcium chloride and heat shock) to take up new DNA;
- a vector to carry gene (plasmid); and
- a method (usually selection media) to identify and isolate host cells that took up and now express the new DNA.

Part 1: Bacterial Transformation Experiment
The techniques needed to do a bacterial transformation require careful attention to details, timing, and sterile technique. Sloppy technique will yield no results and no points!
Note that plasmid concentration is 0.08µg DNA/µl plasmid solution.
Sterile technique begins with sterile supplies – all materials provided to you in lab have been sterilized for you. It will be important that you begin the lab with a sterile workspace. Ethanol wipes provided at your station should be used to wipe down the bench and inside surfaces of the sterile shield. As you progress through the lab, it will be important that you are mindful of sterile technique. Complete the entire lab activity INSIDE the sterile shield. Wear gloves. Do not re-use pipette tips or sterile loops. Be careful not to touch pipette tips or loops to any surfaces inside your sterile shield.
Properly dispose of all items you use during the lab activity. Carefully following sterile technique will reduce the likelihood of contamination on your experimental plates.
Step 1: Make Competent Cells
- Work with your lab group to find and surface-sterilize an open sterile shield. Once sterilized, bring two microcentrifuge tubes to your station.
- Label one closed sterile microcentrifuge tube + plasmid (or +P) and another –plasmid (–P). Label both with your group’s name.
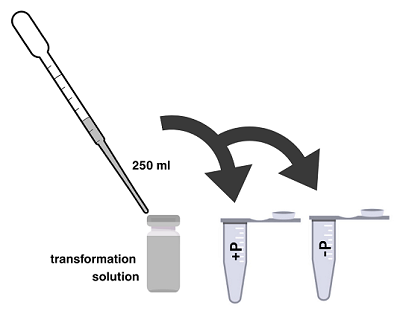
- Grab a microcentrifuge tube of cold Calcium Chloride (CaCl2) from the appropriate station. Uncap the –P tube and use a micropipette with a sterile tip to add 250 µL of cold 50mM CaCl2. Recap –P tube and repeat with +P tube.
- Find the petri plate already in your sterile shield containing Luria agar on which E. coli lacking genes for ampicillin resistance and GFP production have been growing for about 12-24 hours at 37°C.
- Use a sterile loop to remove a single colony from the E. coli plate. Be careful not to pick up any agar. Select the –P tube and immerse the loop into the CaCl2 at the bottom of the tube. Twirl the loop between your index finger and thumb until the entire colony is dispersed in the solution. Cap the tube, vortex, and place it on the ice. Pack ice around the tube.
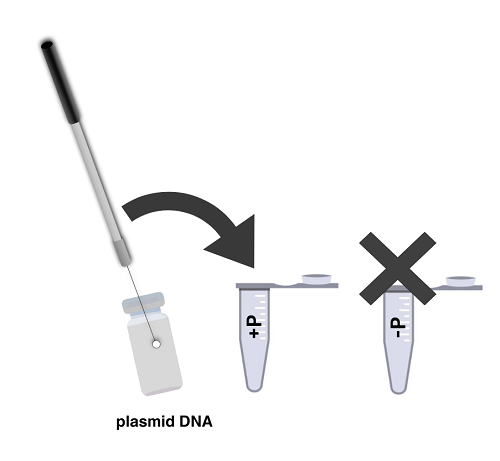
- Using a new sterile loop, add bacteria in the same way to the +P tube. Then ask your TA to use a micropipette to transfer 10 µL of plasmid DNA containing the ampicillin-resistance and GFP genes to the +P cell suspension. Cap the tube, vortex the contents, and place it on the ice. DO NOT add plasmid to the –plasmid tube. Why?
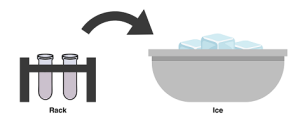
- Incubate both the tubes in direct contact with ice for at least 10 minutes. You can use this time to label your petri plates. See step #10 for labeling instructions.
Step 2: Perform the Transformation
To be successful in getting E. coli to take up the plasmid DNA, follow the temperature and timing in these steps exactly. Make certain that the part of the tube containing the bacteria makes good contact with crushed ice or the warm water bath.
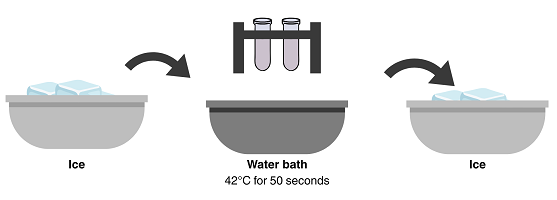
- After 10 minutes, remove both tubes from the ice bath, and immediately place them in a 42°C water bath (in the Styrofoam floater) for 50 seconds to heat shock the cells. After 50 seconds, return both tubes immediately to the ice for at least 2 minutes (longer is better).
- Remove tubes from the ice and obtain a test tube with Luria broth. Open the +P tube and use a micropipette with a sterile tip to add 250 µL of Luria broth. Recap the tube and gently mix the contents. Repeat the procedure with a new sterile tip for the –P tube. Then incubate both tubes at room temperature for 10 minutes.
Step 3: Plate the Bacteria on Selective Growth Media
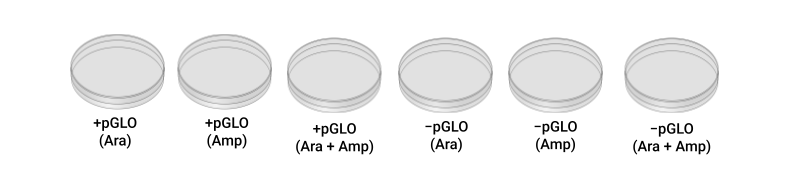
To assess the results of your transformation experiment, you will grow both +plasmid and –plasmid bacteria on three different kinds of culture media:
| Luria agar + arabinose | (ara) | Blue stripe |
|---|---|---|
| Luria agar + ampicillin | (amp) | Orange stripe |
| Luria agar + ampicillin + arabinose | (amp+ara) | Blue and Orange stripes |
Which of these six plates will act as your control(s)? Why is it important to include them in your experiment?
- While your tubes are incubating, obtain two plates of Luria + arabinose agar, and label the bottom (the agar side) of both plates with “ara,” your initials, and date. Label one plate +P and label the other –P. Repeat for the other two kinds of agar, labeling them “amp” or “amp+ara.” You will have a total of six labeled petri plates.
- Follow these directions to inoculate the –plasmid plates with the –plasmid bacteria.
-
-
-
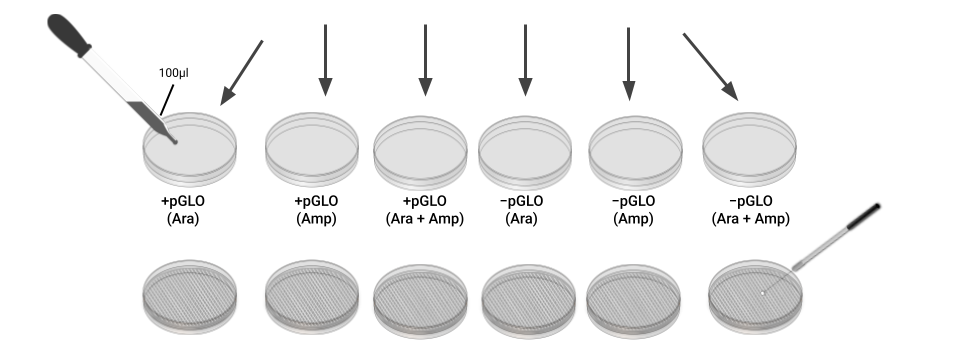
- Gently mix the contents of your –P tube again, then using a micropipette with a sterile tip, pipette 100 µL of the bacterial suspension onto each of your three –plasmid plates. Recap the tube.
- Use a sterile loop to spread the bacterial suspension evenly across the surface of each plate by skating the flat surface of the loop across the agar. Rub back and forth, gently, across the whole surface of the plate, then repeat at a right angle to your previous direction. Use a new sterile loop for each plate. Be careful not to dig into the agar.
-
- Now inoculate the three +plasmid plates with your +plasmid bacterial suspension, following the procedure in step 11 that you used for the –plasmid plates.
-

Step 4: Plate Incubation and Clean Up
- Stack your +plasmid plates and tape them together. Likewise, stack and tape the –plasmid plates. Label the tape with your group name and section number. Place the plates lid side down in a bin that has been designated by your TA. The plates will be incubated at 37 °C until the ampicillin/+plasmid plate has visible colonies (about 18–24 hours). Your TA will then move the plates to a refrigerator until next week’s lab.
- Use the signs posted in the lab and instructions from your TA to make sure you dispose of waste in the appropriate locations. Used sterile loops should be placed into the collection bin at the back of the room. Source E. coli plates, used microcentrifuge tubes, gloves, etc. should be placed into the autoclave bin for disposal.
- Clean up under your sterile shield to prepare the lab station for the next group of students. Follow the clean-up instructions provided in lab.
- During week 7 lab you will analyze your data and turn in your post-lab worksheet during class.
Predictions
Based on the information provided in this lab and the set-up you have just completed, predict what you will see on each plate next week. Consider whether or not you should see growth of bacterial colonies, whether those colonies will be isolated or uniformly cover the plate, whether you will see flourescence, and if so, then whether that flourescence will be present in all colonies. Fill out the below table describing what you expect to see for each of the treatments.
| Without Plasmid | ||
| Arabinose | Ampicillin | Ampicillin + Arabinose |
| With Plasmid | ||
| Arabinose | Ampicillin | Ampicillin + Arabinose |
