
8 Plant Cells and Tissues
Following this lab, students will be able to:
- Properly prepare plant specimens and obtain images of them using lab microscopes
- Identify key structures in plant cells (e.g., cell wall, vacuoles, plastids) and describe their functions
- Identify different types of plant cells and tissues and describe their functions
- Describe how the morphology of different types of plant cells and tissues connect to their functions
Contribution Points:
 Consult with your TA to receive a stamp at the end of your lab period.
I have completed the necessary tasks required during this week’s lab to earn Contribution Points. I am aware that I may have point(s) deducted from my Contribution Points if my workspace is not appropriately clean at the conclusion of lab.
Resources
- Compound Scope Tutorial (video tutorial, linked on Canvas)
- Stereomicroscope Tutorial (video tutorial, linked on Canvas)
- How to use Preview (video tutorial, linked on Canvas)
- Using Leica Software (video tutorial, linked on Canvas)
- Freeman et al. 2024. Biological Science (8th ed.), pp. 751–764. Chapter 34.2
- Botany Photo Atlas (provided for use in lab)
- Canvas Resources
Laboratory 8: Introduction to Plant Cells and Tissues
Plants do not move like animals but require several resources like gases, sunlight, water and minerals for their survival. Plants have evolved diverse forms so that they can harvest these resources successfully and build and maintain their bodies. Plants have an above-ground portion called a shoot system and below-ground portion called a root system. Plants are able to continue to grow these elements throughout their entire life cycle, which is called indeterminate growth.
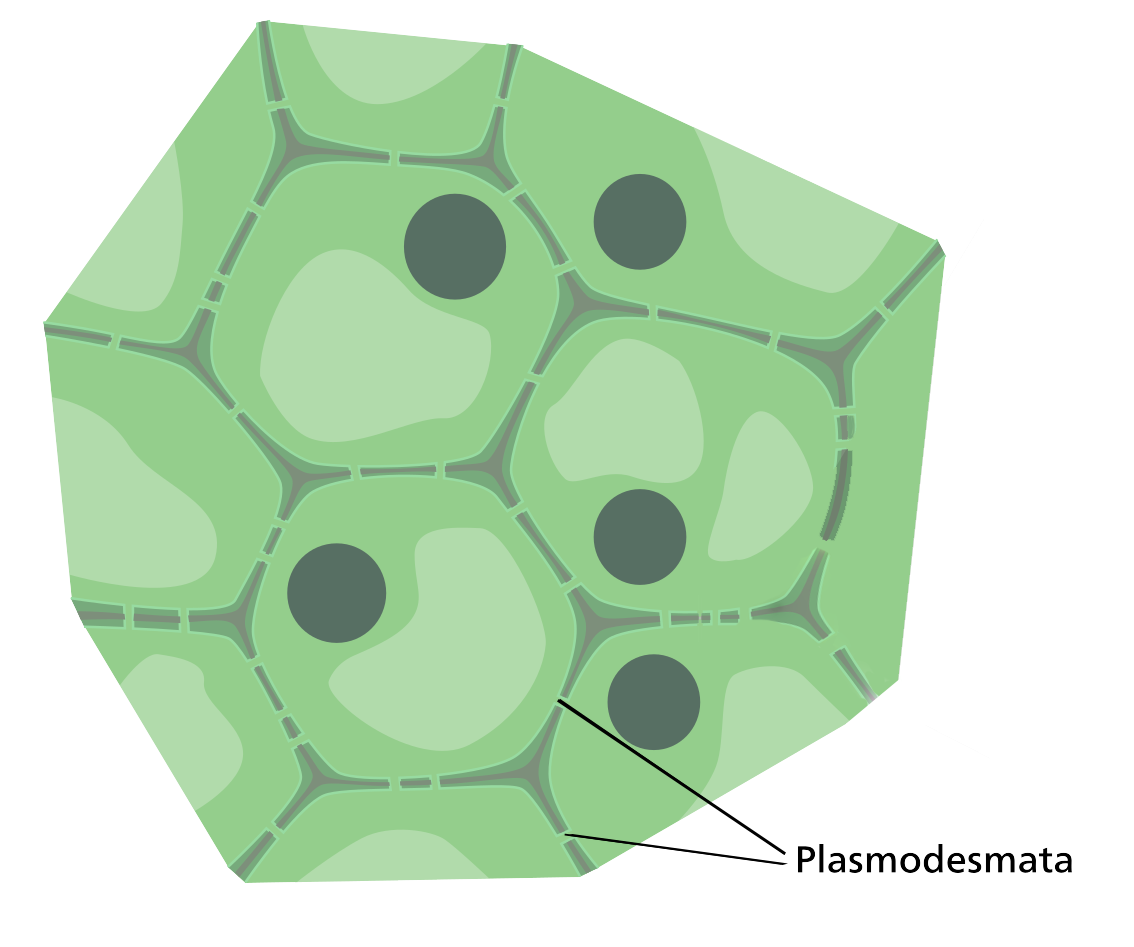
Plants and animals are both eukaryotes. Therefore, their cells contain many of the same types of structures and organelles. There are some key differences, however, that reflect the different functions these cells perform. Like animal cells, plant cells have cell membranes. In addition, plant cells have an outer cell wall made up of strong cellulose fibers. The cell wall consists of an inner primary and outer secondary cell wall. Plant cells also have chloroplasts and plastids that carry photosynthetic pigments. Plant cells have a large vacuole that is centrally located; it helps the cell maintain osmotic pressure and can act as storage for metabolic enzymes or waste products. Plant cells are connected to each other with the help of cytoplasmic connections known as plasmodesmata. These connections allow for cell-to-cell communication and help transport solutes between cells.
Plant cells are organized into group of cells that can function as a unit, called tissues. Simple tissues contain only one type of cell, while complex tissues contain several types of cells. Plant tissues are further organized into tissue systems that are based upon different structural features, their function and where they are localized within the plant. There are three tissue systems in the plant: Dermal, Ground and Vascular.
The dermal system forms the outermost layer of the plants. It acts as a protective barrier, separating the inside of the plant from the external environment, similar to the skin of animals. It is largely made up of living cells. Epidermal cells are flattened, lack chloroplasts and secrete a waxy substance called a cuticle on the external surface of the plant. Plant surfaces and leaves have specialized structures known as stomata (singular: stoma) that help to exchange gases. They consist of an opening, or pore, that is surrounded by two guard cells. The guard cells can change the size of the pore, which allows the plant to regulate the passage of gasses and rate of evaporation.
Some epidermal cells have specialized appendages called trichomes that provide protection. Trichomes come in different forms and therefore perform different protective functions, including reflection of excess sunlight, retention of moisture, protection from feeding or predation.
The ground tissue system makes up much of the interior of plants. It consists mostly of living cells that are involved in metabolism and provide support to the plant body.
The three main types of ground tissue cells are parenchyma, collenchyma and sclerenchyma. Parenchyma cells represent simple living tissue with thin primary cell walls. These are the most abundant living and versatile cells in plants. They may contain chloroplasts and perform photosynthesis or they may have storage functions. They are also found in meristems, where they rapidly divide to form new plant structures. Collenchyma cells are living cells with an unevenly thickened primary cell wall. They are found in simple tissue that functions primarily to provide support during bending and stretching of shoots.
Sclerenchyma cells also provide support, but they are dead at maturity. Sclerenchyma comprises of two types of specialized cells: fibers and sclereids. Fibers are extremely elongated cells, whereas sclereids are relatively short cells and are of variable shapes. They’re often found in the tough coats of seeds and in the pits of nuts.
The vascular system is made up of both living and dead cells and functions to transport water and solutes from one part of the plant body to the other. We will look more closely at vascular tissue in next week’s lab.
Preparation
You will be utilizing the laboratory microscopes, cameras, and computers in lab today as you observe the specimens provided. Before you begin your observations, make sure you familiarize yourself with the microscopes and cameras so you can use them effectively. Read through the Microscope Interchapter on pages 93–98 and watch the related video tutorials posted on the lab laptops and on Canvas.
The lab microscopes and cameras are helpful tools that you can utilize to create your own study guide. As part of your lab assignment, you will be required to submit labeled photos of two specimens to create study pages. You are welcome to take photos of any of the specimens for review or study guide use, but make sure that you are taking your own photos. Submitting a photo that was not taken by you in lab is an example of academic dishonesty and will not be tolerated in lab.
In order to learn about plant cells and tissues, it will be important for you to spend some time looking carefully and critically at the plant material provided to you in lab. The types of plant cells and tissues observed in this week’s lab can be found in many different types of plants in nature, but specific specimens have been selected for you to investigate in lab. These specimens should allow you to reliably see specific cell or tissue types.
Examining plant cells and tissues requires a special set of skills that develop over time and with consistent practice. Don’t expect to get it right on the first try. Be patient and persistent as you work on these skills—you can do it!
Special Skills
- Using the Lab Microscopes
- Taking Digital Images with Microscope Cameras
- Preparing Plant Sections (wet-mount slides)
- Staining Plant Specimens with Phloroglucinol
- Staining Plant Specimens with Iodine Potassium Iodide (I2/KI)
There are several specimens to be viewed in lab this week, many of which need to be carefully prepared before viewing. Where possible, we have chosen to include prepared slides in order to reduce your preparation time. However, it is important to make sure that you know how to prepare specimens for careful viewing. Working with a lab partner to help share the workload is fine, but make sure you know how to section, stain, and prepare the specimens. When you look at the slides under the microscope and take photos, make sure that you do this on your own. Sharing photos of specimens with other students is an example of academic dishonesty and will not be tolerated in lab.
See Interchapter 4 for information on preparing wet-mount slides on pages 93–98. Several of the structures and cell types that you will examine in lab today will be easier to see if they are stained. There are two stains available in lab today – Phloroglucinol and Iodine Potassium Iodide (I2/KI). Each of these stains has properties that make them a good choice for staining specific structures. The most appropriate stain will be available at the station for you to use. Make sure that you follow the instructions below so that the staining is as effective as possible. Please use the stains with caution. Phloroglucinol is an irritant and Iodine Potassium Iodide is corrosive. Both could stain clothing if spilled. Consult with your TA if you have questions about the stains.
Before lab, your TA will have prepared small pieces of fruits and vegetables for the students in your lab section to use. A 1-inch piece will be more than enough for all of the students in your lab. Remember, the thinner the section, the better you will be able to view the specimen under the scope in order to identify cell types.
Protocol 1: Staining Plant Specimens with Phloroglucinol
Phloroglucinol is a stain that reacts with lignin in the secondary cell walls of plants. To view cells that have lignified cell walls, you will need to prepare the specimen with phloroglucinol stain.
Use the following instructions to stain your specimens with phloroglucinol:
- Obtain a clean glass slide. Make sure you have a sharp razorblade, a clean coverslip, and a dropper bottle with water.
- Place the slide on the glass plate in front of you. Add a drop of water onto the center of the glass slide.
- Carefully cut your section from the desired specimen. Remember thinner is always better.
- Place your newly-cut section immediately onto the drop of water on your slide. You may want to use a toothpick to adjust the position of your sample.
- Add a drop or two of phloroglucinol directly on top of your sample.
- Place the coverslip on top of your sample, being careful not to trap air bubbles over your sample.
- Let the slide sit for 5–10 minutes for the stain to take effect.
- View sample under the microscope—you should see that the phloroglucinol has stained some areas red or pink.
Protocol 2: Staining Plant Specimens with Iodine Potassium Iodide (I2/KI)
In order to see the amyloplasts more easily in the potato cross-section, you will need to stain them with iodine potassium iodide (I2/KI) solution. This procedure is a bit different than the process of staining with phloroglucinol. To stain with phloroglucinol, you simply added the stain to the slide and let it sit. However, if you leave iodine potassium iodide on the slide with your specimen, it will stain everything purple or black and you won’t be able to view the specimen properly. To stain the amyloplasts (and only the amyloplasts), you will need to add the stain to the specimen and then quickly remove it.
Use the following instructions to stain your specimens with I2/KI:
- Prepare your workstation with a clean glass slide. Make sure you have a sharp razorblade, a clean coverslip, and a dropper bottle with water available to you.
- Place the slide on the glass plate in front of you. Place a drop of water onto the center of the glass slide.
- Carefully cut your section from the desired specimen. Remember that thinner is always better.
- Immediately place your cut section onto the drop of water on the slide. You may want to use a toothpick to adjust the position of your sample.
- If needed, add another drop of water to the top of your sample.
- Place the coverslip on top of your sample, being careful not to trap air bubbles over your sample.
- Add a drop of I2/KI to the left side of the coverslip (in contact with the water under the coverslip).
- Use a clean kimwipe to wick the stain under the coverslip so it comes into contact with your sample. To do this, place an edge of the kimwipe on the right side of the coverslip. As the kimwipe soaks up the water, it will draw the stain from the left side under the coverslip.
- Immediately place a couple of drops of water onto the left side of the coverslip.
- Wick the water under the coverslip by placing a corner of a clean kimwipe on the right side of the coverslip, drawing the stain through.
- It may be necessary to repeat steps 9 and 10 to remove any excess stain.
- Clean up any messes on your slide and view the sample under the microscope.
The I2/KI will have reacted with the starch in the amyloplasts, but the water added to the slide after the stain will have rinsed the specimen so it is easier to view. There is no need to wait for this stain to take effect – once you have rinsed the stain from the slide, you can immediately view it under the microscope.
![]() This icon represents a question meant to test your understanding. Answering these questions in the space provided as you go through the lab will help you better understand the topic and study more effectively. Use your text or e-book, botany photo atlases (provided in lab), and appropriate Internet resources to help you.
This icon represents a question meant to test your understanding. Answering these questions in the space provided as you go through the lab will help you better understand the topic and study more effectively. Use your text or e-book, botany photo atlases (provided in lab), and appropriate Internet resources to help you.
Plant Cell Structures
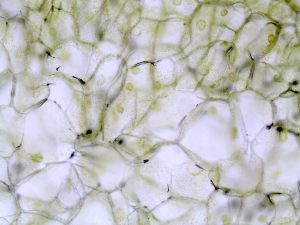
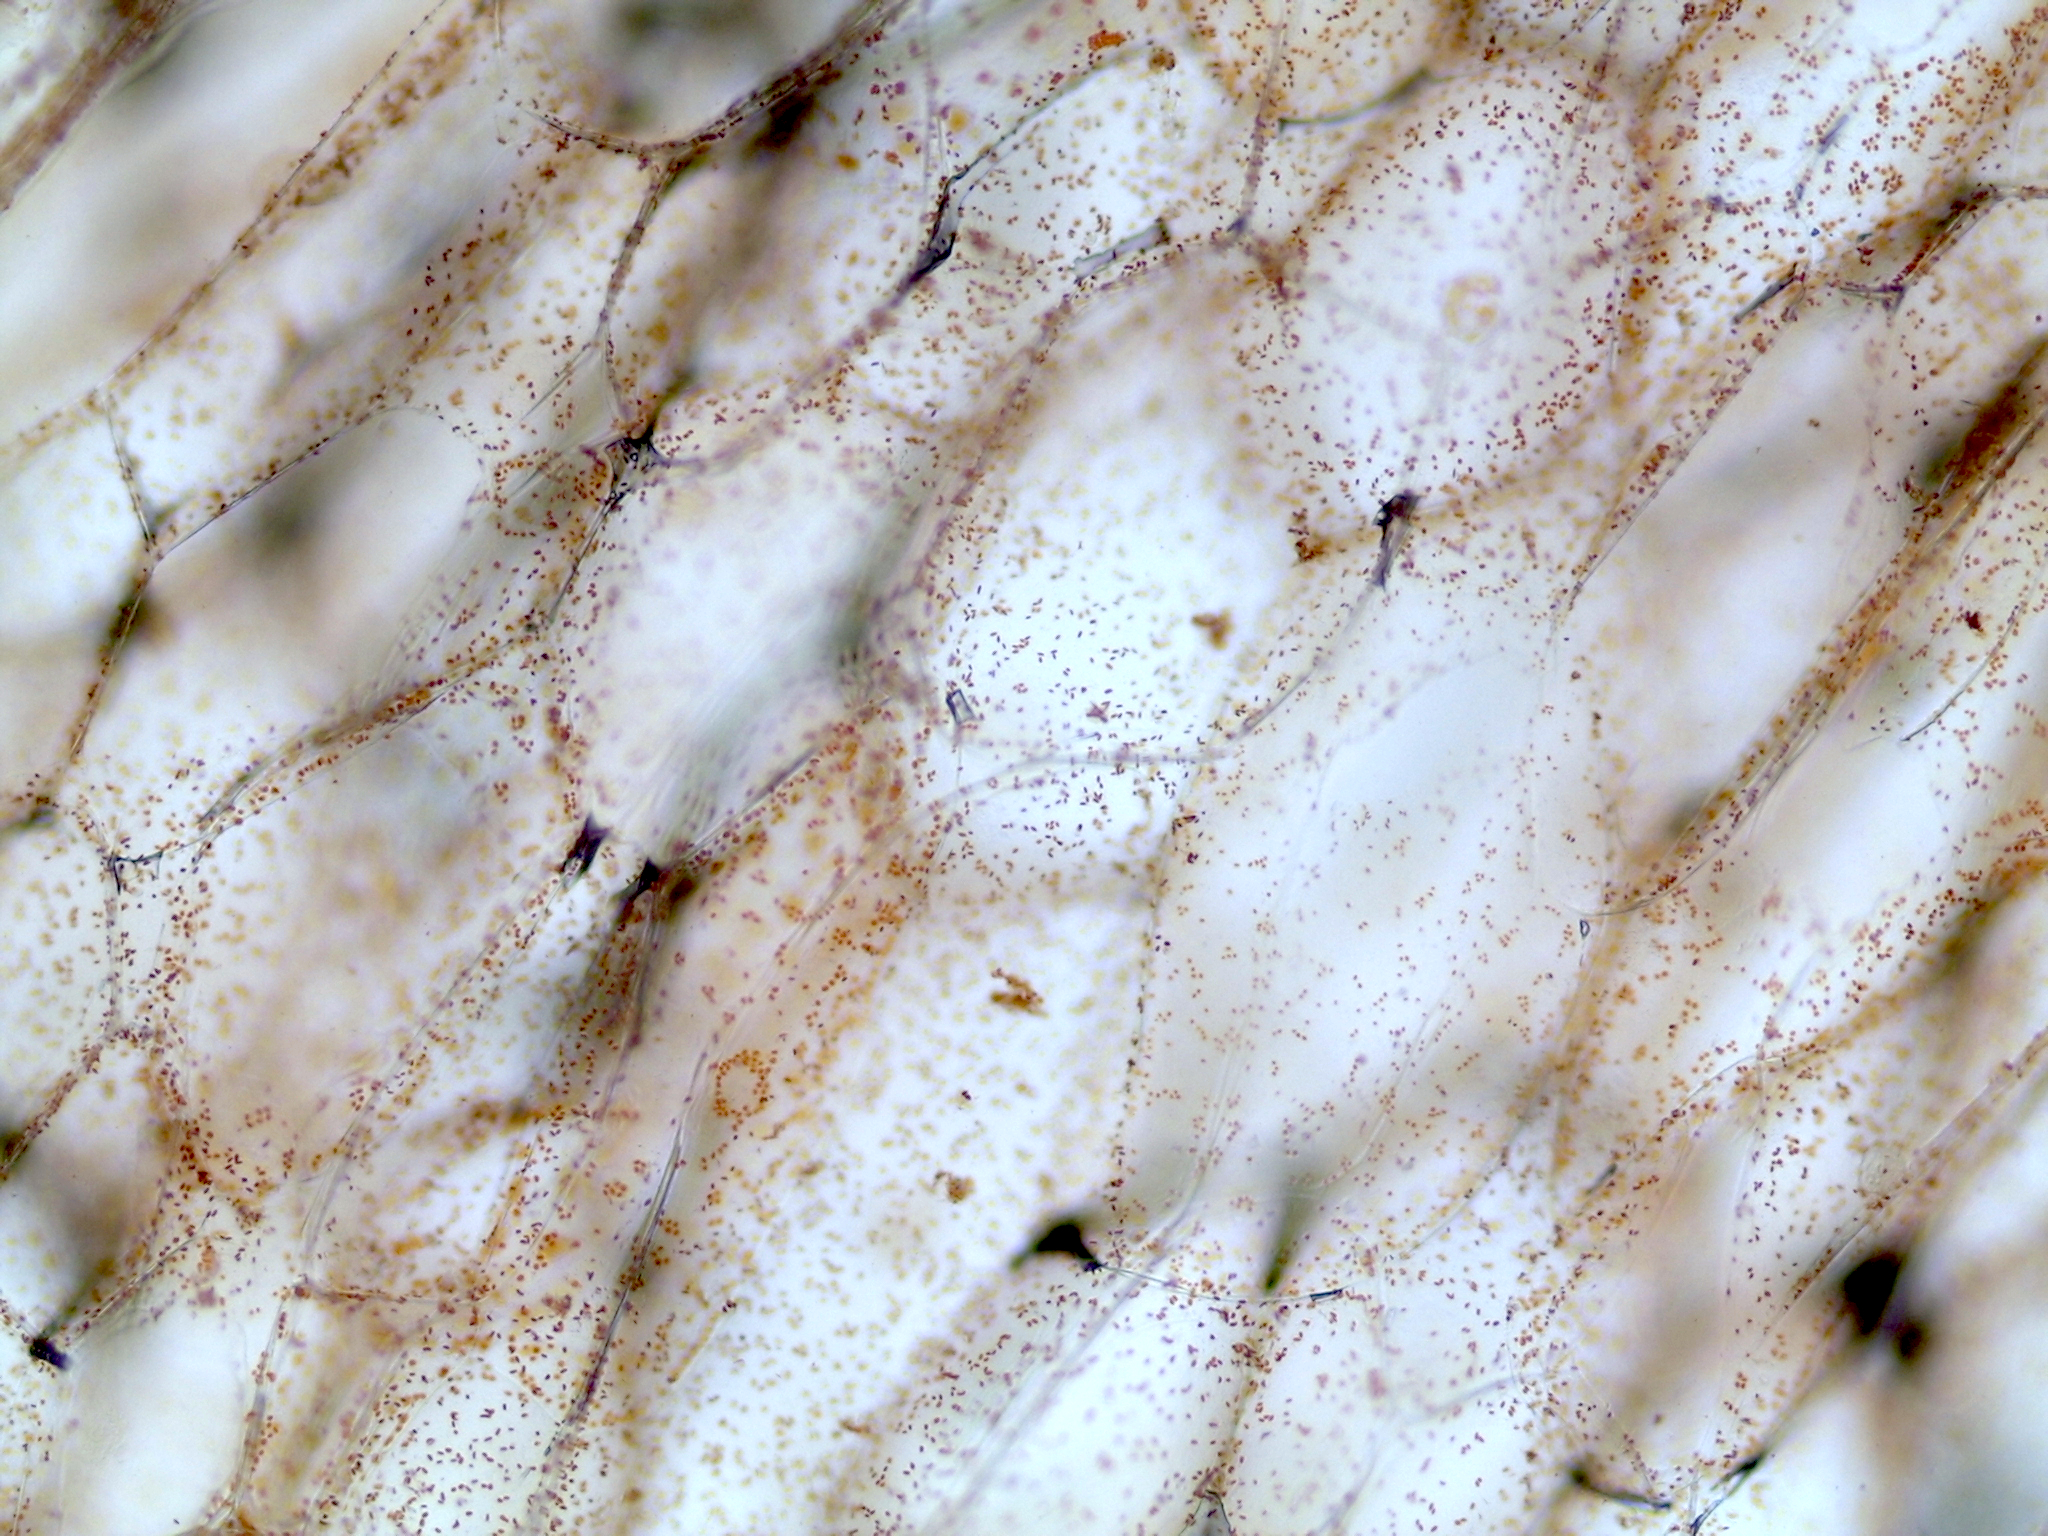
1. Plasmodesmata and Middle Lamella
Specimen: Persimmon (Diospyros virginiana) endosperm prepared slide
 Draw what you see in the space available. Make sure you label the Plasmodesmata and Middle Lamella.
![]() What are plasmodesmata?
What are plasmodesmata?
![]() What is the functional advantage of having cytoplasmic connections between adjacent cells?
What is the functional advantage of having cytoplasmic connections between adjacent cells?
2. Plastids (Chloroplasts)
Specimen: Prepare a fresh wet mount slide of a green bell pepper (Capsicum annuum) cross section.
Identify the Plastids (Chloroplasts) in your specimen and then label them on the illustration below.
![]() What are the functions of chloroplasts?
What are the functions of chloroplasts?
![]() What gives chloroplasts their green color?
What gives chloroplasts their green color?
3. Plastids (Chromoplasts)
Specimen: Prepare a fresh wet mount slide of a red bell pepper (Capsicum annuum) cross section.
Not all plastids are green. This specimen provides you with an example of plastids of different colors (chromoplasts).
Identify the Plastids (Chromoplasts) in your specimen and in the image below.
- What color are the chromoplasts in this specimen? Can chromoplasts be other colors? If so, what other colors?
- What are the functions of the chromoplasts?
4. Plastids (Amyloplasts)
Specimen: Prepare a fresh wet mount slide of a potato (Solanum tuberosum) cross section, stained with iodine potassium iodide (I2/KI). Refer to the instructions on page 96 for staining.
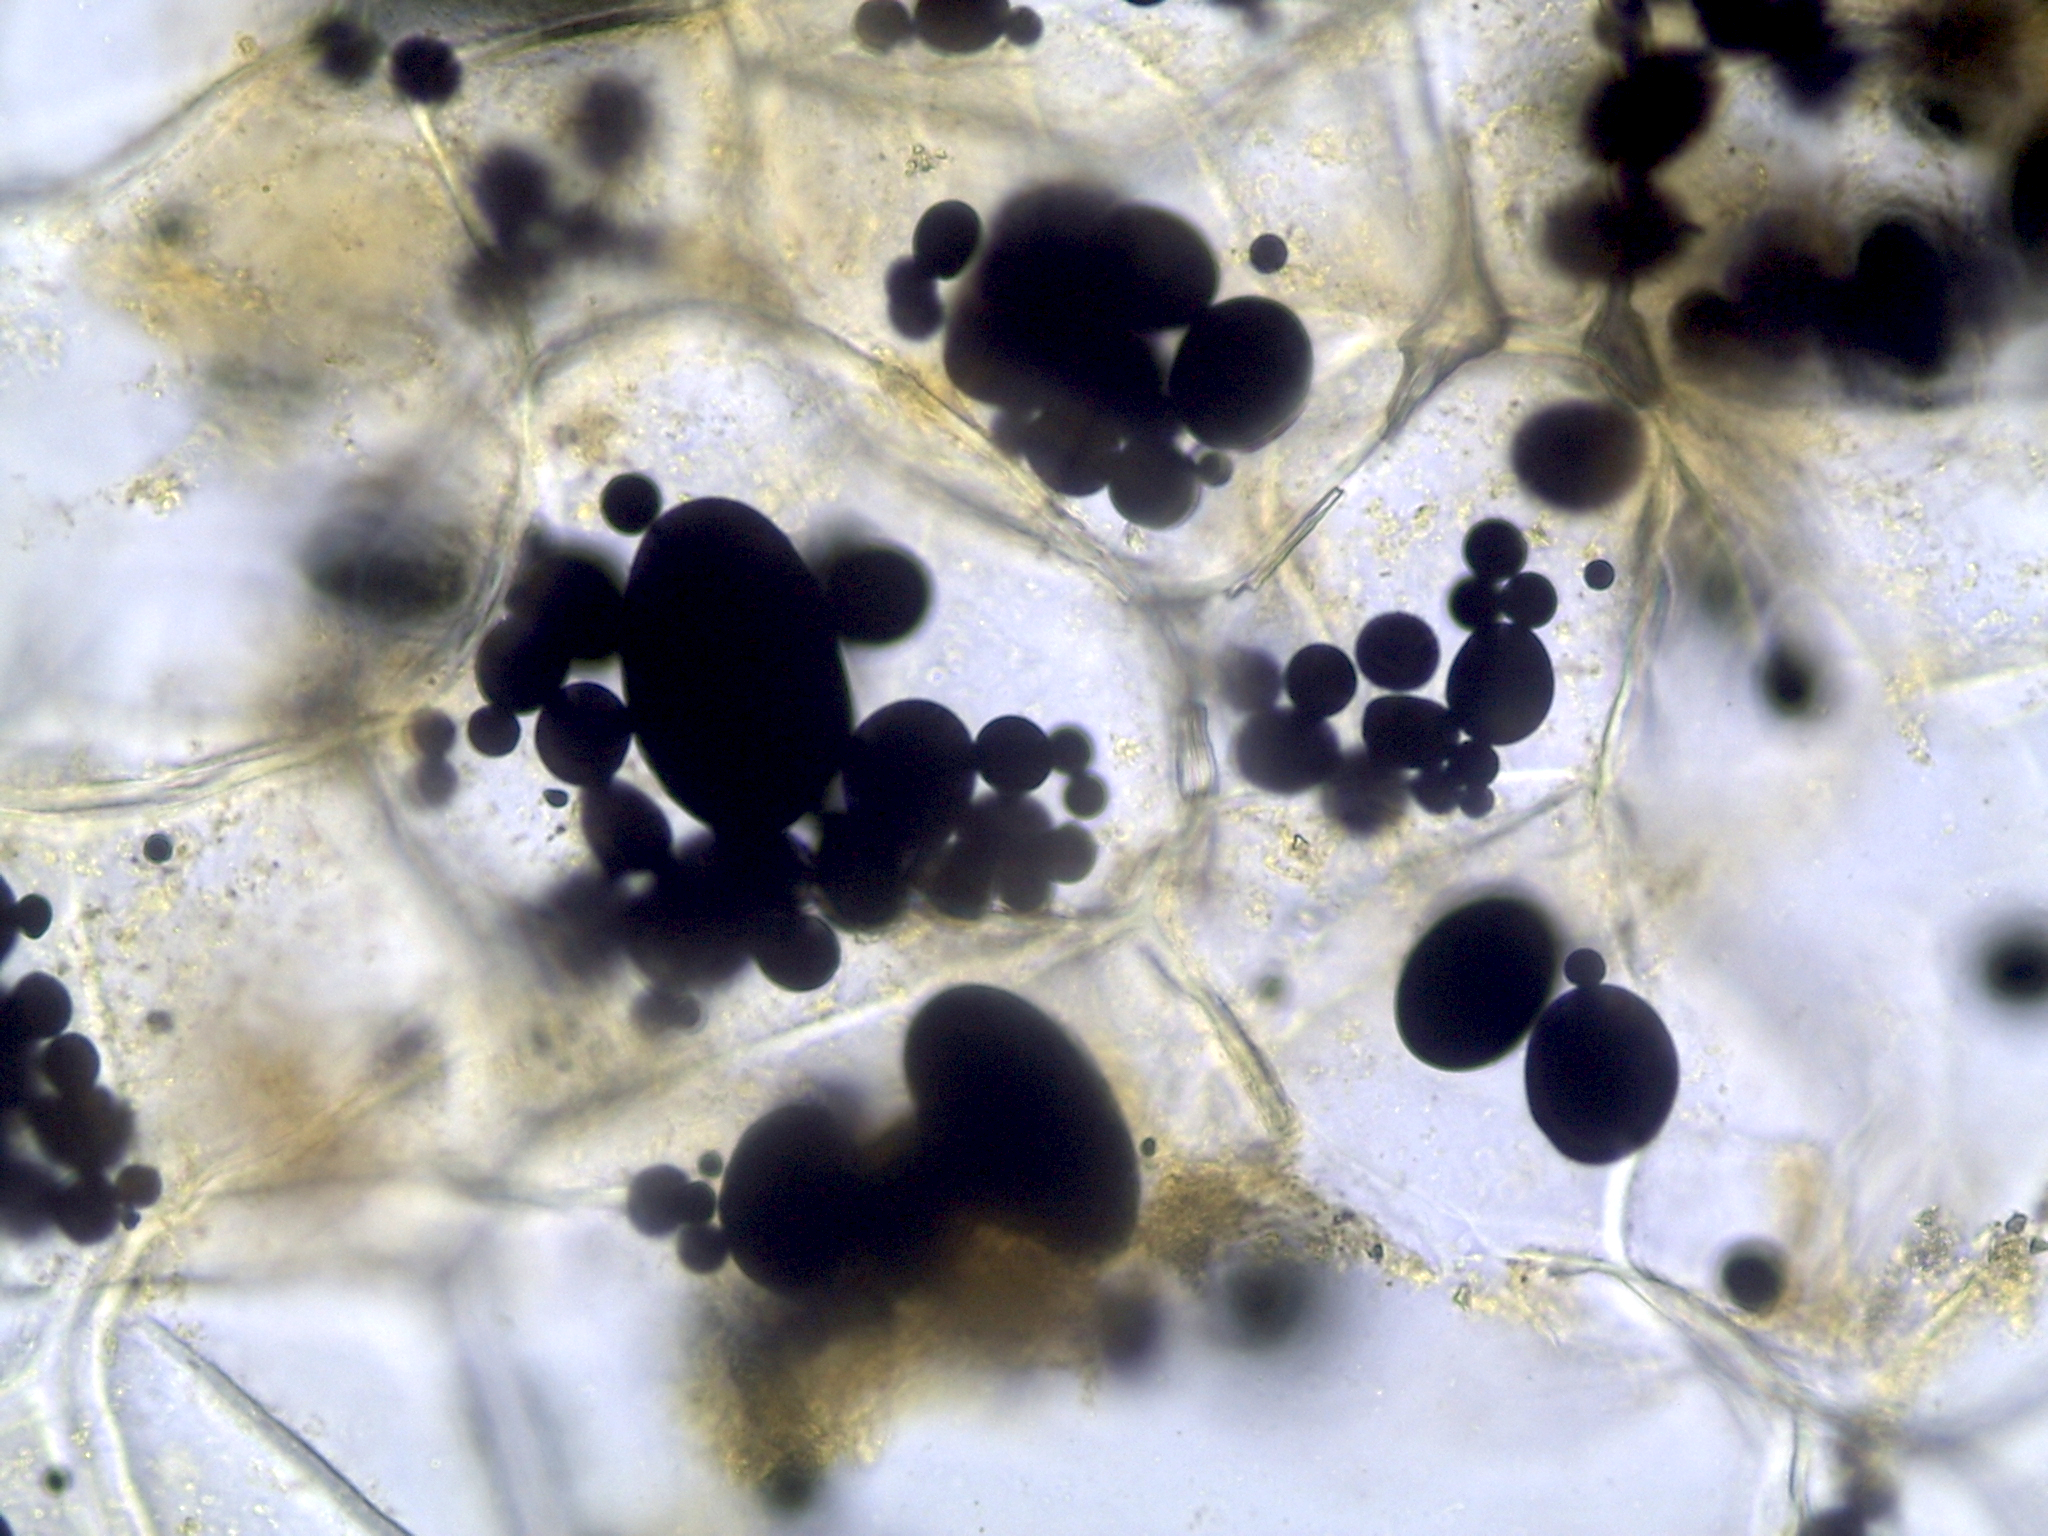
Identify the amyloplasts.
- Why are the amyloplasts stained purple with the addition of I2/KI?
- What is the function of the amyloplasts?
- Pages 795–796 (37.4 Gravity: The Gravitropic Response) of the Freeman Biology Textbook describes an interesting function of the amyloplasts. In your own words, describe the role that these plastids play in a plant’s ability to sense gravity.
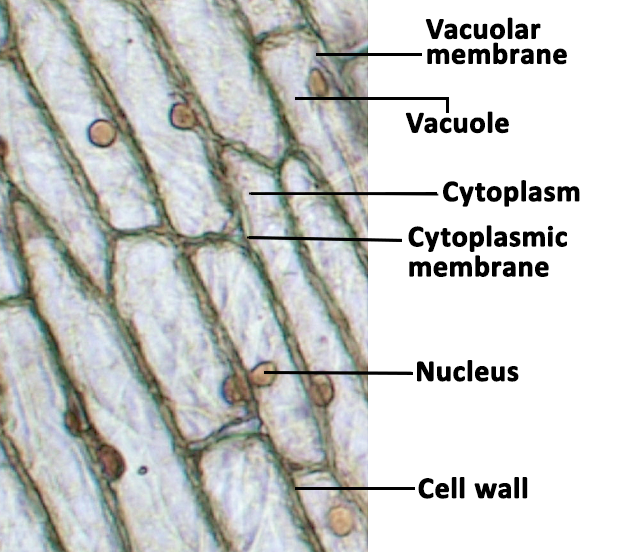
5. Cytoplasm, Central Vacuole, Cell Wall, Nucleus
Specimen: Prepare a fresh wet mount slide of a red onion (Allium cepa) epidermal peel.
Identify the Cytoplasm, Central Vacuole, Cell Wall, and Nucleus.
- What functions do the vacuoles serve?
- In your onion epidermal peel, why do some cells look empty, while others are filled with a purple substance?
To help you understand all of these important cell structures, use the example below to help you label all of the structures in the photo of the onion epidermal peel. Draw arrows from the illustration labels to the corresponding structures in the photograph.
Dermal Tissue
6. Epidermis
Specimen: Shefflera arboricola epidermal cells
To view the epidermis of Shefflera, place a leaf under the dissecting microscope (stereomicroscope) and view it under maximum magnification.
- How would you describe the surface of a Shefflera leaf (hairy, smooth, waxy, dry, shiny, dull, etc.)?
To get a closer look at the epidermal cells, you can also make a wet mount of an epidermal peel of the Shefflera to view the shape of the epidermal cells using the compound microscope.
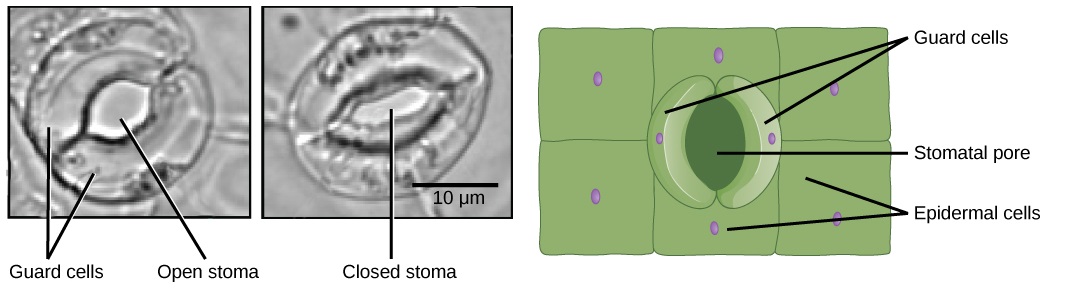
7. Epidermal Cells, Stomata, and Guard Cells
Specimen: Epidermal cells, stomata and guard cells (Tradescantia zebrina)
Prepare a wet mount slide of a tissue peel from the underside of a T. zebrina leaf.
- Describe the shape of the epidermal cells.
- Locate stomata (stoma and guard cells). Draw what you see in the space available.
- What is the function of the stoma and guard cells?
- The shape of the guard cells determines whether or not the stoma are open. Describe how the shape of the guard cells changes in order to open and close the stoma.
To help you understand all of these important cell structures, use the illustration below to help you label all of the structures in the photo of the Zebrina epidermal peel. Draw arrows from the illustration labels to the corresponding structures in the photograph.
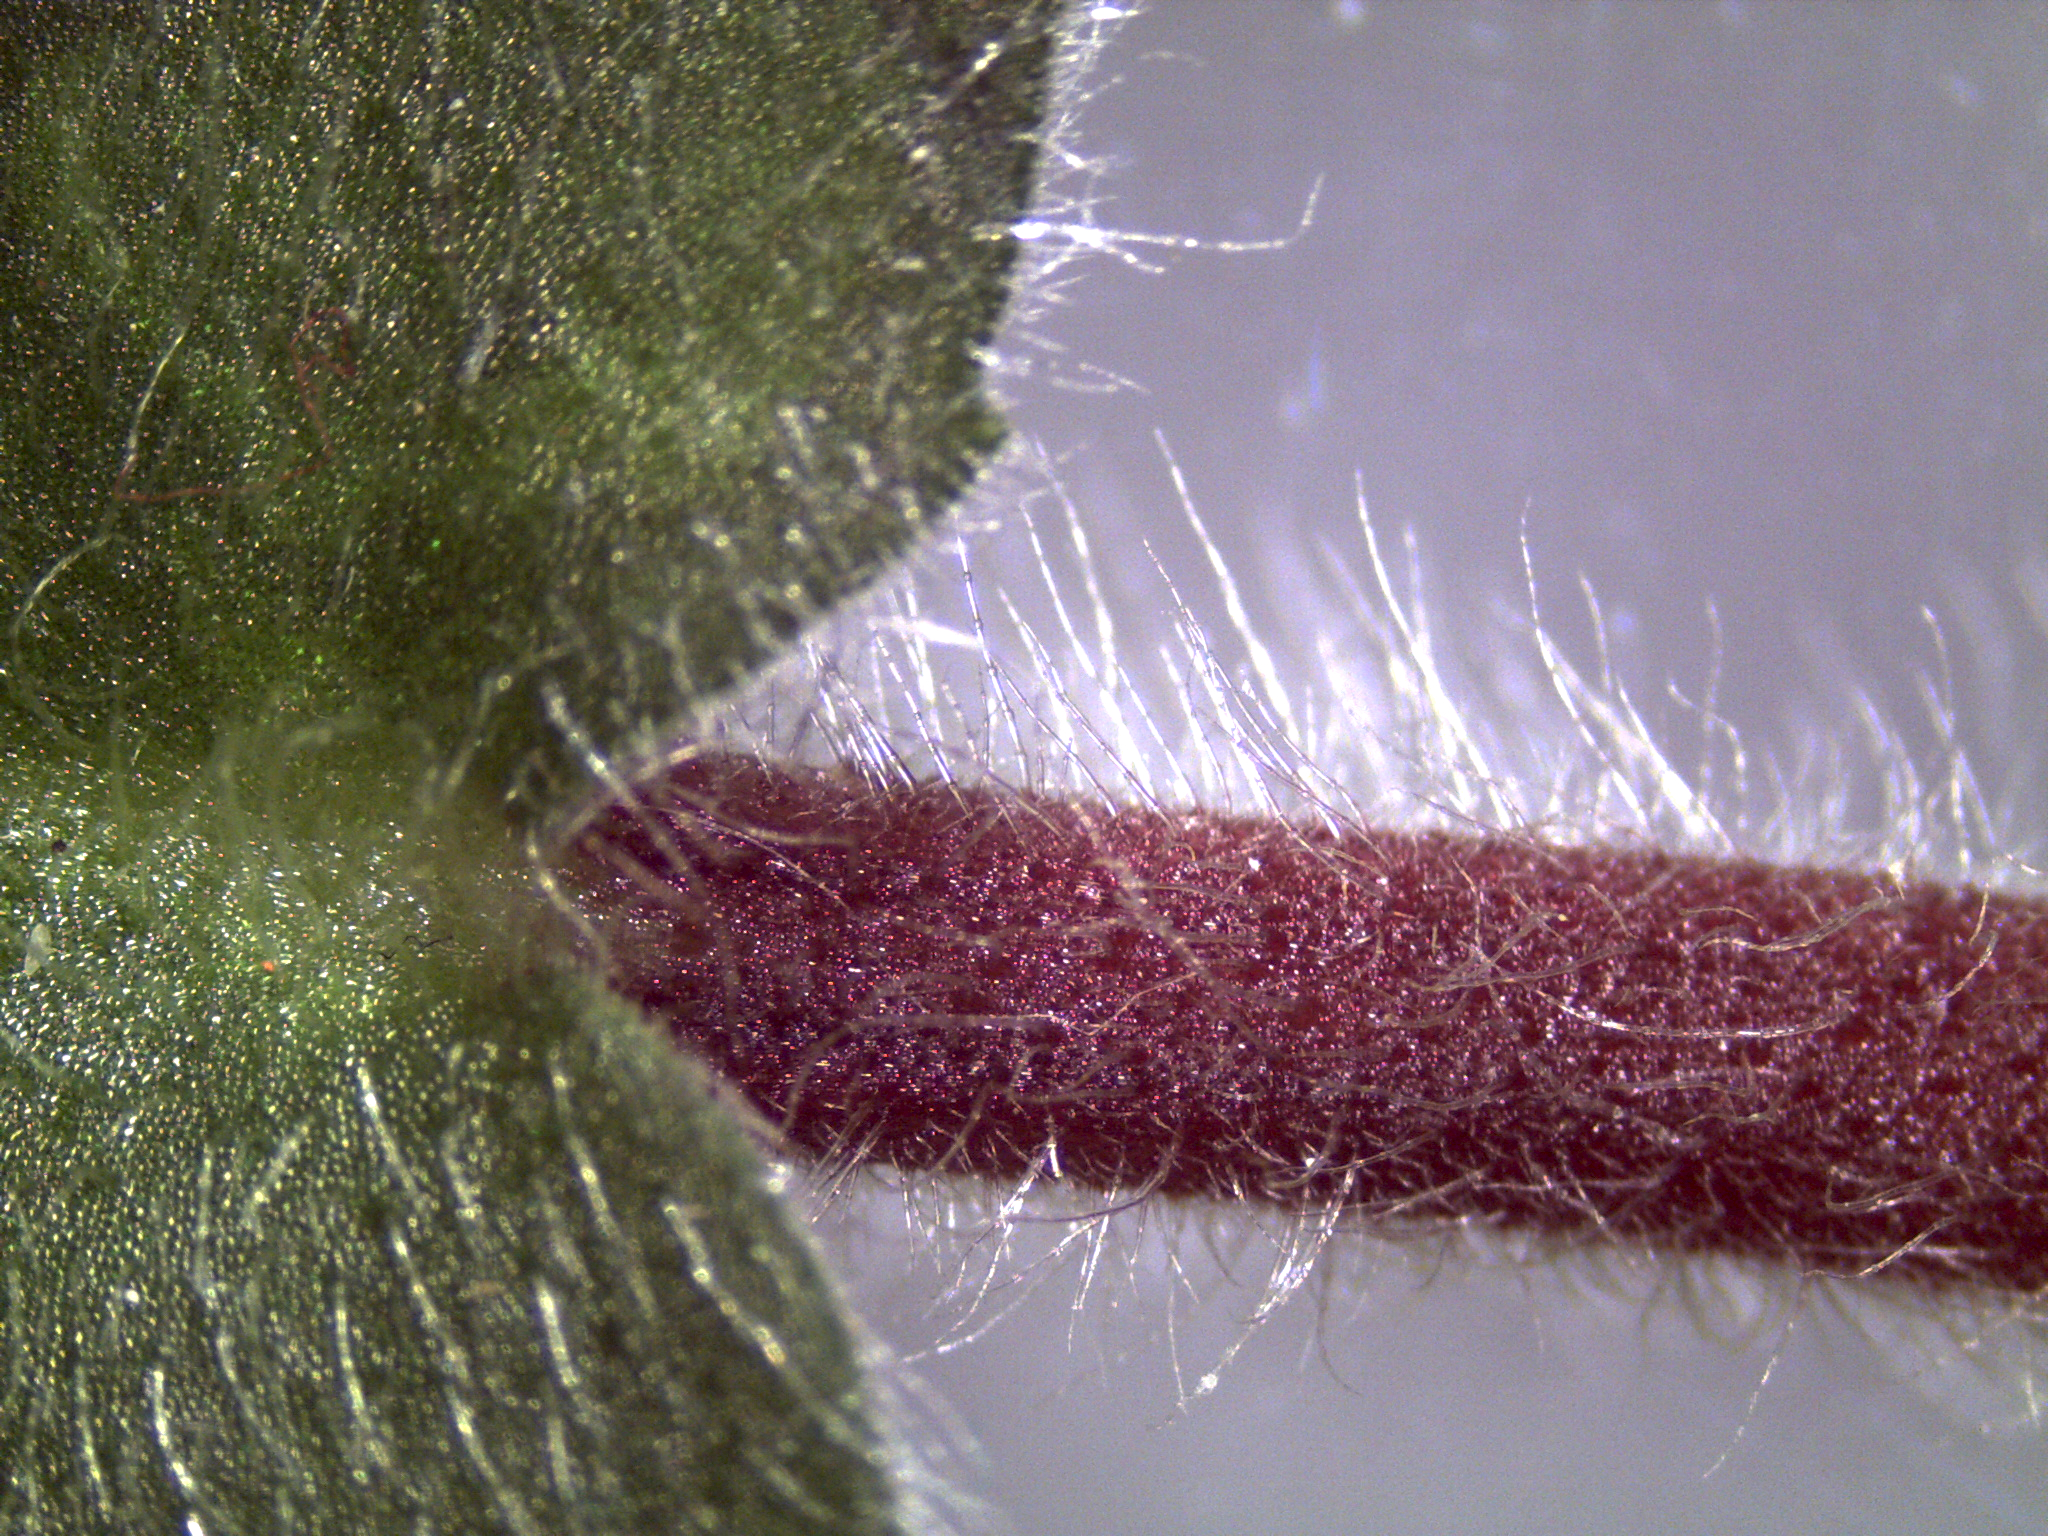
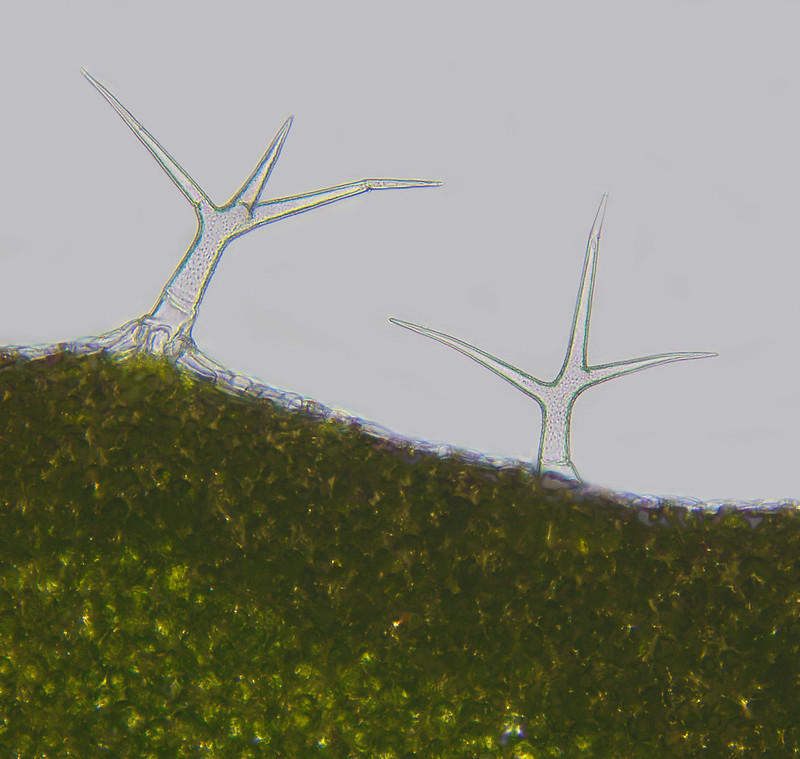
Trichomes
Specimens: Several different specimens can be used to observe trichomes. We have sunflower (Helianthis annuus), African violet (Saintpaulia ionantha), and soybean (Glycine max) available in the lab. To view the trichomes, place a leaf from one of these plants under the dissecting microscope (stereomicroscope) and view it under maximum magnification.
Note: The species available to view at this station may vary.
- How would you describe the surface of the leaf (hairy, smooth, waxy, dry, shiny, dull, etc.)?
To get a closer look at the trichomes, you can make a wet mount by carefully shaving some of the trichomes off of the epidermis onto a glass microscope slide, using a scalpel or razor blade. You can then view them under the compound microscope.
- Draw what you see in the space available.
- What function(s) do trichomes serve?
Circle the trichromes you see in the photos provided below.
Ground Tissue
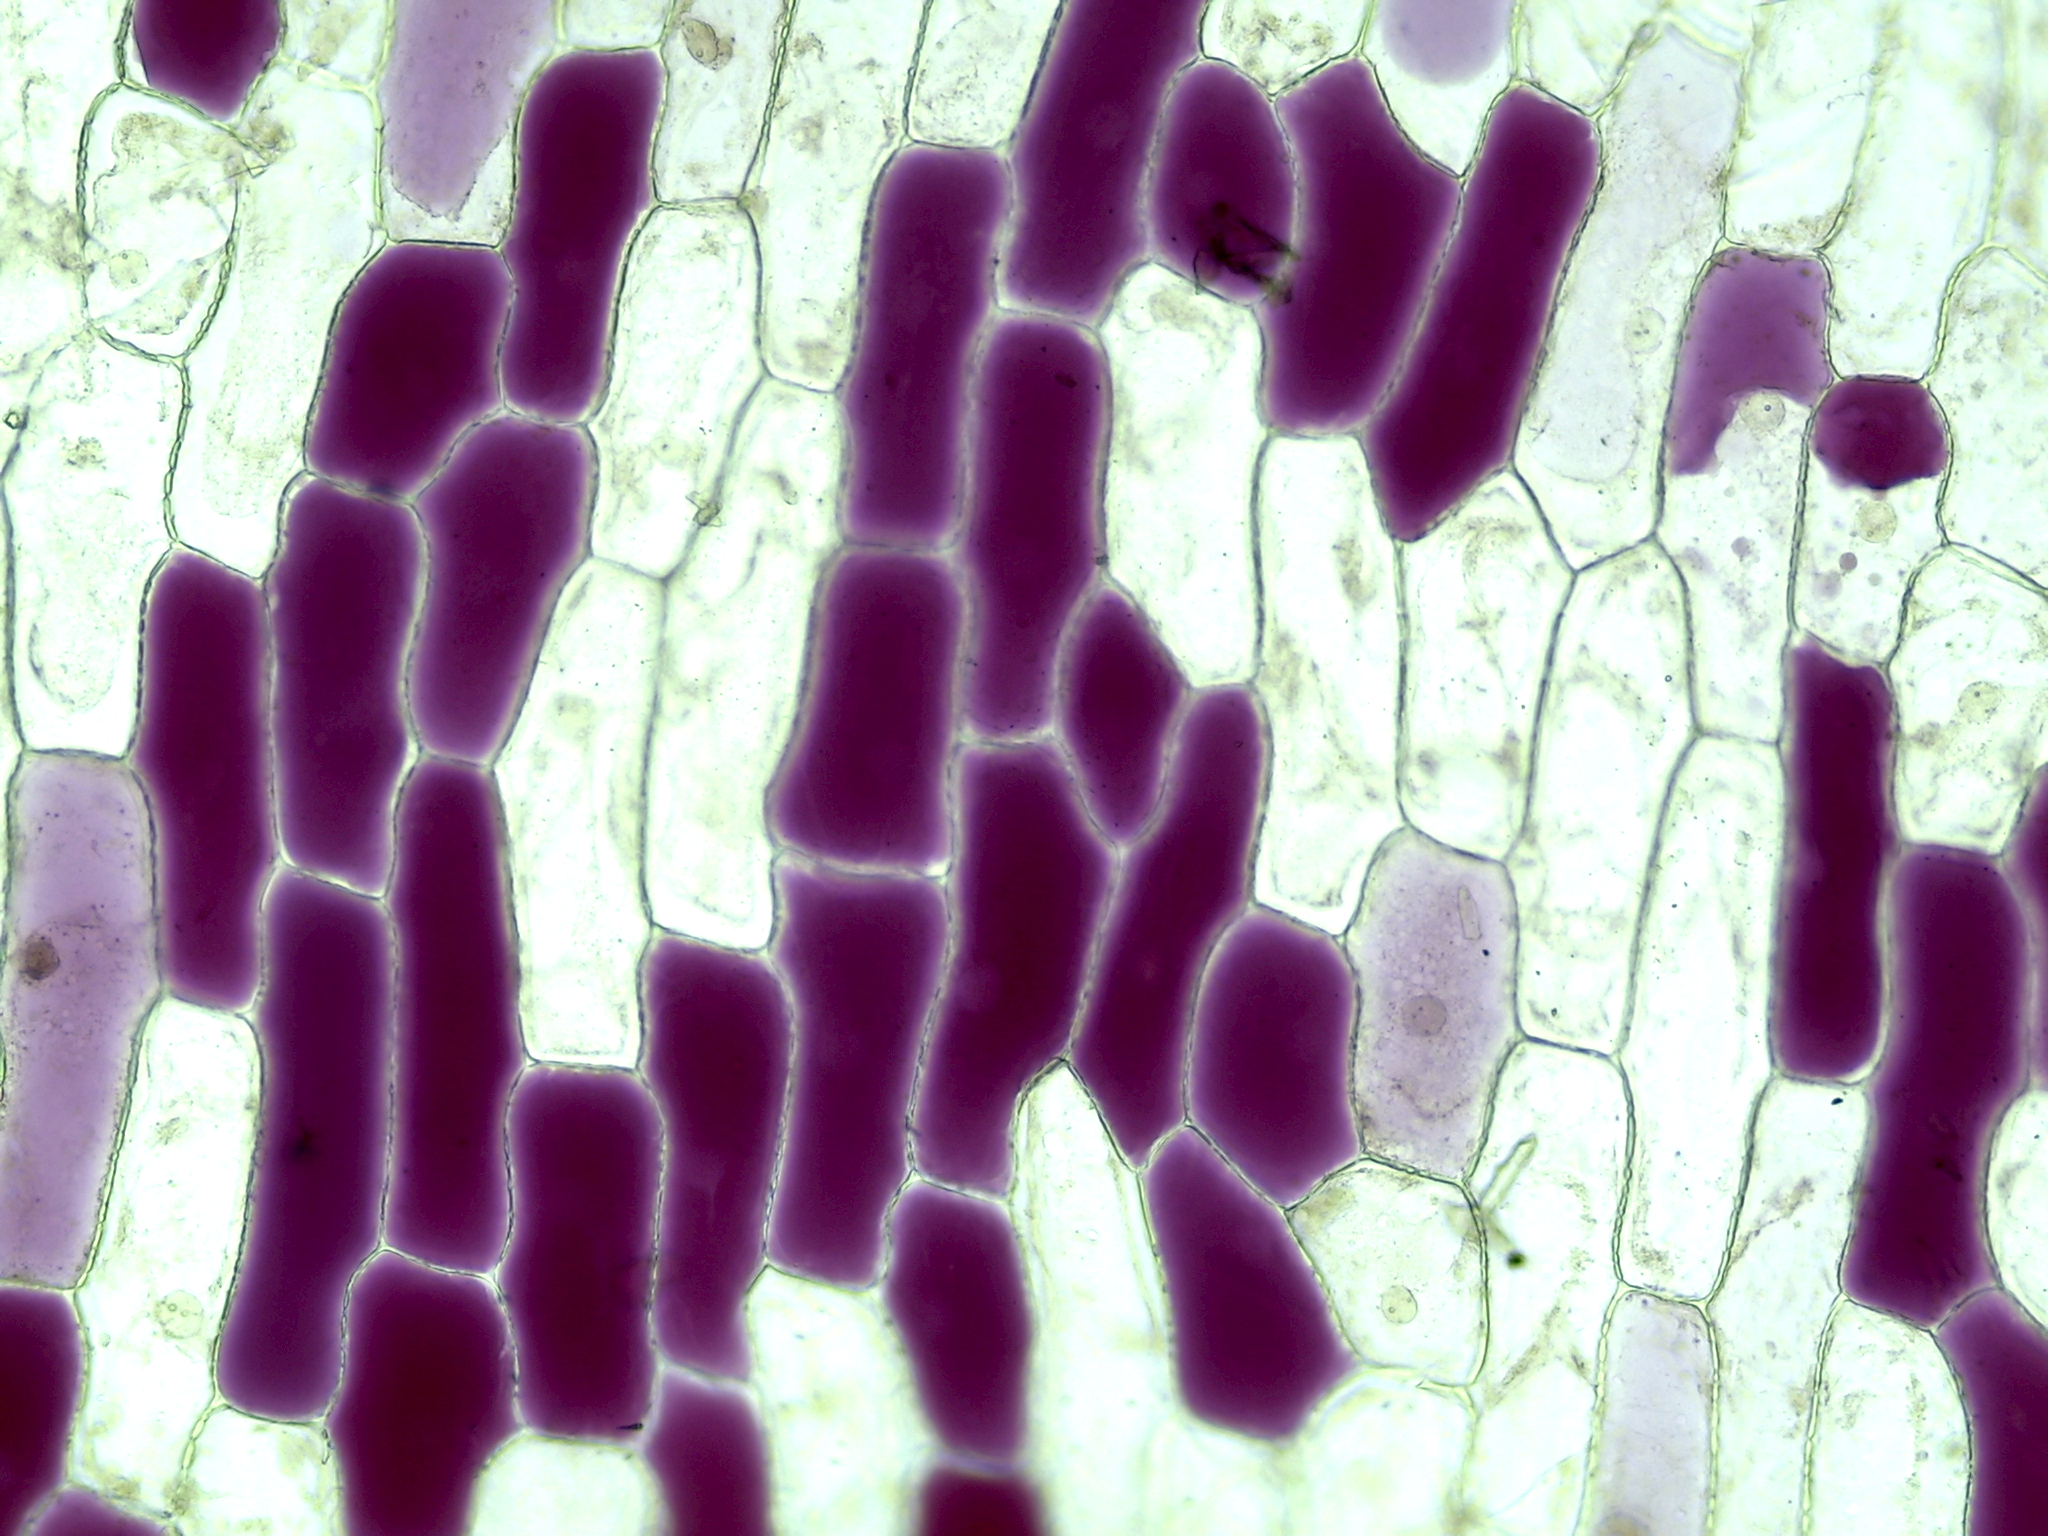
9. Parenchyma
Specimen: Prepare a section of sunflower (Helianthus annuus) stem in both cross section and longitudinal section for a wet mount slide. The sunflower stem has been placed in dye to help you observe the 3-dimensional structure of the cells.
- Use the space below to sketch the parenchyma cells you observed in lab. What shape(s) were the parenchyma cells you observed?
- What function(s) do these cells serve?
- Do these cells contain cytoplasm? A nucleus?
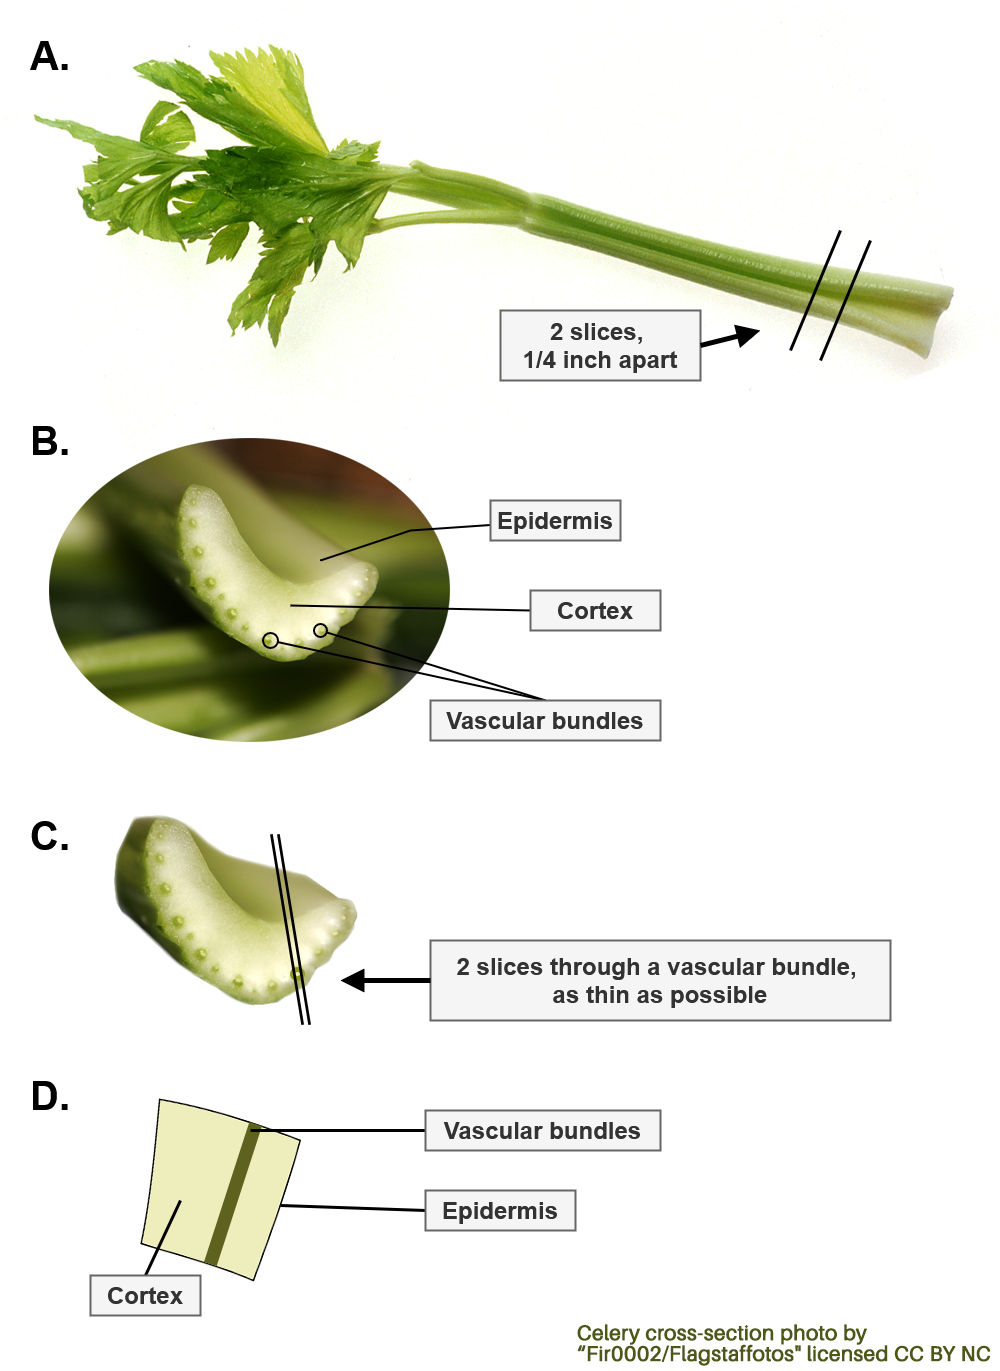
10. Collenchyma
Specimen: Prepare a cross section and wet mount slide of celery (Apium graveolens). Adding phloroglucinol stain to this section may help you see various cell types within the section. Refer to page 102 for instructions on applying phloroglucinol stain.
- How are collenchyma cells different from parenchyma cells?
- Do collenchyma cells contain cytoplasm? A nucleus?
- What is the function of collenchyma?
- What other tissue types can you see in this specimen?
Sclerenchyma— Rope Fibers
Specimen: Tease a bit of sisal rope or burlap apart. Cut a small sample (2−3mm in length) to place on a wet mount slide. Before adding the coverslip, add a drop or two of phloroglucinol.
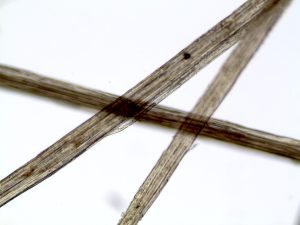
Wait 5 minutes before viewing under the microscope.
- Based on what you view under the microscope, from what cells are these products made?
- Do these cells contain cytoplasm? A nucleus?
- What is the function of sclerenchyma?
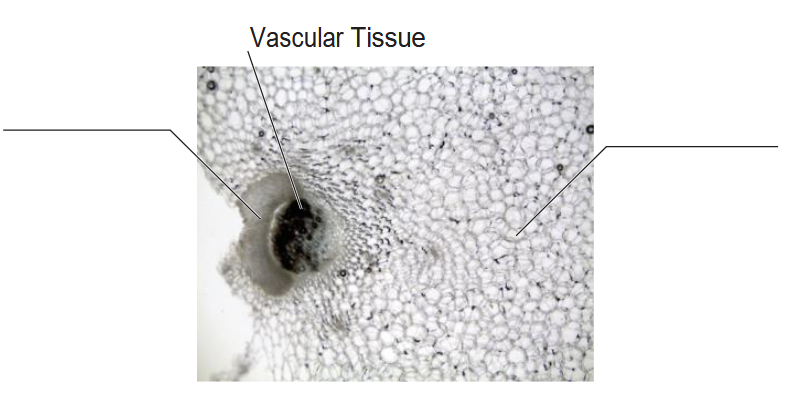
Sclerenchyma— Sclereids
Specimen: Pear (Pyrus) fruit cross section prepared slide. This slide has been prepared with phloroglucinol stain.
Look at the Cell Walls in this specimen.
- Draw what you see in the space available. Make sure you label the cell types visible in the slide. Phloroglucinol is a chemical that will stain _____________(a substance found in the secondary cell walls of plants).
- What is a sclereid?
- What other cell/tissue types can you identify in this specimen?
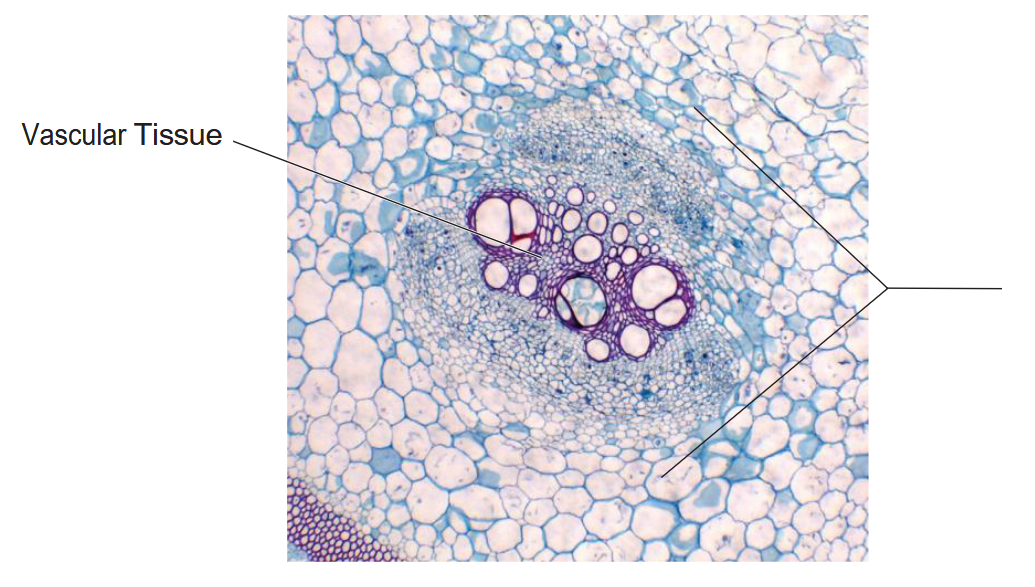
13. Sclerenchyma Fibers (Cross Section)
Specimen: View a prepared slide of Linden (Tilia americana) cross section.
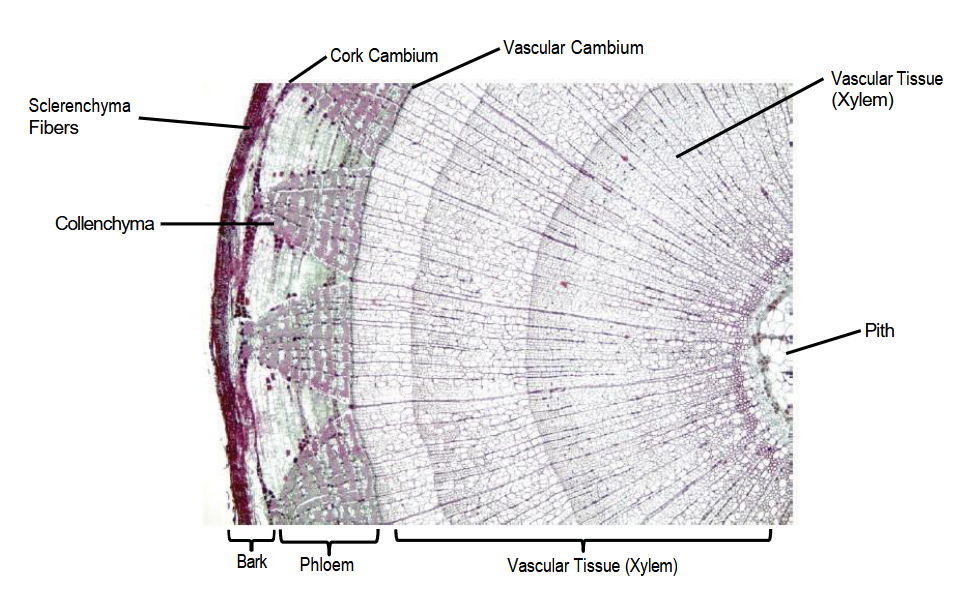
![]() What is the function of the sclerenchyma cells?
What is the function of the sclerenchyma cells?
![]() How do sclereids differ from fibers?
How do sclereids differ from fibers?
![]() What is the function of the sclerenchyma fibers?
What is the function of the sclerenchyma fibers?
![]() Do sclerenchyma fibers contain cytoplasm? A nucleus?
Do sclerenchyma fibers contain cytoplasm? A nucleus?
![]() What other cell/tissue types can you identify in this specimen?
What other cell/tissue types can you identify in this specimen?
Describe the differences between these three types of plant cells using the table below. Make sure that you address physical (morphological) differences in the cell types, as well as the differences in their function(s).
| Type | Morphology | Function |
|---|---|---|
| Parenchyma |
|
|
| Collenchyma |
|
|
| Sclerenchyma |
|
|
