
Dissection Techniques and Terminology
Inter-Chapter 5
Why Do Dissections?
Dissections are an important part of any Biology class. It is one thing to read about anatomy and physiology or look at pictures, but another entirely to explore an organism yourself. For the third part of Biology 2120L, we will use fetal pig dissections to explore mammalian anatomy and physiology. Though we will not study human anatomy directly through dissection, the fetal pig is a relatively good substitute so you can learn a great deal about your own anatomy and physiology through the upcoming labs.
Care of Your Specimen
Fetal pigs are unborn fetuses from the mother pig and are a byproduct of meat production. The veins and arteries of our fetal pigs have been injected with colored latex to help you more easily identify them as you explore. The veins will be blue and the arteries red. The fetal pig will also be preserved with chemicals that prevent the breakdown of tissue while you are embarking on your multi-week dissection. Make sure that you follow the directions in the “fetal pig dissection video” that you will watch in class to keep your pig in top condition and to keep yourself safe.
You will be working with your lab partner over four weeks to complete all of the necessary dissections on your fetal pig, so taking proper care of your specimen will be extremely important. To prevent mold and bacteria growth on your pig, thoroughly spray your specimen with the provided preservative, Wardsafe, at the end of each lab period. Once sprayed, wrap your pig in paper towels, and spray those with Wardsafe as well. When done, place your wrapped pig in a Ziploc bag and return it to the class storage bin for cold storage.
It is important to note that dissection specimens and parts require special disposal and must stay in the lab classroom. You are welcome to take photos of your dissections to help you review the information at home, but do not remove your fetal pig (or any part of it) from the lab classroom.
Dissection Safety
Although dissections can be engaging and fun, there are many safety hazards that you need to keep in mind. Refer back to the safety scavenger hunt you did during week 1 to remind you where the safety equipment in your classroom is located. Feel free to ask your TA any safety related questions you may have.
Gloves: Whenever you are dissecting any specimen, always protect your hands by wearing gloves. Inspect them frequently and replace them if you notice any holes or cuts. The gloves we use in lab are latex-free nitrile gloves.
Safety goggles: Always wear safety goggles to prevent preservative or other liquid animal products from getting in your eyes. In the event that you do get preservative splashed in your eyes, make sure you know where the eye wash station is and how to use it.
Proper attire: As is the case for all labs, it is extremely important to wear closed-toe shoes during dissections. If a scalpel or razor falls on your foot, the fabric of your shoe will offer you a layer of protection. Dress appropriately for dissections to provide your skin with the most protection.
Food and drink: As always, it is important to make sure you do not bring in any food or drink into the lab. All food or drink should be securely stored inside your book bag. There are tables outside the doors of your classroom where you can keep any food or drink that you need to access during lab.
Sharps: In the next few labs we will be using sharp scalpels, scissors, and razor blades. Make sure you know how to properly use these tools. The blade should never be pointed towards you while walking or while dissecting. For razor blades, make sure you are opening them correctly to prevent accidentally pressing into the blade. Consult with your TA for instructions if you need to change the blade on your scalpel.
Fainting: During dissections it is important to watch out for fainting. The sights and smell of dissections may bother some students (especially if they have not slept well or eaten recently). Make sure you are always sitting down when doing dissections (in the case that you faint, there will be a shorter distance to fall). If you or your lab partner is feeling ill, let your TA know and feel free to take a break for some fresh air.
Anatomical Terms
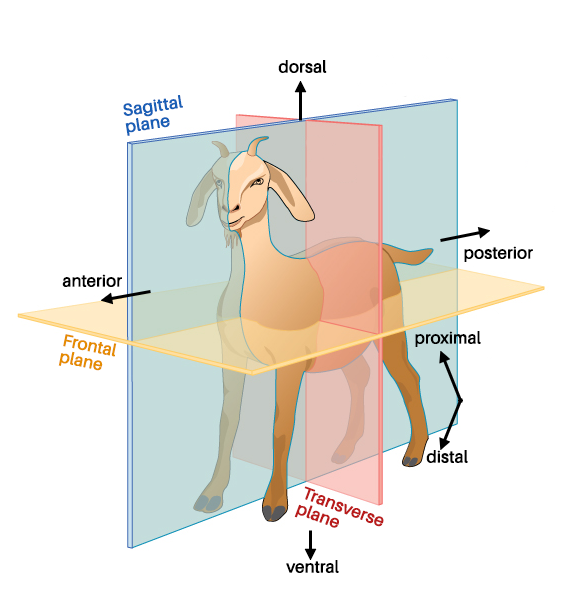
Like all aspects of Biology, each new topic includes its own set of terminology. In anatomy, there are a variety of terms to describe the location of structures and their orientation to other structures and parts of the specimen (tail, head, center of body). The main terms you need to know are described and are shown in the figure of a cat below. When you receive your fetal pig, take a few minutes to make sure you understand these terms in relation to your specimen.
- Anterior: towards the front (head) of the organism
- Posterior: towards the rear of the organism
- Dorsal: towards the upper side (back) of the organism
- Ventral: towards the belly (lower area) of the organism
- Distal: away from the center of the organism’s body
- Proximal: close to the center of the organism’s body
Tools of the Trade
There are many dissection tools available to you in class. Each has its own use and is best for a certain type of motion/dissection. To do the best dissection possible, make sure to use the right tool for the job. The selection of provided tools are described below. The dissection tools we use in lab are not disposable tools. When you finish your dissection each week, make sure that you carefully wash, dry, and put away the tools you used in lab. If you discover any damaged tools, inform your TA so they can be replaced.
Scissors (large and small): Best for cutting away skin, organs, and connective tissue. Use the appropriate size for your needs.
Scalpel: Best for precise cuts. This tool is extremely sharp and it is easy to cut your specimen too deep if you’re not careful. Consult with your TA if the blade on your scalpel needs to be replaced.
Blunt probe: Best for exploring the inside of your pig, gently pushing organs and structures aside to find underlying structures. Once you make the initial cuts with your scalpel, you will find that the blunt probe is a very effective tool during dissections.
Dissection needle: Best for teasing apart connective tissue or other small structures. Be careful not to puncture anything when using this tool.
Tweezers: Best for holding or gently picking up structures.
Razor blades: Best for making thin slices for cross sections. These will only be available at specific stations in which you need to make wet mounts.
