
13 Nervous and Sensory Systems
Following this week’s lab, students will be able to:
- Identify the structures and describe the function of the mammalian nervous system
- Identify the structures and describe the function of the mammalian visual system
- For various phenomena in the eye (e.g., color blindness, bleaching, the blind spot) name the structures involved and describe how those structures contribute to each phenomenon
- Demonstrate proper dissection technique and respect for animal specimens and dissection tools
Contribution Points:
 Consult with your TA to receive a stamp at the end of your lab period.
I have completed the necessary tasks required during this week’s lab to earn Contribution Points. I am aware that I may have point(s) deducted from my Contribution Points if my workspace is not appropriately clean at the conclusion of lab.
Your TA will check that you have attempted to complete the dissections associated with this week’s lab activity.
Resources
- Dissection Inter-Chapter 5 “Dissection Techniques and Terminology” (pp. 137–140)
- Fetal pig dissection tutorial video (tutorial video on Canvas)
- Fetal pig dissection guide, Smith and Schenk 2011 (provided in binders for use in lab)
- Biological Science, Freeman et al. 2024. 8th Edition. Nervous System (Chapter 43) Visual System (Chapter 44, specifically 44.3)
- Canvas resources
![]() This icon represents a question meant to test your understanding. Answering these questions in the space provided as you go through the lab will help you better understand the topic and study more effectively. Use your text or e-book, pig dissection guide, and the internet to help you.
This icon represents a question meant to test your understanding. Answering these questions in the space provided as you go through the lab will help you better understand the topic and study more effectively. Use your text or e-book, pig dissection guide, and the internet to help you.
Station A: Nervous System Microanatomy and Models
Locate the prepared slide showing a smear of cells from a spinal cord and observe it under a compound microscope. Look through the smear to identify neurons and glial cells, and observe the structural differences between these cell types. Label these structures on Figure 13.1 below. You are encouraged to take your own photos to help you study.
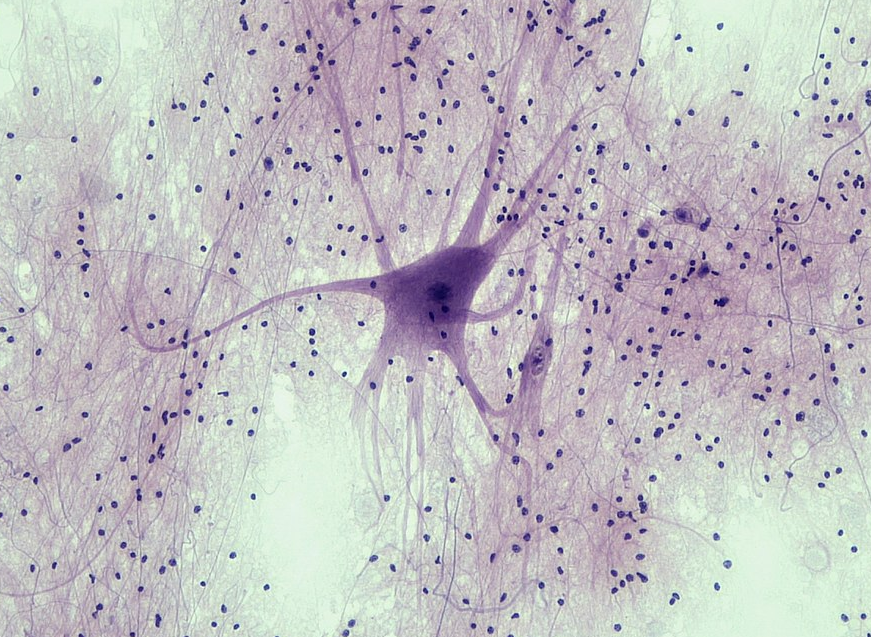
![]() What is a glial cell?
What is a glial cell?
![]() What is a neuron?
What is a neuron?
Look at a spinal cord cross-section prepared slide under the compound scope. Find the structures in the slide that are shown in Figure 13.2 below.
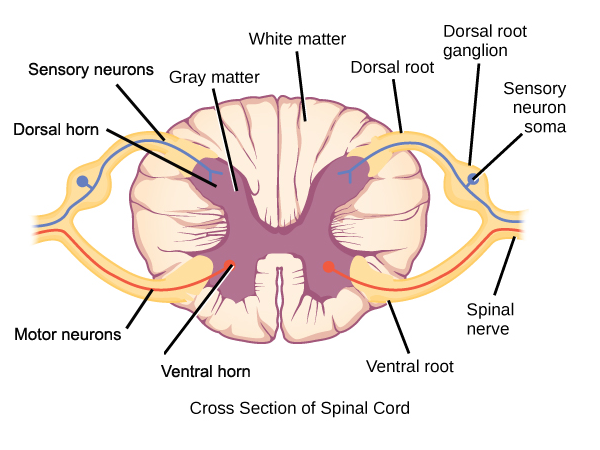
![]() What parts of the cells making up nervous tissue contribute to gray matter? What parts of the cells making up nervous tissue contribute to white matter?
What parts of the cells making up nervous tissue contribute to gray matter? What parts of the cells making up nervous tissue contribute to white matter?
![]() What is the difference between the appearance of gray matter and white matter? Why do you think those differences exist in terms of their function?
What is the difference between the appearance of gray matter and white matter? Why do you think those differences exist in terms of their function?
Now take a look at the model of a nerve cell provided in lab. Compare it to the Figure 13.3 below.
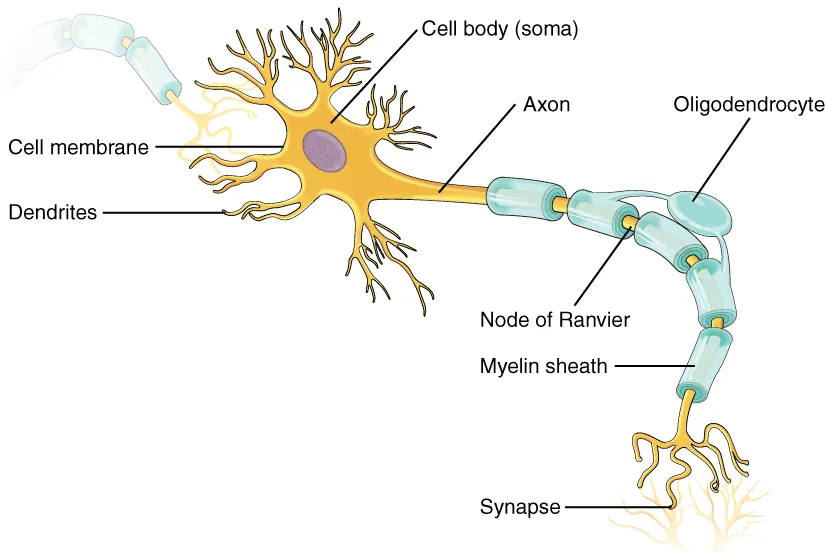
![]() What structures can you identify in the model?
What structures can you identify in the model?
![]() How does a signal pass through these structures?
How does a signal pass through these structures?
Station B: Stretch Reflex
Watch the video provided at this station to learn about the patellar stretch reflex and answer the questions below. There are reflex hammers at this station if any volunteers would like to test their reflexes. If you would like to volunteer, follow these instructions:
Have the volunteer sit in a chair with their legs bent and their body relaxed. The tester should look at Figure 13.4 below to determine the area they will need to tap with the reflex hammer. Then, the tester should gently hit the volunteer’s patellar tendon, right below the kneecap, with the broad side of the reflex hammer. Observe what happens to the volunteer’s leg. You may need to try a few times to get the right location.
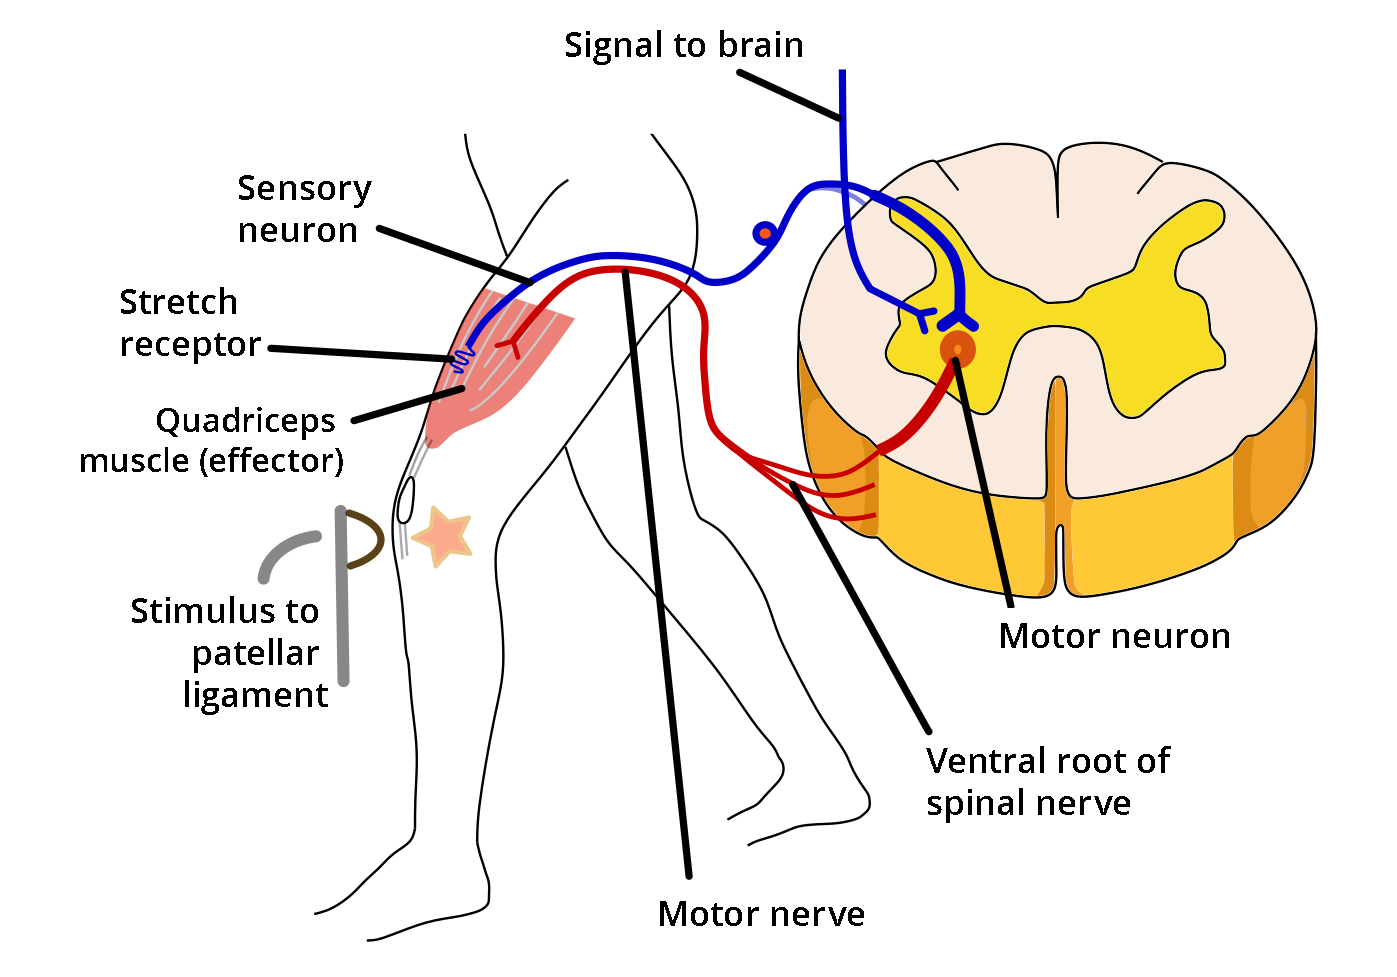
![]() For the patellar stretch reflex to occur, signals need to be sent between the peripheral (PNS) and central (CNS) nervous systems. a) In the sensory neuron, which direction is the signal traveling (towards the PNS or CNS) and at which structure does the neuron end?
For the patellar stretch reflex to occur, signals need to be sent between the peripheral (PNS) and central (CNS) nervous systems. a) In the sensory neuron, which direction is the signal traveling (towards the PNS or CNS) and at which structure does the neuron end?
b) In the motor neuron, which direction is the signal traveling (towards the PNS or CNS) and at which structure does the neuron end?
![]() What can a slow patellar reflex tell your doctor about how your nervous system is functioning?
What can a slow patellar reflex tell your doctor about how your nervous system is functioning?
![]() What part of the nervous system controls reflexes?
What part of the nervous system controls reflexes?
![]() Can you stop or control your reflexes?
Can you stop or control your reflexes?
Station C: Pig Nervous System Dissection
NOTE: This is the last time you will use your fetal pig. When you are finished with your dissection, place the pig back in your class storage bin for disposal. Do not remove any part of your pig from the lab.
In this activity, retrieve your pig and dissection supplies and return to your student bench. You and your partner will expose and observe the spinal cord of your fetal pig. You are going to look at both the ventral and dorsal views of the spinal cord. Begin by removing all the large organs of the body cavity. After removal, you should be able to see the sympathetic trunks and spinal nerves along the back of the body cavity of your pig. You can look at the demonstration dissection provided in class to make sure you are visualizing the right structures.
![]() Which structures are in the central nervous system? Which structures are in the peripheral nervous system?
Which structures are in the central nervous system? Which structures are in the peripheral nervous system?
![]() How do sympathetic nerves and parasympathetic nerves differ in function?
How do sympathetic nerves and parasympathetic nerves differ in function?
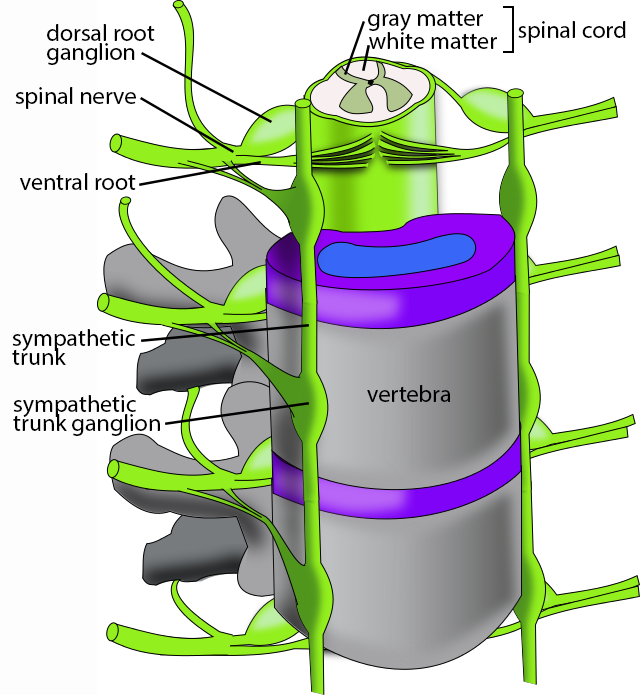
Next, turn the fetal pig over and begin the dorsal spinal cord dissection. Start by removing the skin around the spine and up to the base of the skull. Work slowly to reveal the meninges, dorsal and ventral roots, and spinal nerves. Feel free to look at the demonstration dissection to help lead your dissection. Use the fetal pig dissection guides provided in lab to help find the structures.
![]() What are the functions of meninges in the spinal cord?
What are the functions of meninges in the spinal cord?
![]() How do dorsal and ventral roots differ in function?
How do dorsal and ventral roots differ in function?
![]() Why do nerves, but not ganglia, appear white?
Why do nerves, but not ganglia, appear white?
Station D: Sheep Brain Dissection
SAFETY NOTE
The dissections being completed in lab this week can cause some students to feel queasy and/ or uncomfortable. Please be alert and mindful this week. Look out for your lab partner and make sure that you practice safe dissection protocols.
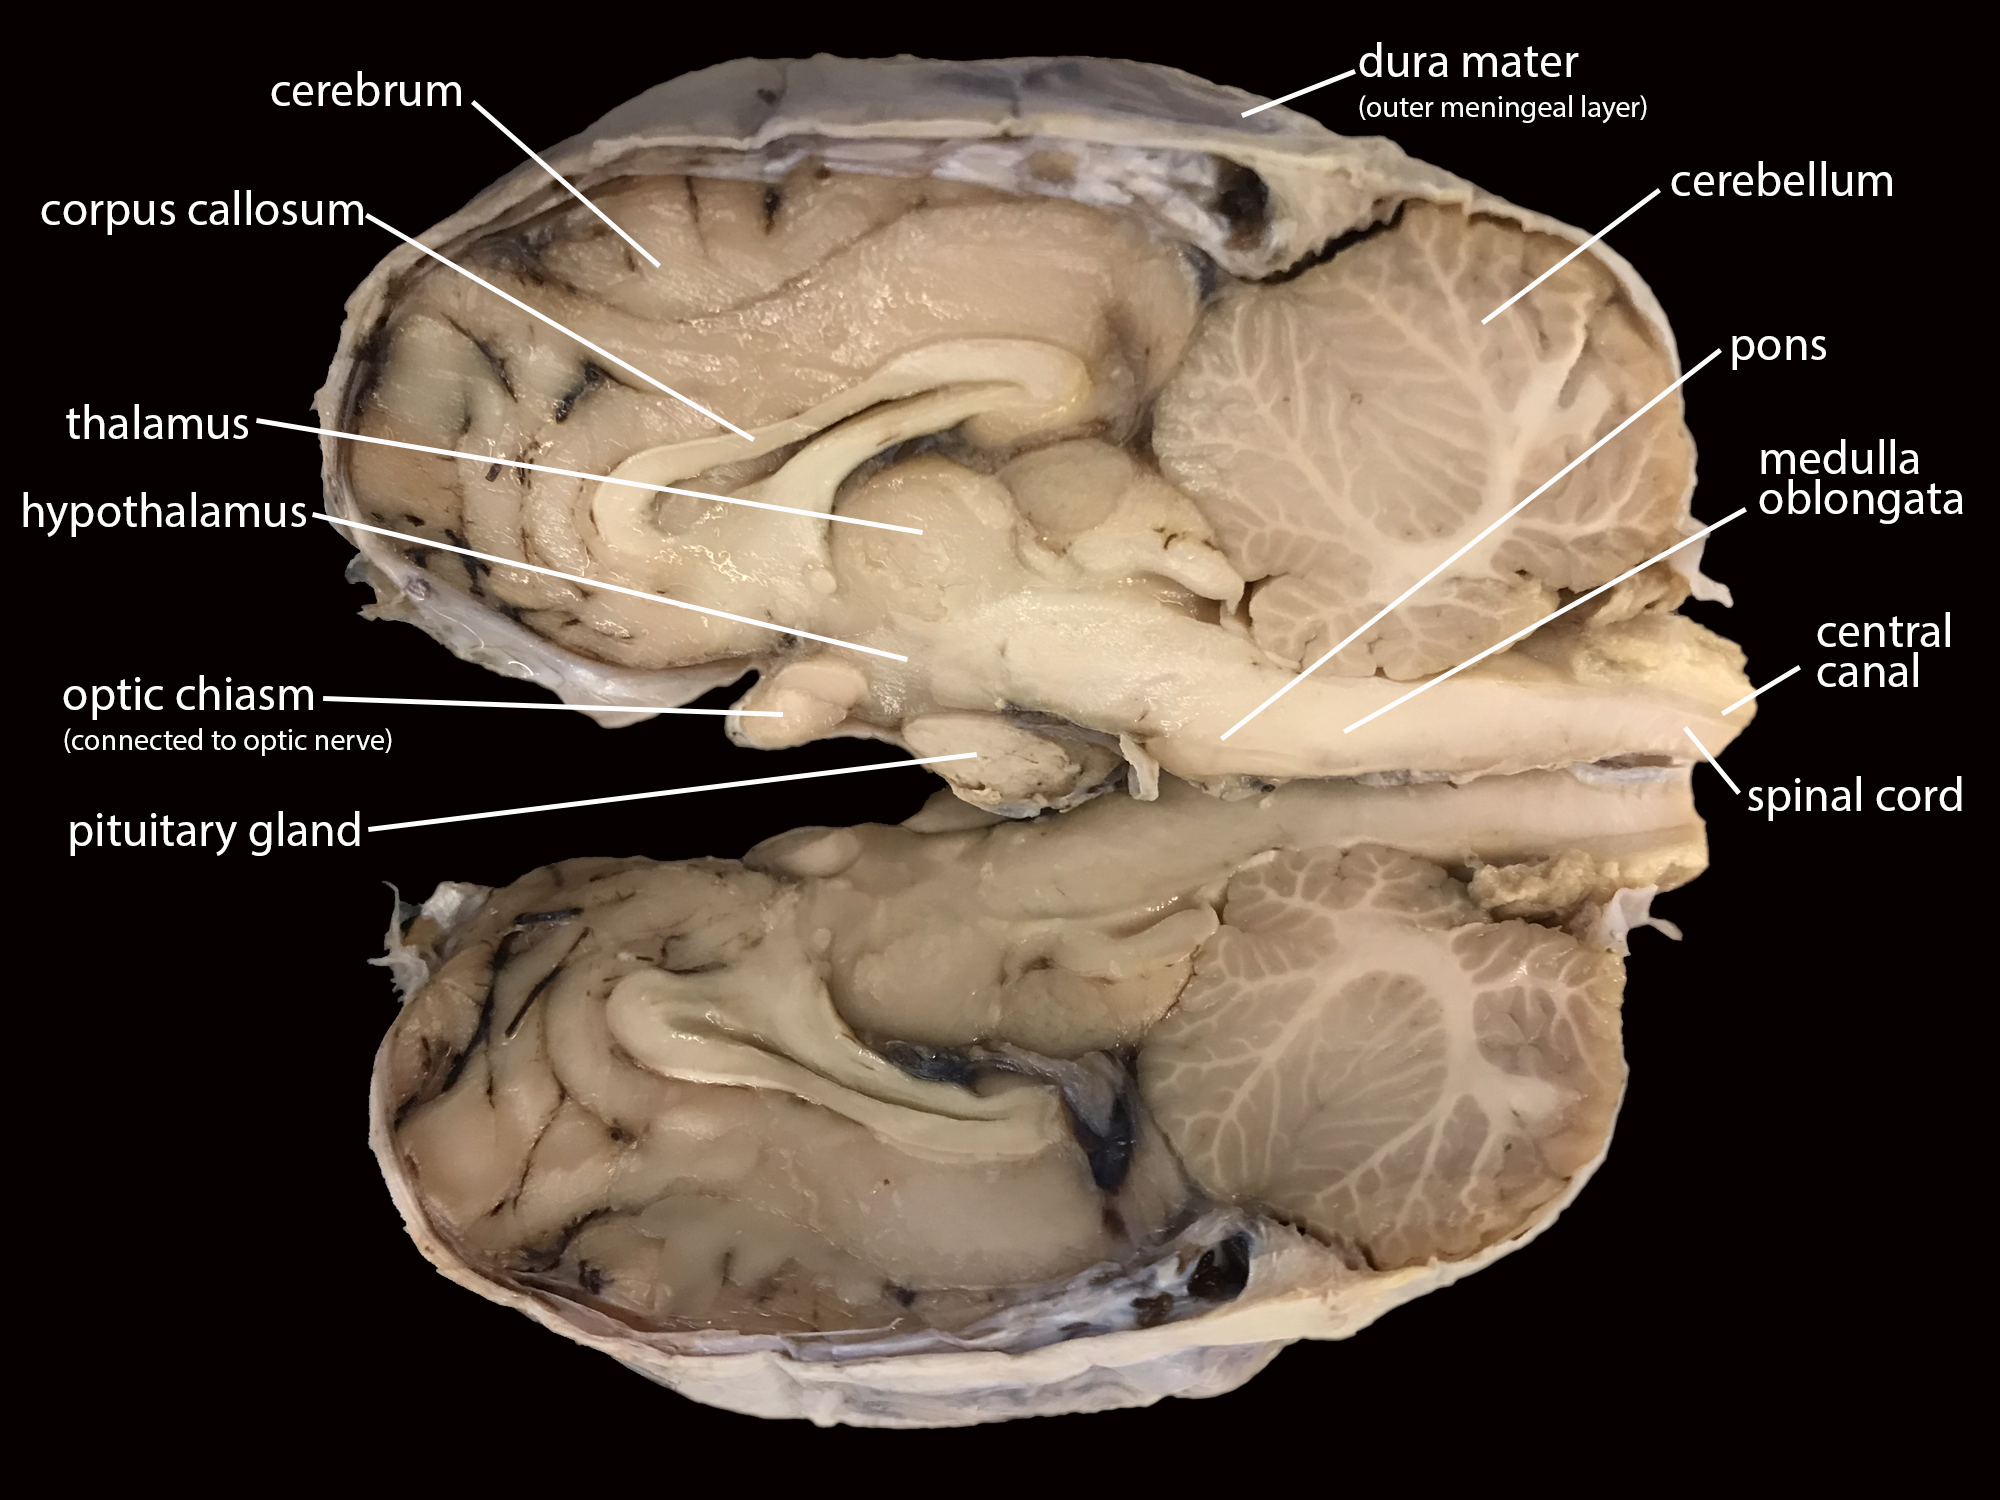
Retrieve a sheep brain from the station in the lab, place it on your dissection tray, and bring it back to your workstation for dissection and observation. You should identify major regions on the outside of the brain first (Figure 13.6) and then cut the brain longitudinally (cut between the lobes) if it has not been done already. Use the fetal pig dissection guide and laminated guides provided at the station to identify all of the areas of the brain shown in Figure 13.6. Test each other on the structures.
After thoroughly observing the sheep brain, fill out Table 13.1 to help you learn about the functions associated with various areas of the brain.
|
Structure |
Function |
|---|---|
|
Cerebrum |
|
|
Cerebellum |
|
|
Pons |
|
|
Hypothalamus |
|
|
Pituitary Gland |
|
|
Medulla Oblongata |
|
|
Optic Chiasm |
|
|
Olfactory Bulb |
|
|
Meninges |
Station E: Sheep Eye Dissection and Retinal Microanatomy
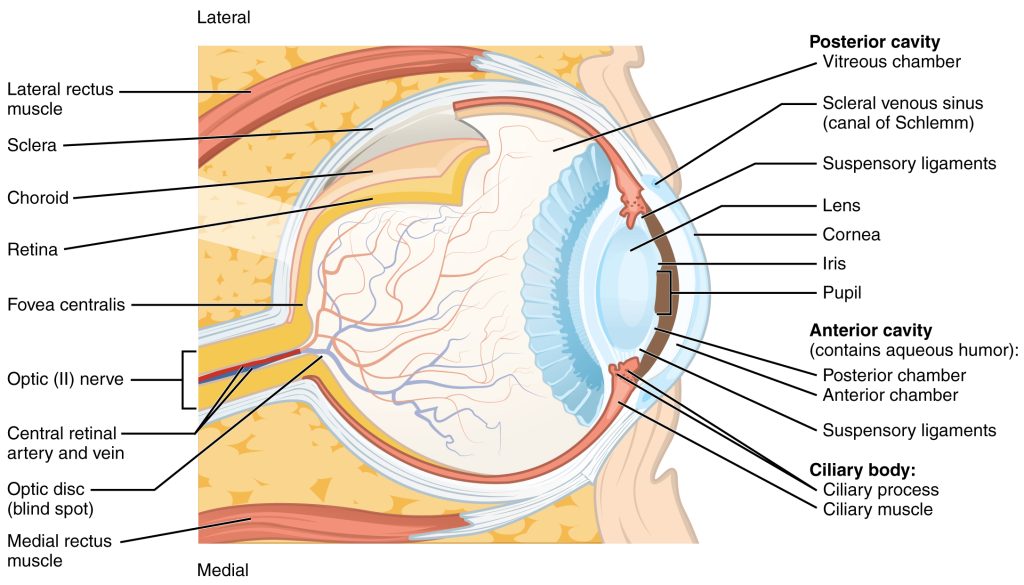
For this activity, each pair of students should retrieve a sheep eye from station E and then return to their student bench. Before cutting into it, observe the external structures of the eye. After you have observed the outer structures, use a scalpel to slice the eye longitudinally.
Wear goggles to prevent any liquid from the specimen from getting in your eyes. Once you have cut the eye, identify the structures shown in Figure 13.7 below. Check out the eye model in the lab to test each other on structure identification.
After you have finished your dissection, work with your partner to fill out Table 13.2 to describe the functions of a few eye structures.
| Structure | Function |
|---|---|
| Pupil | |
| Cornea | |
| Retina | |
| Lens | |
| Optic Nerve | |
| Optic Disc |
Examine a cross section of the retina of a mammalian eye (prepared slide, compound microscope). Use Figure 13.8 as a guide. Try to identify the layers of structures—the sclera and blood vessels in the choroid externally, then the photoreceptor layer deep to the choroid, and then the bipolar and ganglion layers of neurons internally.
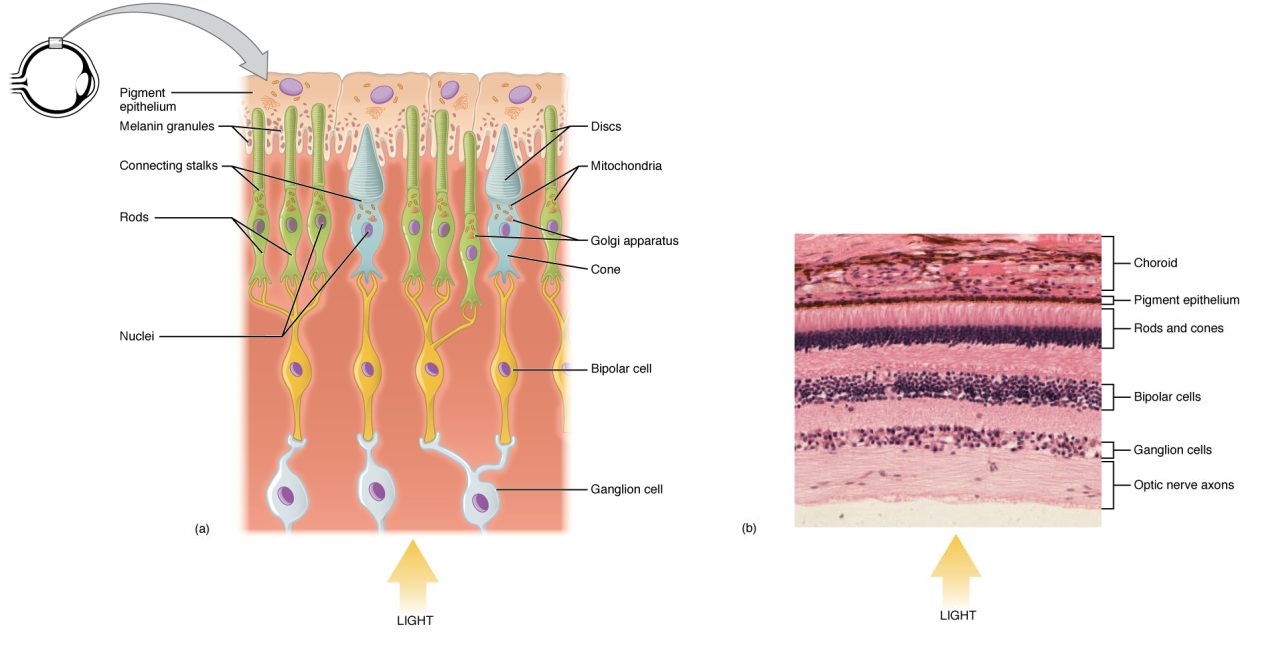
![]() What is the function of the retina?
What is the function of the retina?
In the retina, there are photoreceptor cells that respond to light and help you “see” clear and colorful images. There are two types of these cells: rods and cones. Both are extremely important to the proper function of your eye and create images in different ways. Check out pages 952–956 in the Freeman textbook for more information about rods and cones. Use the information to help you fill in Table 13.3.
| Rods | Cones | |
| Function | ||
| Optimal Conditions (i.e. bright light, dim light) | ||
| How many types? |
Station F: Blind Spot, After-images, and Color Blindness
At this station, you will learn about the concepts of blind spots, after images, color blindness, and attention. Note that all files necessary for this station can be found on all of the student laptops in the lab (as well as on Canvas).
Blind Spot
Open the blind spot activity PowerPoint. Cover your left eye and keep your right eye focused on the black dot closest to the left edge of the window. Press start on the animation.
![]() What do you perceive as the right dot moves across the screen? Do you notice a moment where you cannot see the moving dot?
What do you perceive as the right dot moves across the screen? Do you notice a moment where you cannot see the moving dot?
![]() What is a blind spot? Why is this area of the retina “blind”?
What is a blind spot? Why is this area of the retina “blind”?
![]() Why don’t you normally notice your blind spot in day-to-day life?
Why don’t you normally notice your blind spot in day-to-day life?
2. After-Images
Go through the after-image PowerPoint.
![]() What is an after-image?
What is an after-image?
Once you are ready, start the PowerPoint with your group and follow the directions as told in the PowerPoint. Answer these questions as you go. Think about what you learned about rods and cones in the previous section to help you answer the questions below.
![]() What color after-image did you see after looking at the red cross? Why did you see that color?
What color after-image did you see after looking at the red cross? Why did you see that color?
![]() What color after-image did you see after looking at the blue square? Why did you see that color?
What color after-image did you see after looking at the blue square? Why did you see that color?
![]() What color after-image did you see after looking at the green arrow? Why did you see that color?
What color after-image did you see after looking at the green arrow? Why did you see that color?
![]() What does it mean for cones to be bleached?
What does it mean for cones to be bleached?
3. Color Blindness
In this station you will explore color blindness. Look at the color blindness tests available at the station. Take the tests yourself and answer the questions below.
![]() What structures of the eye allow you to see colors?
What structures of the eye allow you to see colors?
![]() Red-green color blindness is the most common type of color blindness. What would happen if you were missing red cones? What would happen if you were missing green cones? Why would red and green look the same in both cases but blue would still be distinguishable?
Red-green color blindness is the most common type of color blindness. What would happen if you were missing red cones? What would happen if you were missing green cones? Why would red and green look the same in both cases but blue would still be distinguishable?
![]() Complete the tests for color blindness. Assess yourself for color blindness.
Complete the tests for color blindness. Assess yourself for color blindness.
4. Optical Illusions
In this station you will check out the Magic Eye optical illusion books and the Where’s Waldo books. After you go through the provided books, answer the questions below.
![]() What is an optical illusion?
What is an optical illusion?
![]() Why is it sometimes difficult to find Waldo in the Where’s Waldo books?
Why is it sometimes difficult to find Waldo in the Where’s Waldo books?
5. Attention Activity
Watch the attention video on one of the lab laptops.
![]() How good were you at paying attention during the video?
How good were you at paying attention during the video?
![]() Look up what “inattentive blindness” means. Do you think there is a benefit to this in your day-to-day life?
Look up what “inattentive blindness” means. Do you think there is a benefit to this in your day-to-day life?
Study Material
The following material will not be collected or graded but is provided to further test your understanding of the material in the lab. These will be valuable assets for quiz and practical studying.
Review Activity 13.1
Test your knowledge of the structures of the eye by filling in the missing labels on the diagram of a mammalian eye below.

