Chapter 5. The Adaptive Apparel Designer’s Guide to Patternwork
Chapter 5 focuses on pattern work for adaptive apparel. It covers patternmaking techniques useful for adaptive apparel and includes guidance for obtaining body measurements of persons experiencing a disability, including digital options. The chapter also overviews how to use resources provided in chapter 1—descriptions of disabilities and their impact on dressing and clothing needs and illustrated glossary of clothing adaptations organized by wearer’s needs—to create adaptive apparel patterns.
Brief overview of using patterns in apparel design
In the patternmaking steps, designers and product developers develop patterns for the garments they will produce. Patterns are used as a guide in cutting out the fabric pieces to be sewn into the garments or soft goods products. Thus, they are an essential communication tool, and their accuracy is paramount. Patterns may be developed through a variety of processes, most commonly flat pattern or draping. Many books cover these techniques.
Guidance for Obtaining Body Measurements of Persons Experiencing a Disability, Including Digital Options
Taking accurate body measurements is one of the keys to provide great fit and comfort for wearers. Body measurements should be taken how garments are used, especially it is very critical for those who spend lots of time during the day in a seated position.
Tips for taking measurements of the seated body:

- All Measurements: If possible, ask a caregiver for assistance in taking measurements, to make the client feel more comfortable.
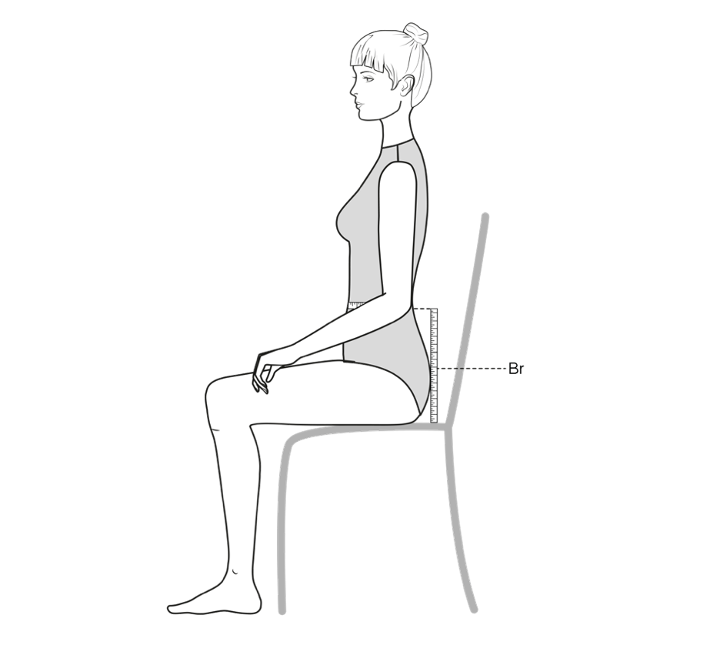
- Lower Body Rise or Crotch Depth: Sit the client being measured on a flat surface, such as a hard chair, stool, or wheelchair, and measure along the side from the lower edge of the waist measure tape vertically downward to the seat of the chair. It may be easier to use a ruler for this measurement.
- Hip: Measure the hips at the fullest part
- Inseam: Measure the inseam along the inner thigh and calf, from just below the crotch to the knee and ankle with a seated position
- Outseam: Measure along the outer thigh and calf, from the waist to the knee and ankle with a seated position
Additional online resources for obtaining body measurement
- Taking Measurements (Mueller & Sohn)
- ClothingPatterns101.com
- Girth Measurement of the Human Body (TextileLearner.net)
3D scanning:
3D body scanning can provide effective technical solutions for the body measuring processes. Body scanning can be faster than hand-measuring processes as all measurements can be taken simultaneously. It offers the additional advantage of creating a permanent 3D record of the person’s body, which the designer can reference later, without the client having to be present. Here are some tips to consider when 3D scanning an individual with a disability:
- To capture 3D body scan data, consider if the target customer can enter the limited space of a stationery full body scanning booth. Handheld scanners may be more appropriate.
- The customer needs to stand with arms and legs extended and hold the position for a short time (e.g., 5 seconds). The process might present barriers for customers with disabilities.
- To obtain a seated position of the customer (if the position is important for the apparel design), an assisting tool (e.g., a chair) is needed to avoid the data loss on the top and undersides of the legs.
Additional online resources regarding 3D body scanning can be found at The 3D Body Scanner (Cornell)
This content was provided by Morgan Tweed, CPACC. Morgan is an Accessibility Specialist in Architecture and Landscape Architecture. Morgan has participated as a client in apparel design class projects focusing on adaptive apparel.
Anytime you must touch their person, ask first. Autonomy is something that people tend to keep from disabled people. This is an important step in respecting your client.
There are many different adaptions to the measuring and fitting that may help depending on the situation. Below are some of the major adaptations that should be considered. Keep in mind that this is not an exhaustive list by any means, and everyone may have different needs.
| Disability | Advice for measuring for patternmaking |
| Deafness and Hard of Hearing |
|
| Sensitive skin and skin conditions |
|
| Neurodivergent |
|
| Wheelchair users |
|
| Other mobility aids and mobility needs |
|
| For weight differences |
|
| For unique shapes |
|
| For swelling |
|
Patternmaking techniques useful for adaptive apparel
The goal of this section is to identify changes from typical patternmaking techniques that can make clothing function better for individuals with disabilities. The table below identifies types of garment adaptations, patternmaking techniques that can be used to achieve these adaptations, as well as how these techniques can help people with disabilities. The designer may wish to research additional specific patternmaking adjustments such as clients with for shorter statures and spinal differences.
| Types of adaptations | Patternmaking principles and techniques for adaptive apparel | Relevant clothing needs of people with disabilities |
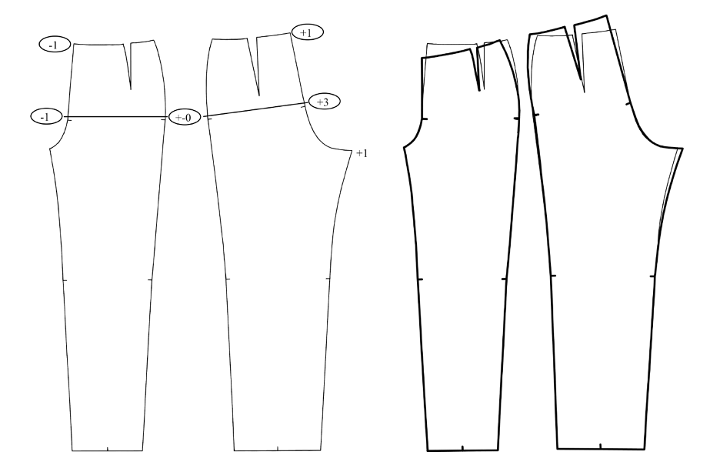
| Increase garment rise | Modify the pant pattern for a seated position. Extend the length of the crotch on the center back and reduce the length of crotch on the center front. Also, the total crotch length is extended. (See the figure below.) | To provide enhanced comfort and fit in a seated position (for wheelchair users) |
| Easier opening | Apply Velcro and magnetic snaps for the fly front zipper of a pair of pants | To make the donning and doffing process easier |
| Easier opening | Extend the fastener (e.g., zippers or snaps) longer on the side seam or the entire length of side seam | To make the donning and doffing process easier |
| Easier opening | Add extra openings through dart manipulation and/or style lines to allow the garment to easily open | To make the donning and doffing process easier |
| Sensory comfort | Use or modify as flat-locked seams or inside-out seams | To provide enhanced sensory comfort and avoid sensory sensitivity |
| Sensory comfort | Remove tags | To provide enhanced sensory comfort and avoid sensory sensitivity |
| Sensory comfort | Modify patterns to minimize or remove seams at pressure points (by combining pattern pieces or moving seams to different locations) | To provide enhanced sensory comfort and avoid sensory sensitivity |
| Sensory comfort | Remove back pockets of pants | To provide enhanced sensory comfort and avoid sensory sensitivity |
| Storage | Create additional pockets which can hold medical items on existing seams or side seams | To provide additional storage for users with diverse needs |
| Storage | Attach pockets on the thighs or knees of pants | To provide additional storage for wheelchair users |
| Easier manipulation | Replace existing closures with adaptive closures (e.g., Velcro, magnetic snaps, magnetic zippers, snaps) | To provide easier manipulation of closures |
| Self Dressing | Add loops to waistbands. | To assist with holding the pants while pulling them up. |
| Garment comfort | Create an adjustable slit (e.g., zippers at the pant hem) | To provide comfort and mobility (for wheelchair users) |

How to use Chapter 1’s Disabilities’ Impact on Dressing and Clothing Needs to create adaptive apparel patterns:
- Review this section of chapter 1 with your user or target market’s needs in mind. Note all their dressing challenges and design considerations that can alleviate these challenges. Make of note of how you will adapt your pattermaking method to implement each desired design consideration. Jot down where you can look for information on completing that pattern alteration. This may be a printed book, web resource, or even an individual with expertise. After planning all your patternmaking steps, carefully consider if there might be any conflicts between the planned alterations. If you identify any, consider alternatives. You may to create and evaluate physical samples of various techniques to choose the best option for your project.
|
Client’s Name: |
Date: |
Notes: |
||
|
|
Dressing Challenge |
Design Consideration |
Patternmaking Method |
Source of Information on Patternmaking |
|
1 |
|
|
|
|
|
2 |
|
|
|
|
|
3 |
|
|
|
|
|
(Add rows as needed) |
|
|
|
|
|
Potential interactions:
|
||||
Download a Tracking Client Dressing Challenges template [DOC] for your own use.
How to use Chapter 1’s Illustrated Glossary of Clothing Adaptations to create adaptive apparel patterns:
- After deciding on your which design considerations are needed to address the identified dressing challenges, use these illustrations to help you visualize the patternmaking changes that will be needed. For example: “I can see that this specialty closure requires a different attachment method. Will my typical seam allowance work with this specialty closure?”
References and Resources
Dallas, M. J., & Wilson, P. A. (1981). Panty Design Alternatives for Women and Girls with Physical Disabilities. Home Economics Research Journal, 9(4), 336–346. https://doi.org/10.1177/1077727X8100900408
Hernández, N. (2000). Tailoring the unique figure. GÖTEBORG UNIVERSITY. http://hdl.handle.net/2077/32796
Hobbs-Murphy, K., Morris, K., & Park, J. (2022). A Case Study of Developing a Paralympic Shooting Jacket for Disabled Athletes. Clothing and Textiles Research Journal, 1–18. https://doi.org/10.1177/0887302X221102920
Kidd, L. K. (2006). A case study: Creating special occasion garments for young women with special needs. Clothing and Textiles Research Journal, 24(2), 161–172. https://doi.org/10.1177/0887302X0602400209
Reich, N., & Shannon, E. (1980). Handicap: Common Physical Limitations and Clothing‐Related Needs. Home Economics Research Journal, 8(6), 437–444.https://doi.org/10.1177/1077727X8000800608
 Feedback Survey
We welcome your feedback as a user of this OER or potential collaborator on Adaptive Apparel Design work. Please click on this survey link or use your personal device to scan the QR code that will then link you to the online survey.

