
Chapter 3: Search techniques
3.1 Basic search techniques
Earlier, we discussed developing a topic into searchable keywords, and introduced key finding tools for library research. This chapter combines those topics to explore how you can use specific techniques to build an effective search strategy for your projects. Keep in mind that no single strategy, set of keywords, or finding tool will work perfectly every time. You’ll need to use different strategies for different situations.
Simple searching techniques
Starting simple is often a useful strategy, especially when you have a broad topic or don’t have a specific source in mind. The easiest way to get started in most finding tools is to type a few keywords into the search box. In the following examples we will use Quick Search, but these strategies will work in almost any finding tool.
Let’s say you are doing a project about solar energy and power storage. Just putting these words in the simple search box uses the default settings without restricting the results that come up. Sometimes that’s what you want, like when you’re doing an initial exploration of what’s available. However, doing this may retrieve far too many results. If that’s the case, you may have to try different search terms or strategies to narrow your results down to the most relevant sources.

Here are some simple ways you can narrow your search results:
Phrase searching is when you take a specific phrase and enter it into the search box using quotations around it. It’s helpful when you want to find a specific term or phrase, for example “solar energy.” By putting quotations around the phrase, that ensures the database will search for those words together, in the order you specify, rather than sprinkled anywhere in the resource.
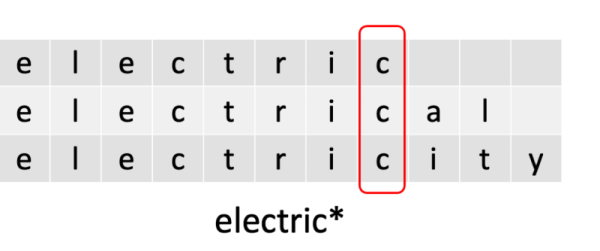
Truncation is when you use a special symbol, often an asterisk (*), to search for multiple endings for a word’s base, or “trunk.” Using a truncation symbol tells the search tool to find any word that starts with the letters leading up to that symbol, regardless of what letters come after that point. This is a simplified way to search for different forms of the same word with a single search. For example, by searching for electric* you can find results containing all or any of these terms: electric, electrical, and electricity.
You can determine where to truncate by spelling out variations of your keyword and highlighting the last place where the letters overlap. This is likely to be the most useful place to truncate. See the example below.
Watch out!
- Truncating too early makes it more likely that you’ll retrieve irrelevant results. For example, by truncating electric as elect*, you would also get elections, elected, and electoral.
- Truncating too late reduces the number of variations you will find, missing many results that could be useful. For example, electricit* will retrieve electricity but not electrical.
- Truncation is not a useful strategy for all keywords. In some cases, a keyword may share a base with words that are not closely related to it. For example, protest* will find the related terms protests, protesters, and protesting, but also matches the unrelated word Protestant.
Check your understanding
Filtering your results
Filtering is the process of narrowing your results by applying modifiers to your existing search. Think of it like online shopping: after you search for something you want, you can limit your results to only items within your price range, or those with free shipping. Filtering your search results when doing research is a similar process. Finding tools like Quick Search include various filters that let you do things like restrict your results to a specific date range (e.g. published in the past 5 years) or format (e.g. books instead of articles).
Where the filters are located will depend on which tool you’re using. In Quick Search, they are located in a column on the right side of the page, but many databases and indexes place them on the left. Once you have selected one or more filters and applied them to your search, they will typically appear in a list near the top of your search results page. One thing to be aware of is how your search tool handles filters when you change your search or start a new one. Filters from your previous searches may still be active, or not. If a filter was removed, you might want to add it back in; alternatively, if the filters are still active, you may want to remove one or more of them to broaden your results.
When you’re considering your search terms, take a few moments to reflect on whether modifying the phrases and keywords you’ve used will be useful for your search. Phrase searching, truncation, and filtering are not the only techniques you should know, but they are useful to know. In the next section, we’ll explore a technique that gives you more control over your results from the beginning.
