
Assessment of Patellar and Achilles Reflexes
Karri Haen Whitmer
A reflex is an involuntary (automatic) response to stimulus that quickly returns the body to homeostasis. There are several kinds of reflexes. Examples are shivering in response to low core body temperature; or withdrawing your hand from a hot stove when temperature and pain receptors in your hand register the stimulus.
A reflex arc refers to the neural pathway that a nerve impulse follows. The reflex arc typically consists of five components:
- A receptor, and independent sensory cell, or an ending of a sensory neuron, reacts to a stimulus (e.g., a stretch receptor).
- The sensory, or afferent, neuron sends a nerve impulse through an afferent pathway to the central nervous system.
- An integration center consists of one or more synapses in the CNS (typically the spinal cord) where the incoming information and outgoing response are integrated.
- A motor, or efferent, neuron sends a nerve impulse along an efferent pathway from the integration center to an effector cell.
- The effector cell responds to efferent impulses (for example, by contracting, if the effector is a muscle fiber).
Because integrating center processing may occur at the level of the spinal cord rather than requiring impulses to travel to the brain, reflex responses have a relatively short path length and, thus, a quick reaction time compared to voluntary or conscious body movements.
Reflexes require a minimum of two neurons, a sensory neuron (input) and a motor neuron (output) (see Figure 1). The sensory neuron detects stimuli and sends a signal towards the CNS. The sensory neuron synapses with a motor neuron, which innervates an effector tissue, such as skeletal muscle in order to pull away from painful stimuli. This type of reflex is a “withdrawal” reflex and is monosynaptic, meaning only one synapse has to be crossed between the sensory neuron and the motor neuron. This is the simplest reflex arc, and the integrating center is in the spinal cord. Polysynaptic reflexes are more complex, but also more common. They involve interneurons, found in the CNS, which further process stimulus and output information. Beyond simple reflexes with integrating centers in the spinal cord, more complex reflexes have integration centers in the brainstem or even in the cerebrum.
A stretch reflex is a type of muscle reflex, which protects muscle against increases in length that can tear and damage muscle fibers. The primary purpose of the patellar reflex – the stretch reflex of the quadriceps femoris muscle – is to prevent excessive stretching of the quadriceps. The patellar reflex is illustrated in Figure 1.
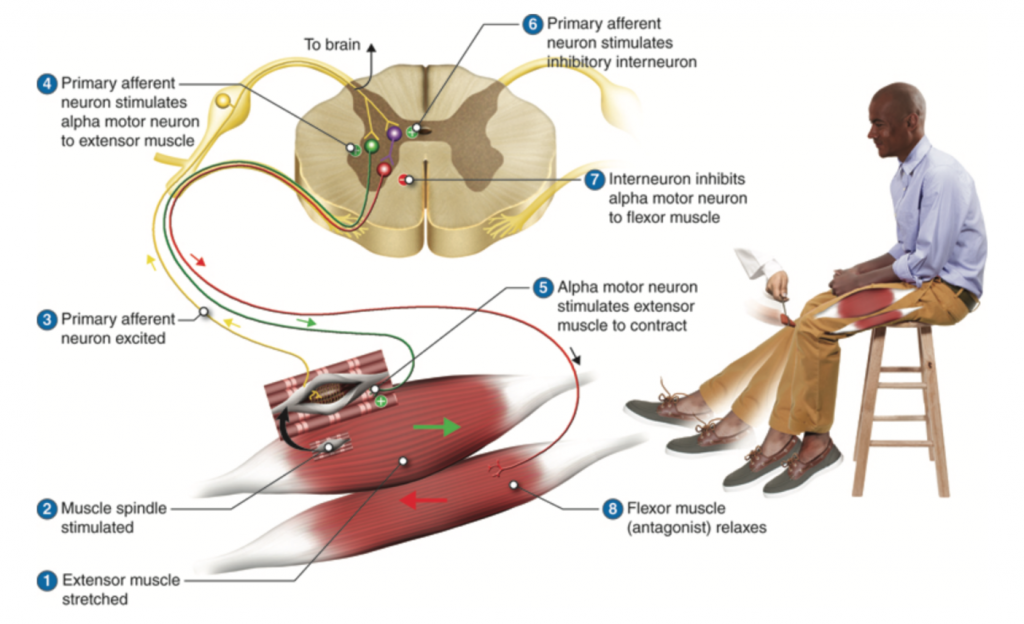
The patellar tendon attaches the quadriceps muscle to the tibial tuberosity of the lower leg. The quadriceps is an extensor muscle: when it contracts it extends the angle of the knee joint by raising the lower leg from a bent position. Tapping the patellar tendon pulls and stretches the quadriceps muscle and causes the sensory receptor of the muscle, called a muscle spindle fiber, to send a signal along the afferent neuron to the spinal cord (Figure 2). This causes the efferent neuron to return a signal to the quadriceps muscle to contract and lift the lower leg. This action resists the initial stretch and is a classic example of negative feedback.
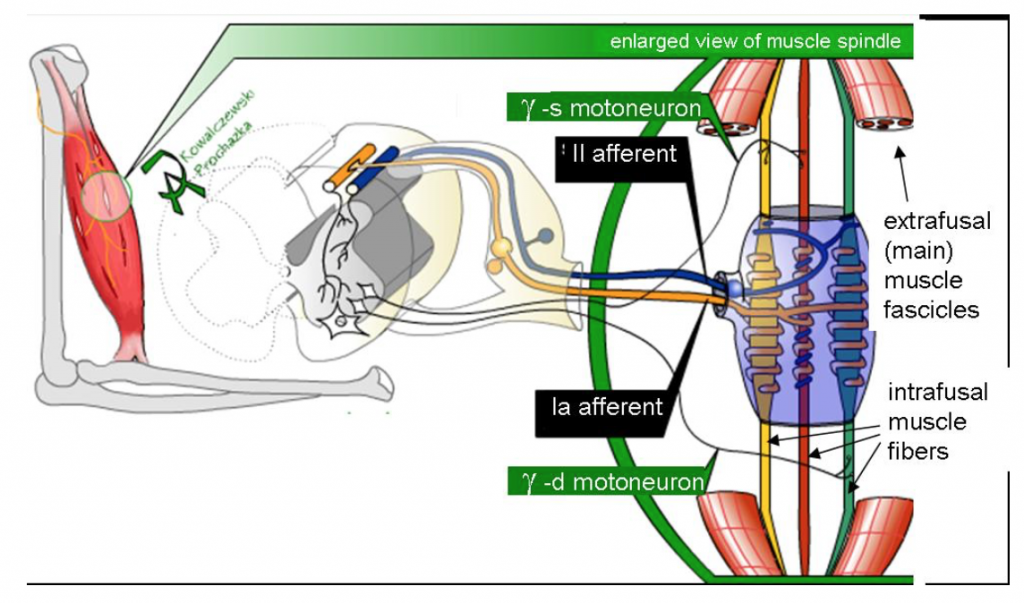
To better consider the events that result in the “sensation” of muscle stretch, we must first define muscle fiber types. Muscle spindles, sensory structures which contain intrafusal muscle fibers, are innervated by sensory neurons and are arranged in parallel to normal (contractile), extrafusal, muscle fibers. Intrafusal fibers are not contractile where they associate with the sensory neuron. Intrafusal fibers respond to tension in the tissue by depolarizing a sensory neuron. The sensory neuron synapses with a motor neuron in the spinal cord that innervates contractile extrafusal fibers. The contraction of the extrafusal fibers, that is, contraction of the belly of the muscle, releases tension on the intrafusal fibers, decreasing stimulation to neuron.
In the case of the monosynaptic knee-jerk reflex, hitting the patellar tendon with a mallet stretches the intrafusal fibers of the spindles in the quadriceps muscle, leading to contraction. In parallel, an inhibitory impulse is sent from the spinal cord to cause relaxation of the hamstring muscles, via a polysynaptic pathway.
It is important to note that, even with the simplest of reflexes, there are multiple inhibitory and stimulatory influences that can affect the excitability of the motor neuron. These can amplify or suppress a reflex response and may somewhat vary from subject to subject. Lesions that damage the sensory or motor fibers, or damage to the spinal cord, generally diminish a reflex unless the spinal cord has been completely transected. In the latter case, spinal cord damage or damage to “upper motor neurons,” motor neurons in the brain, may eventually lead to overly reactive reflexes (hyperreflexia).
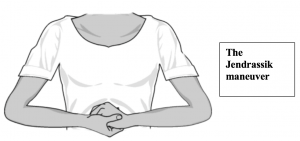
Additionally, neural activity at other sites in the body may influence a reflex arc. Facilitation (reinforcement) may enhance the relative strength (relative amplitude) and/or speed (reaction time, in milliseconds) of a reflex response due to maximal isometric contraction of muscles in a remote part of the body – for example, by clenching the jaw or locking the fingers of the two hands and pulling (the Jendrassik maneuver). The Jendrassik maneuver (JM) is a special method for reinforcement that is applied in the clinical setting when it is difficult to initiate a reflex in a patient. The JM likely amplifies reflexes by decreasing inhibitory signals to the alpha motor neurons that are responsible for muscle contraction at the neuromuscular junction (NMJ) (Passmore & Bruno 2012). Sometimes, though, outside of the clinical setting, experimental outcomes with the JM maneuver can result in no effect or inhibition of a reflex. Different results when implementing the JM may be due to differences in the physiology of healthy experimental subjects versus patients (in the clinical setting) who are being assessed for nerve problems.
Reflex testing is of clinical value. Testing of the patellar response indicates:
- The relative health of the muscle spindle, afferent (sensory) and efferent (motor) neurons, neuromuscular junctions, and the extrafusal (contractile) muscle fibers.
- An appropriate balance of excitatory and inhibitory regulation from the central nervous system.
- The integrity of the L2-L4 vertebral segments of the spinal cord.
Tests for simple muscle reflexes, such as the patellar reflex, are basic to any physical exam when motor nerve or spinal damage is suspected. The tests help to locate neural damage: motor nerves synapsing in the spinal cord above the damage site aren’t affected, but nerves that originate at or below the injury will most often produce abnormal reflexes. To determine this, doctors may also test stretch reflexes in the triceps muscle and the Achilles tendon (ankle-jerk reflex) and compare results.
The Achilles reflex is a monosynaptic stretch reflex similar to the patellar reflex. In the Achilles reflex, the hammer taps the Achilles tendon while the foot is dorsiflexed, and the foot, in response, should jerk toward the plantar surface. The Achilles reflex originates in the S1 and S2 nerve roots. When comparing reflexes from different sites of the body, the locations of the corresponding nerve roots along the spinal cord should be considered in order to determine possible sites of injuries and differences in reflex path lengths.
This Week’s Lab Technique: Surface Electromyography
In this lab, students will record electromyograms (EMGs) for the fibers in a muscle, and use them to determine the time between the stretch of a tendon and the arrival of a motor impulse at the muscle. Surface electromyography (EMG) measures the electrical activity in a muscle by placing recording electrodes on the skin over the muscle. To be more precise, an EMG measures fluctuations in the electrical activity of muscles due to muscle cell action potentials.
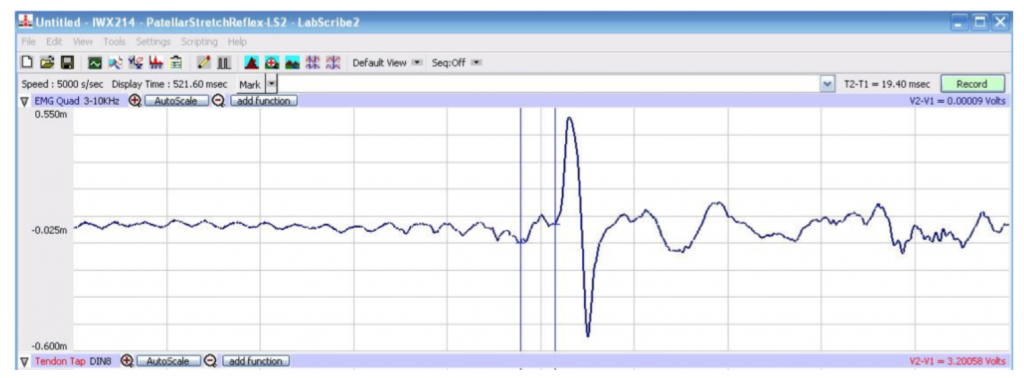
The EMG produces an electromyogram, which records both the relative amplitude (relative strength) and timing of muscle contractions. The EMG displays the electrical potentials generated by the muscle cells on a computer screen as a series of peaks and troughs defining the EMG wave (Fig. 3, below).
In this lab, two monosynaptic reflexes in a human subject will be studied: the Achilles tendon reflex, and the patellar tendon (knee-jerk) reflex. Mean reflex reaction times, the observed time for the reflex response measured in seconds, and reflex conduction velocities, the velocity of transmission in the nerve measured in meters/second, for each reflex arc will be determined and compared. The effect of pre-existing tension in the effector muscle, or motor activity in other muscle groups, upon reflex responses will be measured. The coordination of motor activity in antagonistic muscles may also be studied.
Some measurements we will make in the lab experiments:
- Response time, path length, and conduction velocity of the patellar and Achilles reflexes.
- Voluntary vs reflex muscle movement reaction times.
- Reflex amplitude (strength) and speed with and without reflex reinforcement.
Can you think of some hypotheses for the experiments in this week’s laboratory?
Stretch Reflexes Laboratory Methods for iWorx
Lab Activity Highlights
Stretch reflexes are protective reflexes that ensue to avoid damage due to over-stretching a muscle.
Stretch reflexes occur in response to the activation of special sensory receptors in the muscle called “muscle spindles” or “stretch receptors.”
In this lab, students will determine the response time, conduction velocity (speed), and amplitude (strength) of two stretch reflexes: the Achilles reflex at the ankle and the patellar (knee-jerk) reflex.
The velocity of a reflex informs us about the health of the receptors, neurons, and muscles involved in a reflex and can help to diagnose neuromuscular damage or disease.
Conduction velocity cannot be measured directly and must be calculated using path length and reaction time data
Experimental Set-Up: Start the Software
- Turn on the iWorx hardware with the switch on the back of the unit.
- Double click the Week6 StretchReflex settings file from the p-drive.
EMG Cable and Reflex Hammer Setup
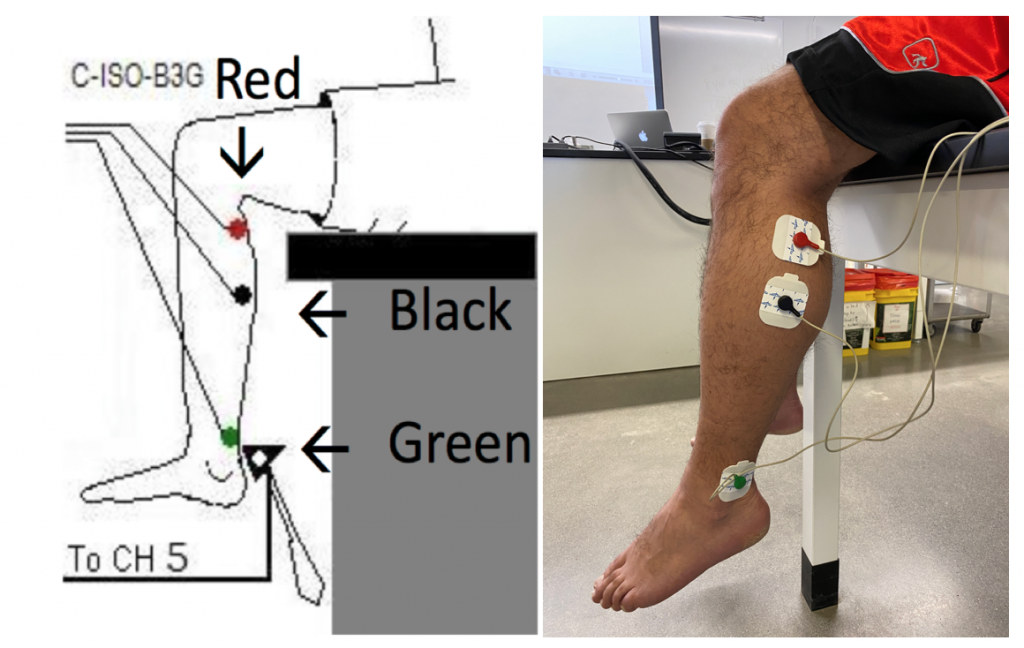
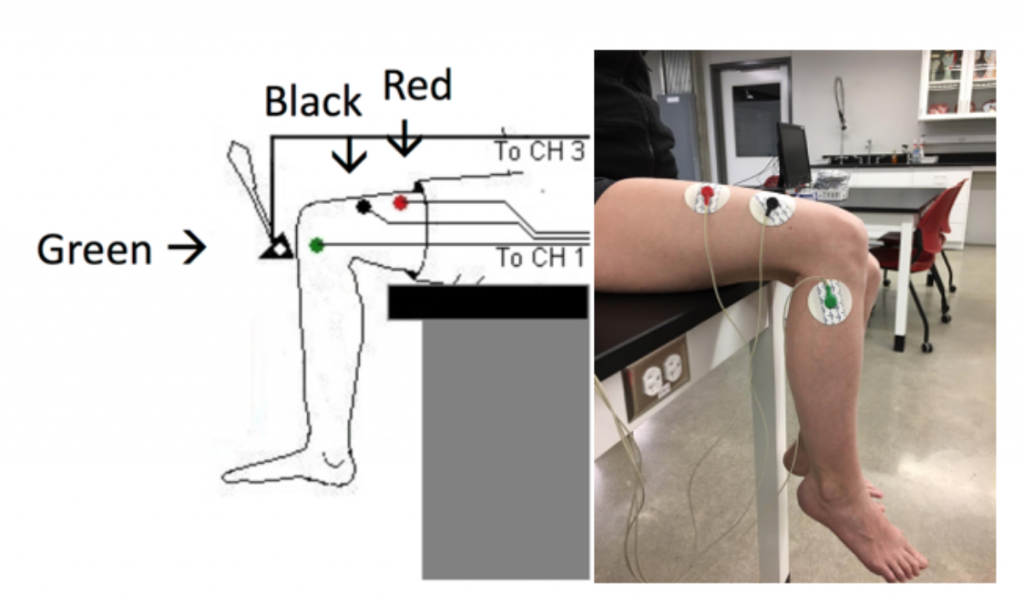
- Use an alcohol swab to clean and abrade three regions on the lower portion of the left leg for electrode attachment. One area is posterolateral near the knee (see Methods Figure 1), the second is posterolateral on the calf muscles, and the third area is on the lateral side of the ankle that functions as the ground. Let the areas dry.
- Remove the plastic disk from a disposable electrode and apply it to one of the abraded areas. Repeat for the other two areas.
- The RED (+1) lead wire is attached to the electrode laterally, near the back of the knee. Flex your calf muscle to make sure the electrode is placed on the muscle.
- The BLACK (-1) lead wire is attached to the electrode in on the lateral aspect of the gastrocnemius (calf) muscle. Flex your calf muscle to make sure the electrode is placed on the muscle.
- The GREEN(C) lead wire is attached to the electrode on the lateral side of the ankle that functions as the ground. Make sure the electrode is placed laterally as you will strike the calcaneal tendon (Achilles Tendon).
Exercise 1: Achilles Tendon Reflex Arc
Objective: To determine the conduction velocity of the Achilles tendon reflex arc.

Procedure:
- Instruct the subject to sit on a tall stool or tabletop so that the subject’s thighs are supported by the top of the stool and his or her calves hang freely (feet off the floor).
- The Achilles tendon is located above the heel and connects the gastrocnemius muscle to the tarsal bone of the foot. Tap the tendon smartly with the wide end of the reflex hammer a few times to locate a point on the tendon which produces a consistent contraction of the gastrocnemius muscle and a downward movement of the foot (plantar flexion). Make a mark with a marker at this spot.
- Click Record. Instruct the subject to point his or her toes up and down to demonstrate the type of EMG that occurs during plantar flexion and dorsiflexion at the ankle. Click AutoScale on the EMG Muscle (upper) channel.
- Test the hammer by lightly tapping on the palm of your hand to make sure the signal is read on the lower “Hammertime” Labscribe screen, only.
- Type Subject’s Name Achilles Reflex in the Mark box. Press the Enter key on the keyboard to mark the recording. Continue recording.
- Instruct the subject to not watch you, that the exercise has begun, and that his or her tendon could be tapped at any time.
- Adjust the subject’s foot so the joint is in neutral position (see photo, below). Hold the foot lightly without applying resistance. Give the subject’s Achilles tendon smart tap to elicit the stretch reflex. Record a total of ten trials using the same tapping force, noting the plantar flexion of the joint.
- After the tenth trial, Click Stop to halt recording.
- Select Save As in the File menu, type a name for the file. Designate the file type as *.iwxdata.
- Click on the Save button to save the data file.
Data Analysis
Determine the Reflex Reaction Time
- Scroll to the beginning of the data recorded for the Achilles Reflex to display the first trial on the Main window. You can also click on MARK to show locations for all marks. Highlighting a mark and clicking GO TO MARK will take you to that mark on the data screen.
- Use the Display Time icons or Zoom Between Cursors to adjust the display on the Main window.
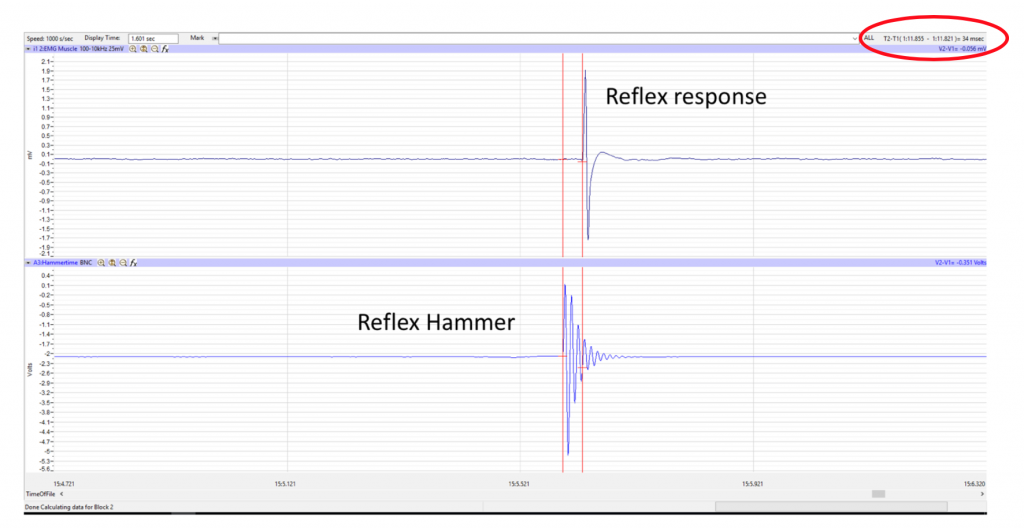
- Look at the Function Table that is above the display of the EMG channel. The mathematical function, T2-T1, should appear in this table.
- Very important: adjust the zoom on the waves, so that you can clearly see the distinct peaks of the EMG and the hammer tap before it.
- Drag a cursor to the beginning of the wave recorded from the reflex hammer which is displayed on the bottom Hammertime screen. Drag the second cursor to the ONSET of the First Wave on the EMG that is displayed (on top EMG Muscle screen) (Methods Figure 2, above).
- Once the cursors are placed in the correct positions for determining the reflex time, record the value for T2-T1 and record this time on your worksheet.
- Once the reflex time in the first trial is measured and recorded, move to the data from the second trial (tap).
- Repeat the measurement of T2-T1 on the data for all the 10 reflex tap trials by moving the cursors.
- Once the reflex times in all ten trials have been measured and recorded on your worksheet, discard the longest and shortest times from the data set, and determine the average of the eight remaining reflex times.
- Record the mean reflex time for the Achilles reflex in the Data Table in your Lab Report.
Determine the Reflex Path Length
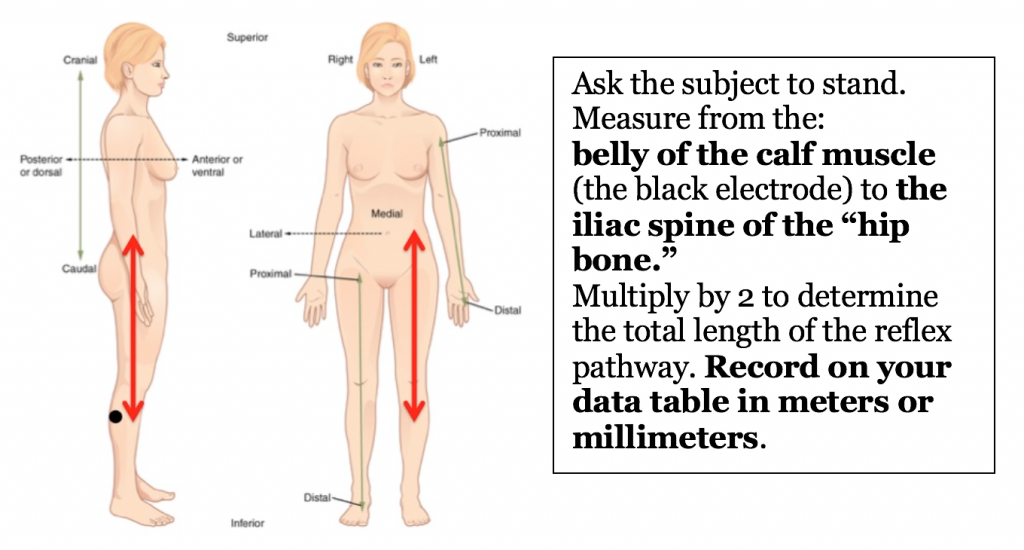
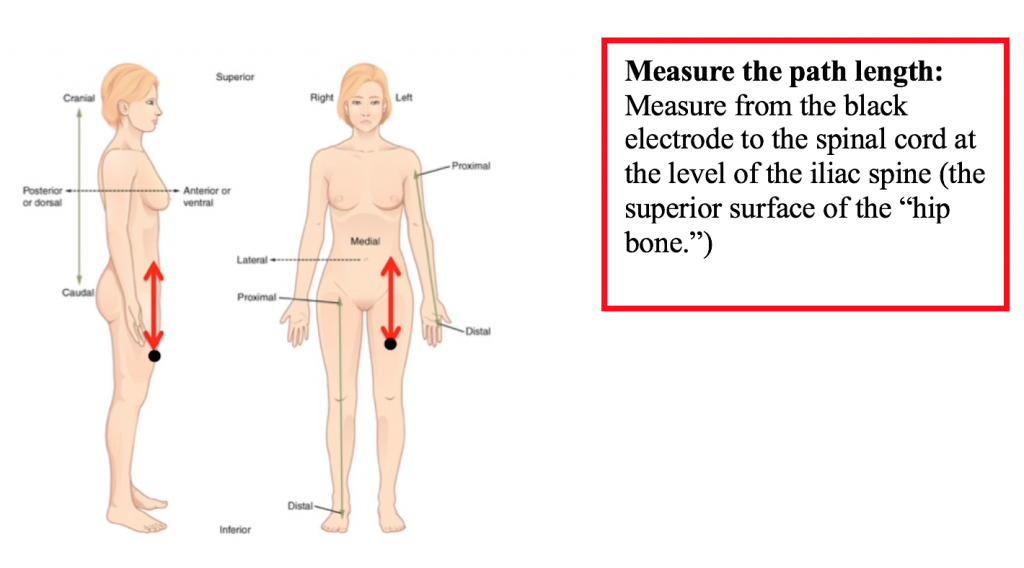
Measure the distance between the belly of the subject’s gastrocnemius (calf) muscle (black electrode) and the site of the sensory-motor synapse in the spinal cord. For the purpose of this exercise, assume that the sensory-motor synapse is at spinal segment S1, which is near the iliac spine, or the upper rim, of the hip bone). Multiply this measurement by 2 to determine the total length of the reflex path. Note the result in meters or mm.
Determine the Reflex Conduction Velocity
- Conduction velocity cannot be measured directly and must be calculated
- Assume synaptic transmission in this pathway takes about 0.5 msec (0.0005 sec), and calculate the conduction velocity in the nerves composing this reflex pathway by the equation:

- Record the conduction velocity for the Achilles reflex in your Lab Report.
- Save your data to your lab folder, Save As: Student’s Name Achilles Reflex.
- Use the same equation to calculate the patellar tendon reflex conduction velocity (below).
Exercise II: Patellar Tendon (Knee Jerk) Reflex
Objective: To determine the amplitude and conduction velocity of the patellar tendon reflex arc under different conditions.
Procedure:
- Instruct the subject to sit on a Tall Stool or tabletop so that the subject’s thighs are supported by the top of the stool and his or her calves hang freely.
- Remove the electrodes over the subject’s calf muscle and, if still sticky, place the same set of recording electrodes on the quadriceps muscle of the subject, towards the lateral side of the thigh (Methods Figure 3) so that:
- The BLACK (-1) lead wire is attached to an electrode which is placed on the “belly” of the Rectus Femoris muscle (flex your quad muscles to locate the muscle) and place the electrode slightly lateral to the midline of your femur.
- The RED (+1) lead wire is attached to an electrode which is about 10cm above the negative (black) electrode.
- The GREEN (C) lead wire is attached to the electrode on the knee that functions as the ground.
- Measure the Patellar Reflex Path Length from the black electrode on the quadriceps to the iliac spine of the hip (top of the “hip bone”). Double this length for the total length of reflex pathway in meters. Record on your data table.
Determination of the Reflex Time for the Patellar Reflex
- Feel the position of the patellar tendon just below the kneecap. Place one hand on the patella (kneecap), and use the other hand to tap the patellar tendon with the reflex hammer. Find the point on the patellar tendon that causes the greatest response from the quadriceps muscle. Make a mark at that spot.
- Click Record and then instruct the subject to raise and lower his or her lower leg to demonstrate the type of EMG that occurs during quadriceps contraction and relaxation. Click AutoScale on the EMG screen.
- Test the reflex hammer by lightly tapping on your hand to make sure the signal is read on the lower “Hammertime” Labscribe screen, only. Click Stop to halt the recording.
- Type Patellar Tendon Reflex in the Mark box that is to the right of the Mark button.
- Click Record. Press the Enter key on the keyboard to mark the recording.
- Instruct the subject to relax his or her quadriceps muscle, have the subject look away and let them know that the exercise has begun.
- Tap the subject’s patellar tendon to elicit the stretch reflex. Record a total of ten trials using the same tapping force.
- After the tenth trial, click Stop to halt recording.
- Select Save in the File menu.
Reflex Time with Application of Jendrassik Maneuver
To test reflex facilitation, repeat this exercise on the same subject while the subject is performing the Jendrassik Maneuver (below). To perform this activity:
- Mark the data “Jendrassik” in the Mark box so you can find the data recording.
- The subject should curl the fingers of each hand toward its palm form a cup-shaped grip.
- The subject should hold hands and arms in front of the chest so that elbows are pointed out.
- The subject should interlock the hands using the cup-shaped grip, attempting to pull the hands apart, DURING reflex recording.
- Ask subject to look away and record 10 trials.
Voluntary Muscle Contraction in Response to Auditory Stimulus
- To test the response time for voluntary muscle contraction: repeat this exercise on the same subject (no facilitation), but ask the subject to strongly kick his or her leg in response to gently tapping the reflex hammer on the lab table. Note: do not pound the hammer on the table; it will break the hammer!!
- Mark the Mark Box “Voluntary Knee Jerk” at the start of the recording.
- Ask the subject to look away or close his or her eyes and kick his or her leg in response to hearing the noise of the hammer when it taps the bench top.
- Lightly tap the hammer on the benchtop at irregular intervals 10 times to record the 10 trials.
Data Analysis

- Go back to the Patellar reflex data to measure the time and amplitude. In this analysis, you will perform measurements for the patellar reflex, facilitated patellar reflex (Jendrassik), and the voluntary knee jerk conditions.
- Measure the response time (T2-T1) following the instructions in Exercise 1 for cursor placement. After you have the reflex time measurements go on to Step 3 below.
- Measure the EMG amplitude (Max-Min; see the red circle on Methods Figure 4) with double cursors on the EMG Screen:
-
- Using the arrow keys on your key board helps to move the cursor more precisely when you are very close to wave peaks.
- Place the first cursor at peak of the first EMG wave
- Place the second cursor on the bottom of the same EMG wave
- Record Max-Min amplitude in mV on your Worksheet. Calculate the average in your data table on the Lab Report.
Citations
- Reflexes by Janet Chen Daniel. Last accessed January 22, 2020. http://csmbio.csm.jmu.edu/biology/danie2jc/reflex.htm
- Disorders of the nervous system by Reeve and Swenson accessed at https://www.dartmouth.edu/~dons/part_1/chapter_8.html
- Passmore SR, Bruno PA. Anatomically remote muscle contraction facilitates patellar tendon reflex reinforcement while mental activity does not: a within-participants experimental trial. Chiropractic & Manual Therapies. 2012;20:29. doi:10.1186/2045-709X-20-29.
Please cite:
Haen Whitmer, K.M. (2021). A Mixed Course-Based Research Approach to Human Physiology. Ames, IA: Iowa State University Digital Press. https://iastate.pressbooks.pub/curehumanphysiology/
