
Voluntary Muscle Activity
The Electromyogram
Karri Haen Whitmer
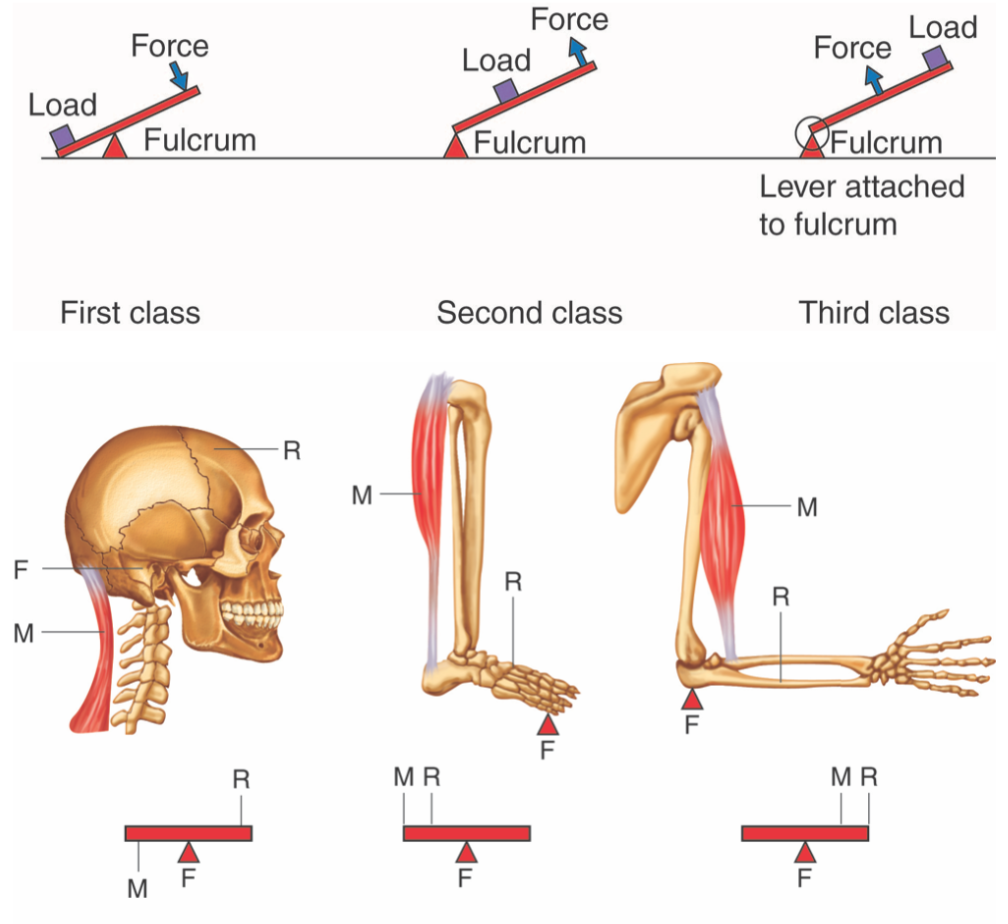
The movement of parts of the body is accomplished through a system of levers composed of skeletal muscles and bones. In a lever, the muscle attached to the bone provides the effort or force that moves the bone. As the muscle contracts and relaxes, flexes or extends, the bone rotates around a joint in the skeletal system. In relation to the muscles, the bones, and the body part being moved, the joint is the fixed point that functions as the fulcrum (point of rotation) for the lever. The body part being moved is the load on the lever. All levers, including the ones in the body, can be categorized into one of three classes, which are based on the position of the fulcrum in relation to the positions of the effort and the load (Figure 1).
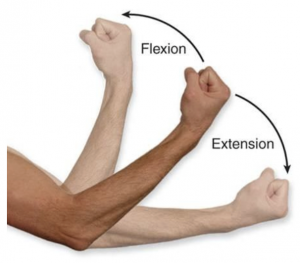
Muscles are classified into functional groups depending upon how they contribute to joint movement. Agonist muscles are also referred to as “prime movers.” The agonist provides the most force to complete the movement at a joint. Antagonist muscles are those whose action opposes the movement of the agonist. That is, typically when the agonist muscle contracts, the antagonist muscle must relax to allow movement. For example, during elbow flexion, the biceps are the agonist and the triceps are the antagonist. Antagonistic muscle activity can be seen as waxing and waning EMG trends when recording the biceps and triceps while flexing or extending the arm. Muscles classified as synergists stabilize a joint when it is moving. During elbow flexion, synergist muscles include the brachioradialis and brachialis: these assist the biceps and stabilize the elbow joint.
Voluntary Muscle Movement and EMG Activity
At this point in the course, we have created and analyzed several electromyograms (EMGs). This week, EMGs will record the electrical impulses from muscles during sustained voluntary muscle contraction during an arm wrestling match to help us understand how arm movement works. Unlike the smooth, wave-like EMGs seen for stretch reflexes and direct nerve stimulation, EMGs recorded during most voluntary muscle contractions are visualized as bursts of spike-like signals where the duration of the burst is proportional to the duration of the muscle activation. During voluntary muscle contraction, like we see in arm wrestling, hundreds or thousands of motor units fire at the same time. Additionally, the frequency of muscle fiber firing is greater in voluntary movement than in reflexes. Because of this, it becomes very difficult to quantify the amount of electrical activity in a muscle unless the raw EMG data is mathematically transformed. Most commonly, raw EMG data is transformed using the integration of the absolute values of the amplitudes of all the individual EMG spikes. This is called the absolute integral. The area under the curve of the absolute integral of the EMG is linearly proportional to the strength of the voluntary muscle contraction.
Increases in the force produced by a muscle are due to two physiological phenomena: recruitment and summation. During recruitment, increasing the stimulus amplitude on the muscle will result in more motor units responding to the stimulus, thus, increasing the tension in an entire muscle. During summation, muscle fibers become unable to relax due to increasing the stimulus frequency. Both phenomena result in increasing the force and duration of a muscle’s contraction and contribute to sustaining strong muscular contractions over time. In general, with increasing force, the EMG readout becomes denser and the maximum peaks in the EMG signal have a higher amplitude.
Muscle Strength
The number of skeletal muscle fibers in a given muscle is genetically determined and does not change. Muscle strength is directly related to the amount of myofibrils and sarcomeres within each fiber. Factors, such as hormones and stress (and artificial anabolic steroids), acting on the muscle can increase the production of sarcomeres and myofibrils within the muscle fibers, a change called hypertrophy, which results in the increased mass and bulk in a skeletal muscle. [1]
Arm Wrestling Basics
The basic idea of arm wrestling is to pin an opponent’s arm to the table. The general rules of arm wrestling are simple:
- Start the match sitting square to the table
- Keep both feet on the ground without bracing your feet or legs against any solid object
- Elbows should be bent and against the wrestling surface, such as a lab table or a lab stool
- Grip opponent’s hand
- Do not touch your body to your hand
- On the command “Start Wrestling” begin the Arm Wrestling Match
- Stay in the seated position throughout the entire match
- To win, a contestant must cause their opponent’s hand or fingers to touch the table’s surface
- Once the match is completed, Wrestlers should remain in the “Finished” position for measurement of the elbow joint angles
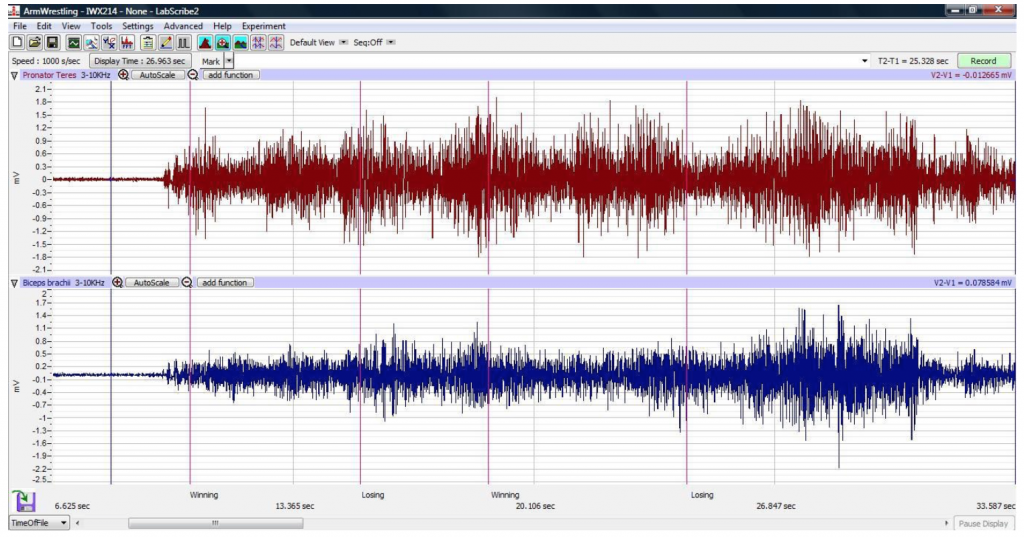
As the arm wrestling contestants begin the competition, muscle action potentials are generated to keep their muscles active and move their forearms to pin the opponent to the table. The muscles that are more active on an EMG will depend on whether the contestant is winning, gaining the advantage by pushing their opponent’s arm to the table, or losing, being at a disadvantage when their own arm pushed toward the table.
Mechanics of an Arm Wrestling Match
Arm wrestling involves the primary use of four muscles: the Biceps brachii, Pronator teres, Pectoralis major and Flexor carpi ulnaris. Other muscles such as the deltoid, Latissimus dorsii and Triceps brachii are also used. The forearm muscles are generally thought to be the most important with the upper arm and chest providing additional strength.
There are two factors involved in winning an arm wrestling match: muscle fitness and arm wrestling technique. In this lab, we will explore EMG responses to arm wrestling for two muscles: the pronator teres and the biceps brachii muscle. Using the EMG data, you may be able to differentiate whether technique or muscle mass was more important for the outcome of your matches.
Movements During a Match: Pronation and Supination
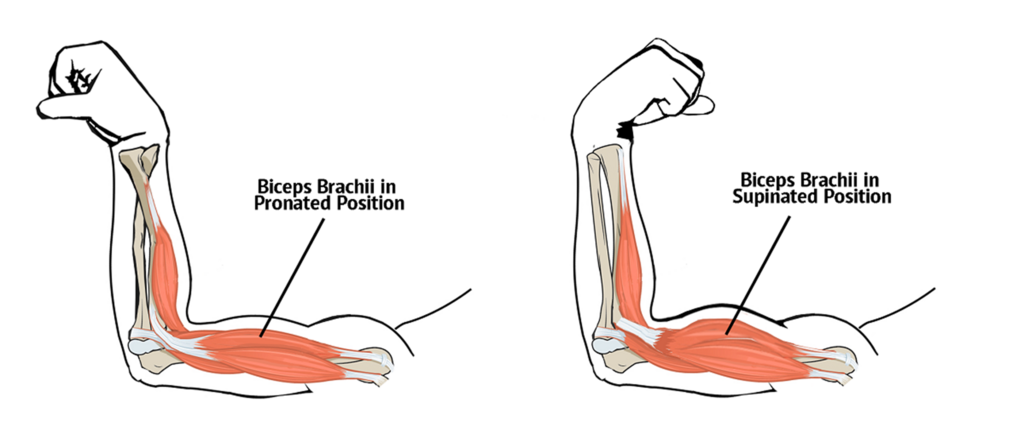
The pronator teres pronates the wrist and palm by crossing the ulna and radius. When you win an arm wrestling match, your wrist and palm will be completely pronated as you pin your opponent’s hand to the table. When you lose an arm wrestling match, your wrist and palm will be completely supinated (the dorsum of the hand will be flat on the table in the “pinned” position). Once the arm is supinated, it becomes more difficult to push back into the neutral position.
The heads of the biceps brachii, mostly known for flexing the elbow, exert force during supination and act as a accessory supinators. You can feel this if you put your hand on your biceps and pronate and supinate your palm with your elbow on the table: the biceps flex in the supinated position. During pronation and supination, the biceps brachii and pronator teres behave antagonistically.
Movements During a Match: Elbow Flexion
Keeping the arm close to the body and the flexion of the elbow tight during arm wrestling is a commonly taught technique for helping to win a match. This is partially because the power of the biceps brachii muscle can be more easily harnessed to force the opponent’s arm down onto the table in this position. Once the opponent’s biceps are extended, they have to work much harder to win the match. In the case of elbow flexion, both the pronator teres and the biceps brachii will act as elbow flexors under resistance; that is, they act synergystically to keep the elbow bent.
In general, proper arm wrestling technique involves keeping the arm at an acute angle and never allowing the arm to extend beyond 90 degrees. This posture allows the arm wrestler to more easily keep the arm close to the trunk and capitalizes on the strength of multiple muscles and ligaments. Once the opponent’s arm is extended beyond 90 degrees, it will be very difficult for them to push back into a neutral position.
In this lab, you will compare the size of the upper and lower arm, EMGs and the angle of the humerus and radius/ulna to determine:
- Relative muscle exertion in the pronator teres and biceps brachii during resistance in an arm wrestling match.
- Whether muscle size, technique, or both lead to winning a match between two opponents.
Students participate in arm wrestling to observe and measure EMG activity while winning and losing. Electrodes will be placed on the Biceps brachii (upper arm) and Pronator teres (forearm) muscles to observe muscle action as different forces are used to pin the opponent to the table. Detailed instructions of electrode placement are found in the Set-Up portion of this week’s lab.
Laboratory Methods for iWorx
- Record EMGs of voluntary muscle movement
- Record EMGs of voluntary muscle movement under stress
Start the Software
- Turn on the iWorx unit.
- Open the Week 9 settings file by clicking it in the P-Drive.
EMG Cable Setup
1.) Locate the muscles of the forearm and upper arm over which the recording electrodes will be placed. Muscles can be located by flexing or extending the hand and noting the areas of the forearm where the muscles are tense during these hand positions:
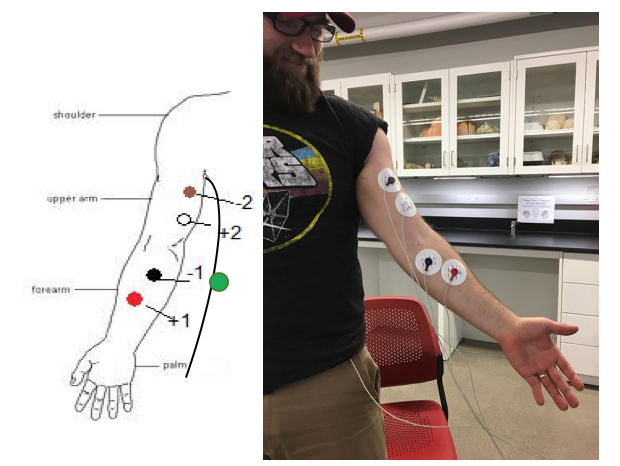
- One pair of recording electrodes will be placed over the Pronator teres muscle on the anterior surface of the forearm. The pair of electrodes should be placed side by side, with 2-4 centimeters between them, on the length of the muscle as it crosses the inner forearm (Figure HM-7-S2). Figure HM-7-S2: Location of Pronator teres muscle.
- A second pair of electrodes will be placed over the Biceps brachii on the upper arm. The first electrode in this pair will be placed about 4 centimeters above the elbow. The second electrode in this pair will be placed about 2-4 centimeters above the first, towards the shoulder.
- A fifth electrode, used as the ground, is placed on the lower abdomen, just above the waist, on the same side.
2.) Use an alcohol swab to clean and scrub the areas where the electrodes will be placed (Figure HM-7-S4). Let the areas dry before attaching the electrodes.
3.) Remove the plastic disk from a disposable electrode and apply it to one of the scrubbed areas. Attach an electrode to each of the other areas.
4.) Snap the recording lead wires onto the electrodes, so that:
- THE RED “+1” lead is attached to the electrode on the anterior forearm on the Pronator teres, close to the lateral edge of the arm towards the thumb.
- THE BLACK “-1” lead is attached to the electrode on the anterior forearm on the Pronator teres, closest to the middle of the forearm, near the elbow.
- THE WHITE “+2” lead is attached to the electrode on the anterior upper arm on the Biceps brachii, near the elbow.
- THE BROWN “-2” lead is attached to the electrode on the anterior upper arm on the Biceps brachii, above the +2 electrode.
- THE GREEN “C” lead (the ground) is attached to the electrode on the lower abdomen.
Exercise 1: EMGs During Simulated Arm Wrestling
Aim: To study the EMG activity in muscles that work while simulating winning or losing during arm wrestling.
Note: Only one of the participants will have the electrodes attached to his/her arm at a time. Each student must participate as subject in Exercises 1 and 2. You may share data from the “between table” activity (Exercise 3).
Procedure
- Click Record and test the electrodes by:
- Making a tight fist and looking for corresponding EMG spikes on the upper Pronator teres screen
- Doing a bicep curl and checking for the bicep EMG on the lower Biceps brachii screen
- Type Neutral in the Mark box to the right of the Mark button. Click on the Mark button to label the recording. Instruct the subject to place his or her arm in the neutral position, while clasping the hand of the opponent.
- While the subject’s arm is in the neutral position, type Winning in the Mark box. When the subject pushes his or her opponent’s arm towards the table, click on the Mark button to label the recording.
- While the subject’s arm is in this position, type Neutral in the Mark box. When the subject returns his or her arm to the neutral position, click on the Mark button to label the recording.
- While the subject’s arm is back in the neutral position, type Losing in the Mark box. When the subject’s arm is pushed towards the table by the opponent, click on the Mark button to label the recording.
- Click the Stop button.
- Select Save As in the File menu, type a name for the file. Choose a destination on the computer in which to save the file, like your lab group folder. Designate the file type as *.iwxdata. Click on the Save button to save the data file.
Data Analysis
- Scroll through the recording and find the section of data recorded while the subject was simulating arm wrestling.
- Click on the Analysis window icon in the LabScribe toolbar.
- Look at the Function Table. The mathematical functions, Abs. Int. and T2-T1 should appear in this table.
- Absolute Integral is the measurement of the total area under the EMG curve and is linearly proportional to strength of muscle contraction. T2-T1 is the time measured in the same region as Abs. Int. in this experiment.
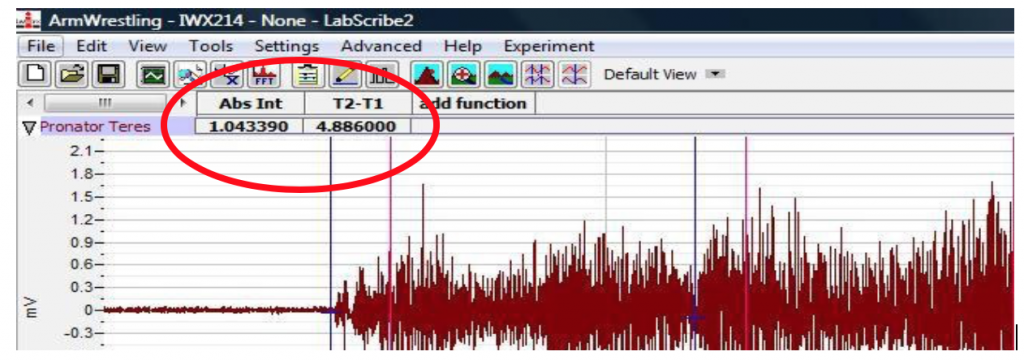
5. Use the mouse to click and drag the double cursors to the onset and offset of the WINNING EMG burst (including both the pronator and biceps EMGs) during the first “winning” cycle (Methods figure 3).
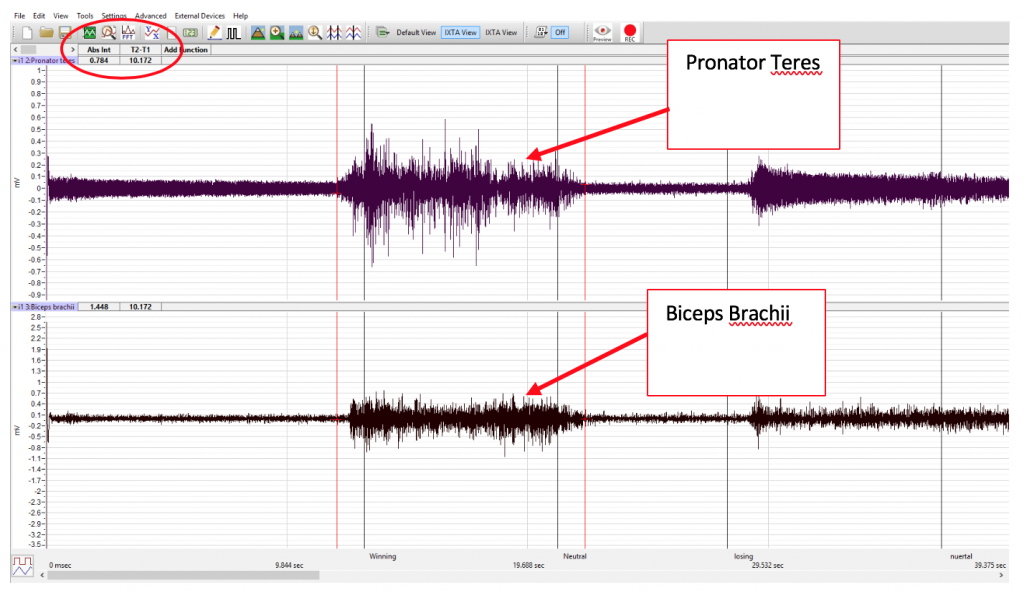
6. Record T2-T1 and the Abs Int values for each muscle on your data table.
7. Use the mouse to move the cursors to onset and offset of the LOSING EMG burst (while the subject was “losing” at arm wrestling). Record the values for Abs. Int and T2-T1 from both muscles while “losing”.
Exercise 2: EMGs During an Arm Wrestling Match
Aim: To study the EMG activity in muscles that work while winning or losing during an arm wrestling match.
Only one of the participants will have the electrodes attached to his/her arm at a time.
What are the rules for Arm Wrestling?
- Start square to the table.
- Keep both feet on the ground with out bracing your foot or legs against any solid object.
- Elbows should be bent and against the wrestling surface (table).
- Grip opponent’s hand.
- Do not touch your body to your hand.
- On the command “Start Wrestling” begin the Arm Wrestling Match.
- Stay in the seated position throughout the entire match.
- Once the match is completed, Wrestlers should remain in the “Finished” position for measurement of the angles of the arms in both the Winner and Loser
Note: at the end of the match, ask opponents to hold their relative winning/losing positions in order to measure the arm angle with the goniometer.
To start: record the circumference of the upper arm (biceps) and forearm (pronator) for each opponent by using a tape measure and wrapping it around the broadest area of the arm.
Procedure
- Use the same experimental setup used in Exercise 1.
- Instruct the subject to rest his or her forearm, with the electrodes, on a flat surface.
- Have the participants clasp hands and get ready to arm wrestle.
Note: The person operating the computer needs to know when the subject’s arm moves from a winning position to a losing position and back again. One student should act as the “spotter” and call out “Winning or Losing.” The computer operator can simply type in W or L to indicate. This can occur relatively quickly, and some matches can be over in less than a minute.
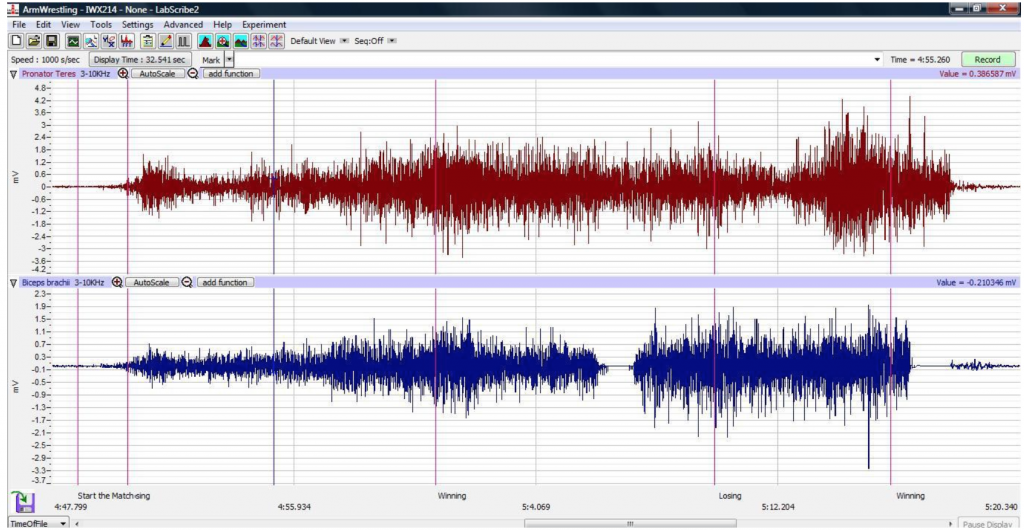
- Click Record. Instruct the subjects to begin arm wrestling at any time after the Record button has been clicked. Mark the recording “Start Wrestling”.
- Record the EMG activity from the muscles of the arm while the subject is winning or losing during the arm wrestling match. Mark the recording appropriately when the subject’s arm changes from a winning or losing position (Methods Figure 4).
- The match is over when the subject either pins his opponent’s arm to the table or gets pinned by his/her opponent.
- When the match is over, click Stop to halt the recording. While the opponents remain in their winning/losing position, measure the angle made by the forearm and upper arm with the goniometer.
- Select Save in the File menu.
Data Analysis
- Scroll through the recording and find the section of data recorded while the subject was arm wrestling his/her opponent.
- Use the same procedures used in Exercise 1 to measure and record the Abs. Int and T2- T1 from each muscle while winning or losing the match.
- Record the values in TABLES 1 and 2 of your Lab Report.
- Select Save from the File menu.
Exercise 3: Winning Arm Wrestlers “Smack Down Match” Between Tables
Now a winning arm wrestler from each table will wrestle another table. Due to equipment upkeep concerns, for this exercise, only one of the arm wrestlers from the two tables needs to be connected to electrodes. The two tables should share the data for the wrestler whose data is recorded.
To start: record the circumference of the upper arm and forearm for each opponent by using a tape measure and wrapping it around the broadest area of the arm. When the match is over, be sure each opponent holds his/her winning or losing arm position to record the angle of the arms.
Use the same instructions from Exercise 2.
During the match, spotters should tell the computer operator whether the recorded opponent is Winning or Losing so it can be marked on the data.
- Record the Winning and Losing EMG values for one wrestler, and record arm sizes, and final elbow angles from both participants for this experiment (again, tables should share their data).
- Record data in Tables 1 and 3 (BETWEEN TABLES).
- Once the match is complete, measure the Abs. Int. and the T2-T1 for both muscles and report this data in the Lab Report.
Please cite:
Haen Whitmer, K.M. (2021). A Mixed Course-Based Research Approach to Human Physiology. Ames, IA: Iowa State University Digital Press. https://iastate.pressbooks.pub/curehumanphysiology/
- Access more at https://openstax.org/books/anatomy-and-physiology/pages/1-introduction Section URL: https://openstax.org/books/anatomy-and-physiology/pages/10-3-muscle-fiber-contraction-and-relaxation ↵
