
Part One. AutoCAD
Chapter 7. Symbols and prints
Upon completing this session, students will be able to:
- (CO 1) Add/Edit symbols in Paper spaces – drawing title, elevation symbol and section letters, north arrow
- (CO 2) Printing
 Session Highlights
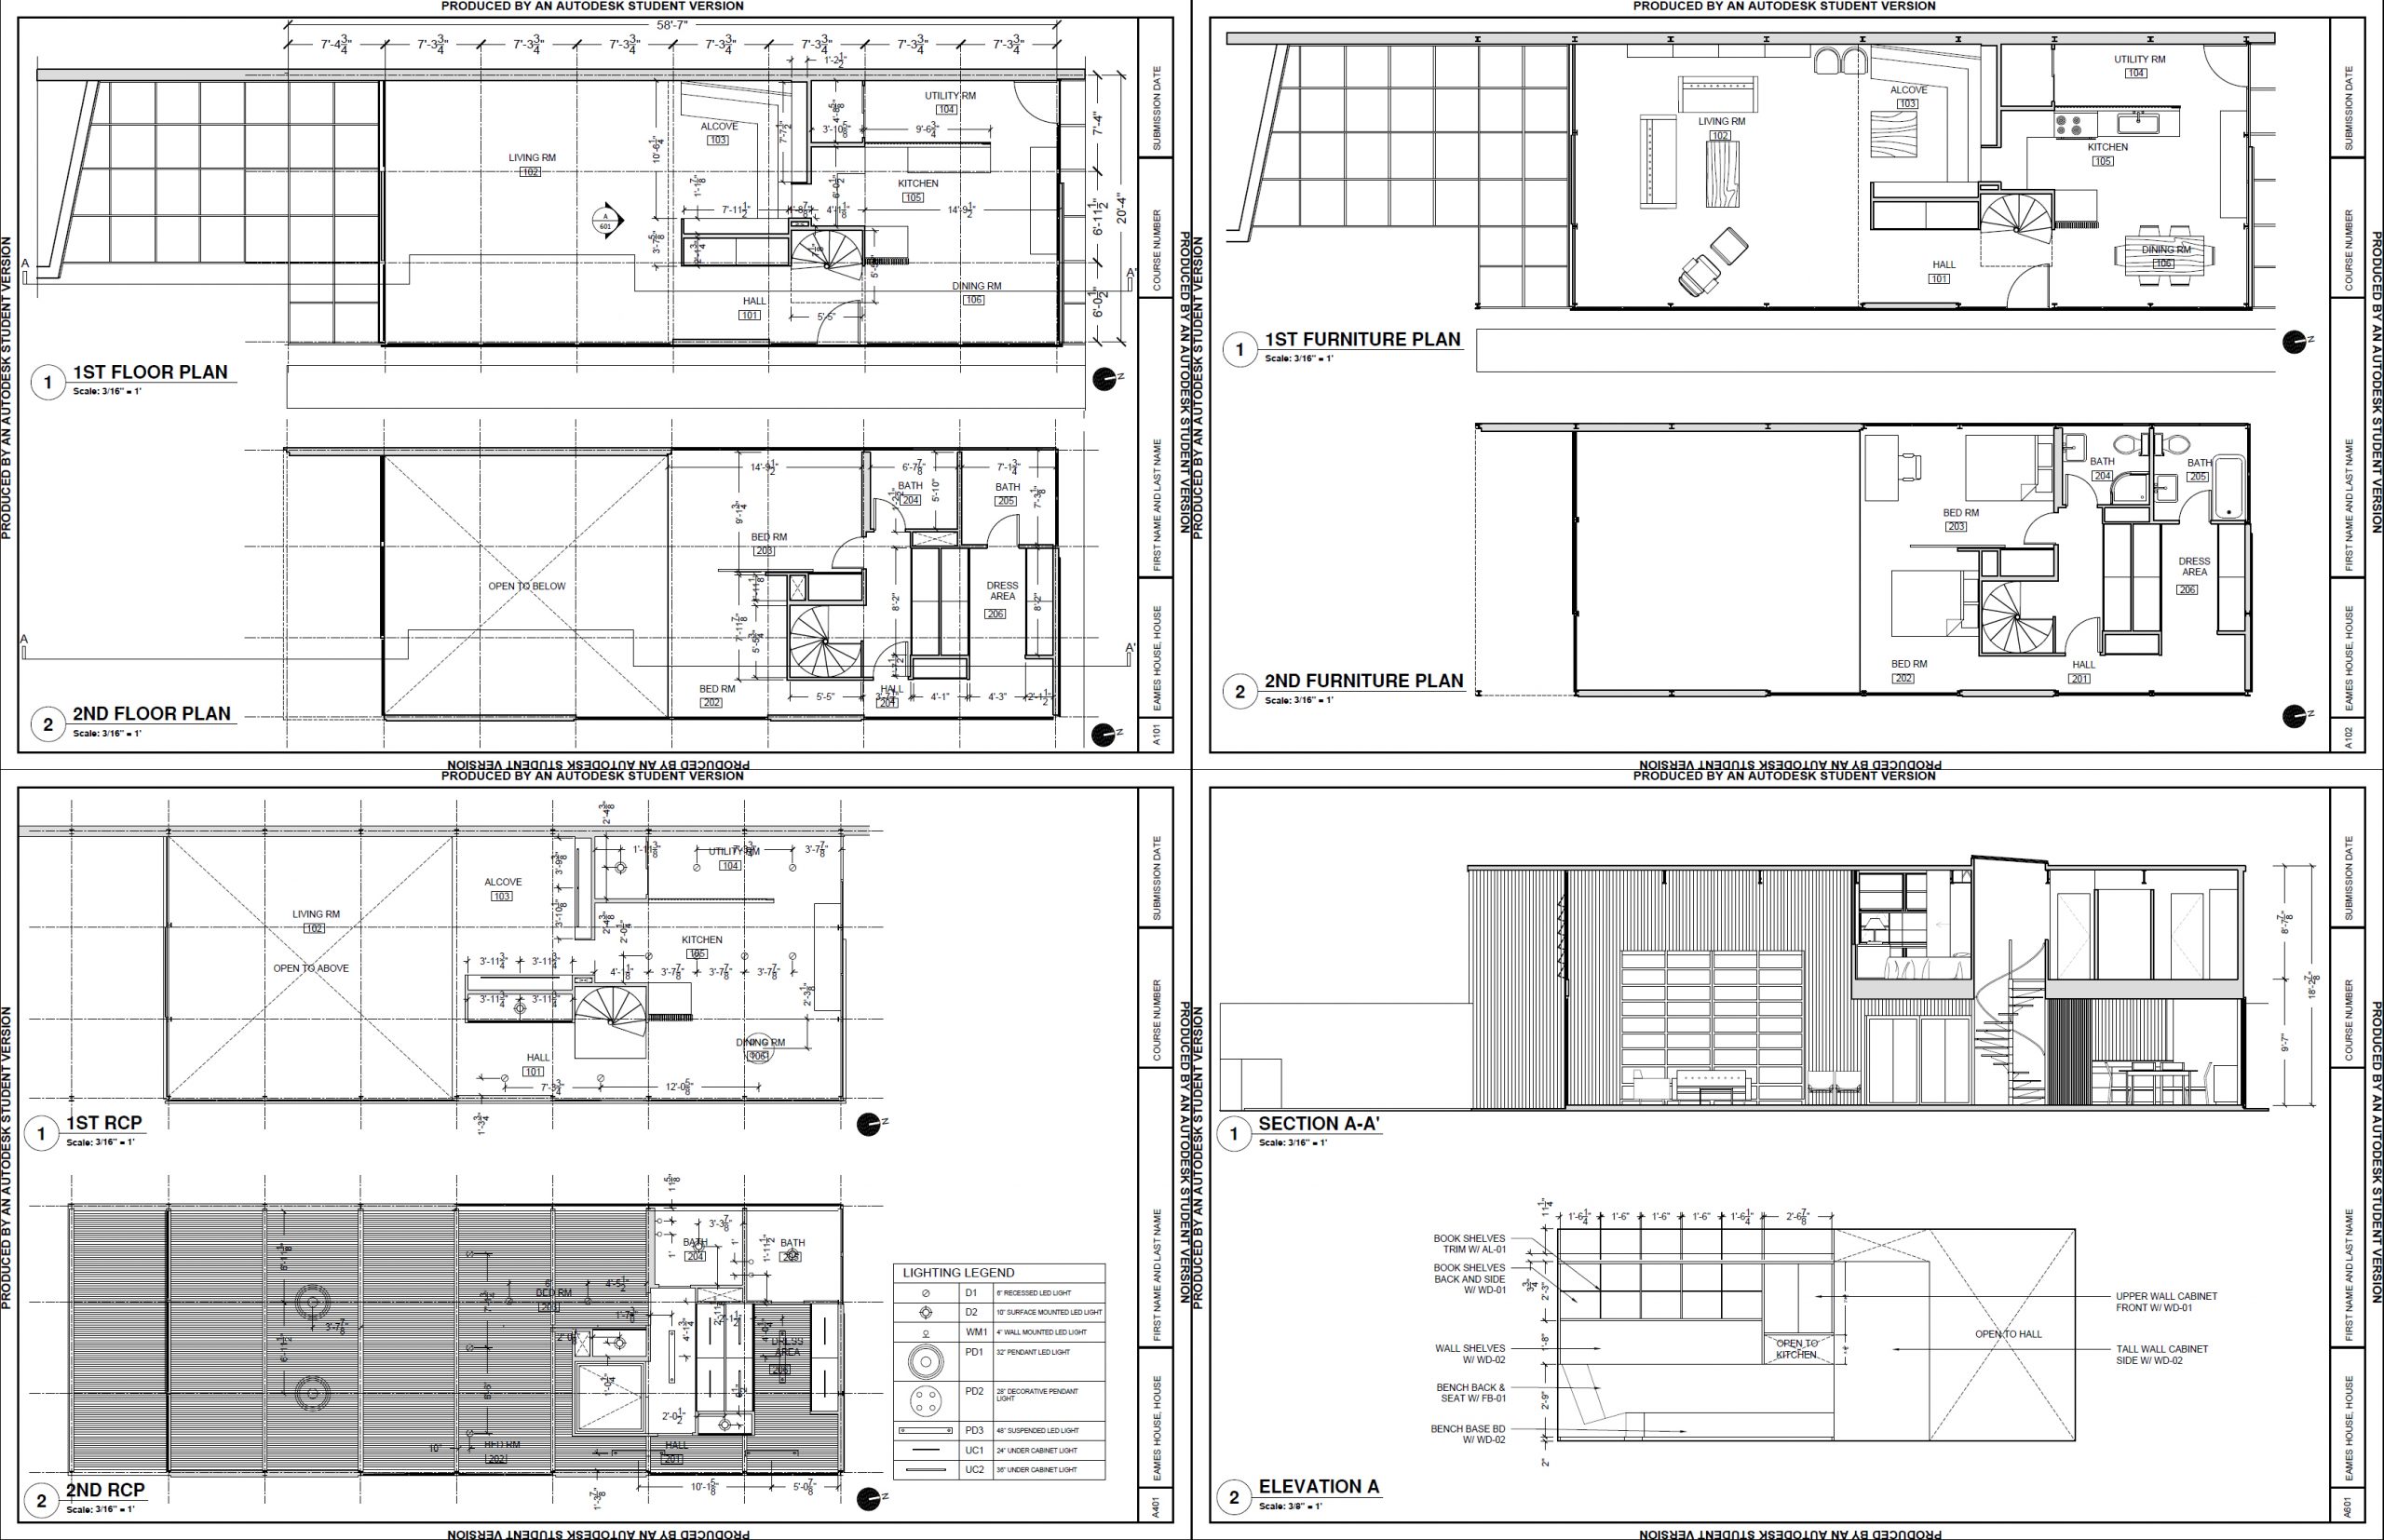
At the end of the session, students can create the graphics below.
 Lecture Contents
(CO 1) Add/Edit symbols in Paper spaces- drawing title, elevation symbol and section letters, north arrow
Open your AutoCAD file.
Add drawing title and scale for Floor plans, Furniture plans, RCPs, Section view, and elevation
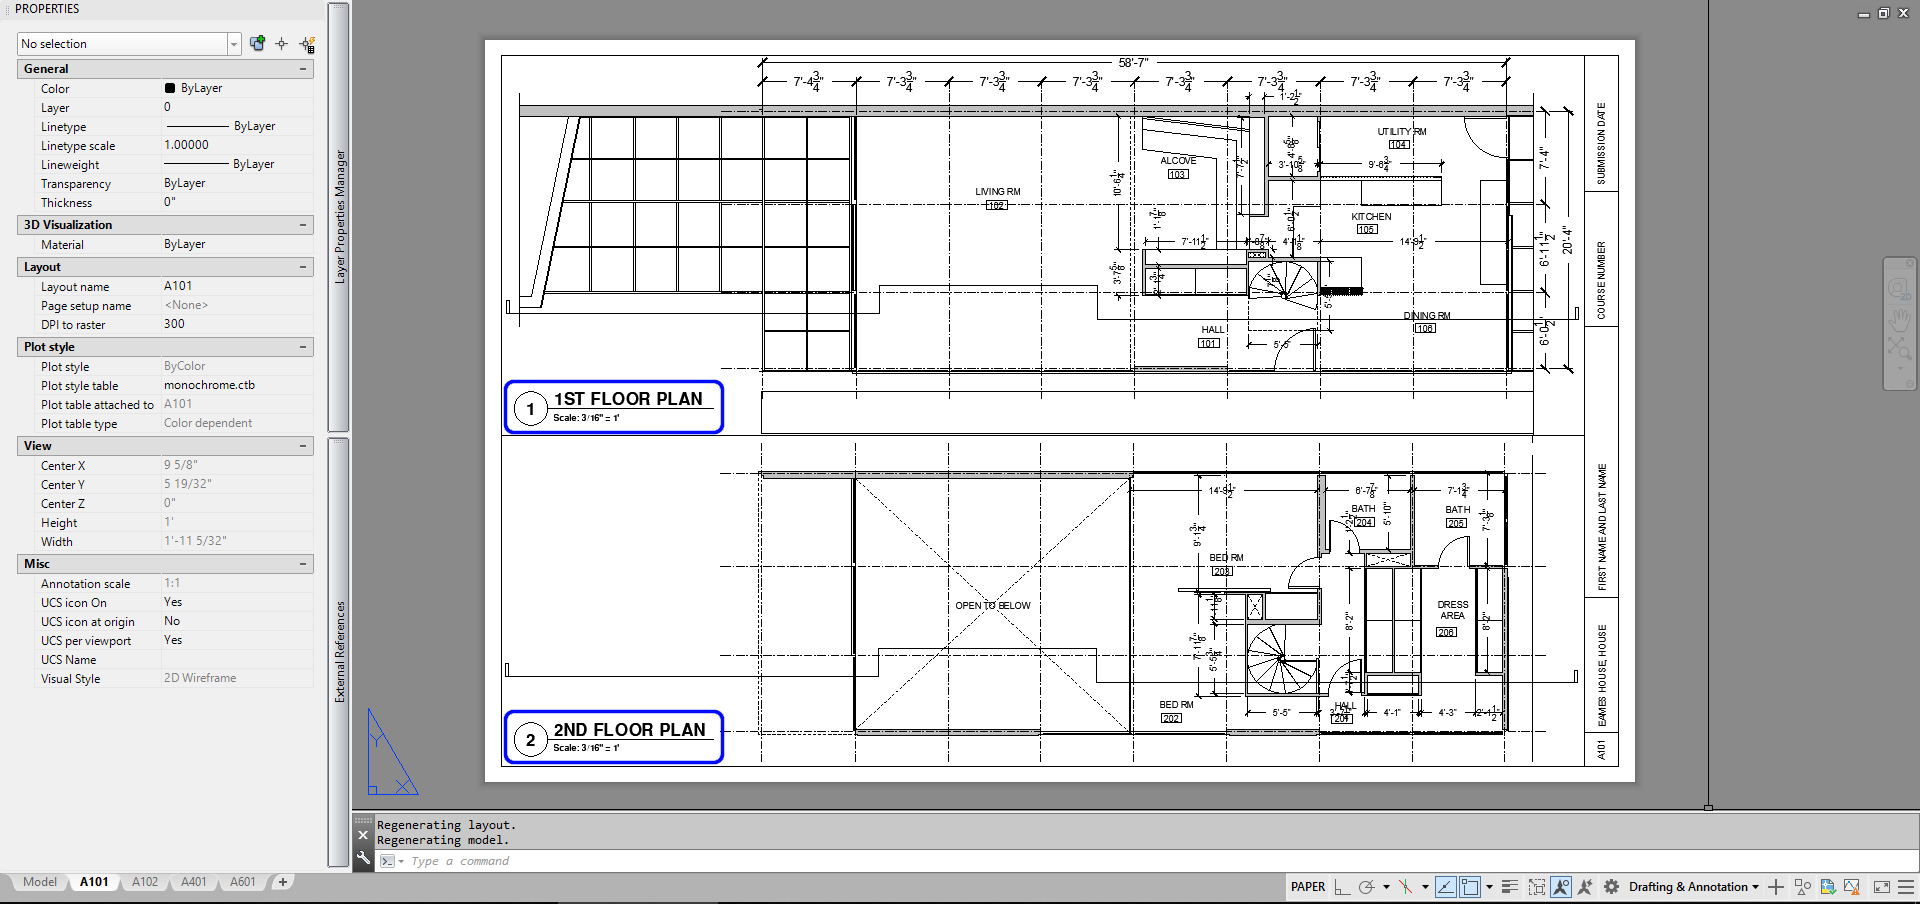
- [STEP 1] Click [A101] sheet to open the view
- [STEP 2] Open [DESIGN CENTER]
- [STEP 3] Find [A-01.dwg] for a sample drawing title
- Click the [HOME] icon
- Open [Sheet Sets] > [Architectural] > [A-01.dwg]
- Open [Blocks]
- Double click [Drawing Title]
- [STEP 4] Add on the sheet
- [STEP 5] Double-click the inserted drawing title and edit the attribute. Adjust the title line length
- [STEP 6] Copy the edited drawing title for the 2nd-floor plan and double-click to edit the drawing title
- [STEP 7] Repeat [STEP 6] for other drawings
- [STEP 8] Update the drawing titles to the [A-ANNO] layer
Add an elevation symbol from [TOOL PALETTES]
- [STEP 1] Open [TOOL PALETTES] from [VIEW] tab, on [PALETTES]
- [STEP 2] Click [Annotation] tab from [TOOL PALETTES]
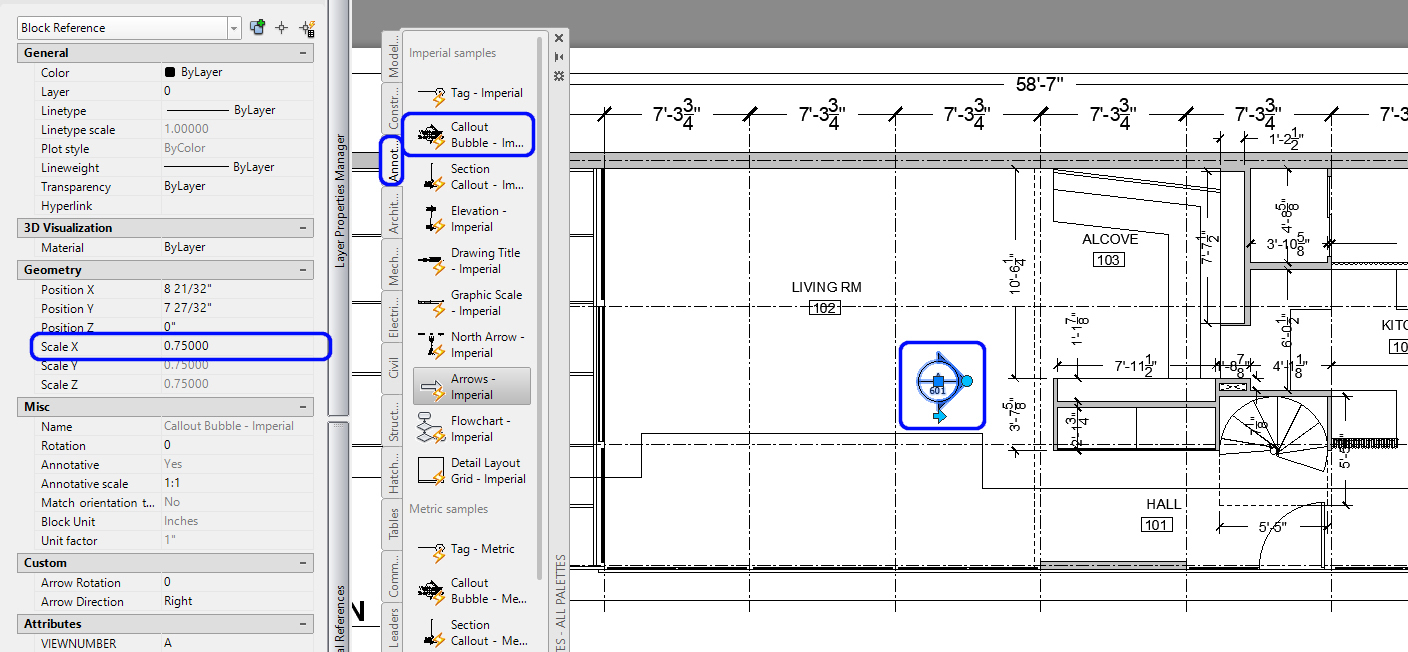
- [STEP 3] Select [CALLOUT BUBBLE – IMPERIAL]
- [STEP 4] Add the symbol on the first floor
- [STEP 5] Double-click to open the attribute editor, and update information
- [STEP 6] Update scale to 0.75
- [STEP 7] Update the symbols to the [A-ANNO] layer
Add section letters with [MTEXT]
- [STEP 1] Type [MT], press [ENTER] key
- [STEP 2] Draw a text box to add the section letter
- [STEP 3] Text size update to 1/8”
- [STEP 4] Add section letter
- [STEP 5] Repeat this process for other sections
- [STEP 6] Update section letter to [A-ANNO] layer
Add north arrow with drawing tools [LINE], [CIRCLE], [MTEXT], & [HATCH]
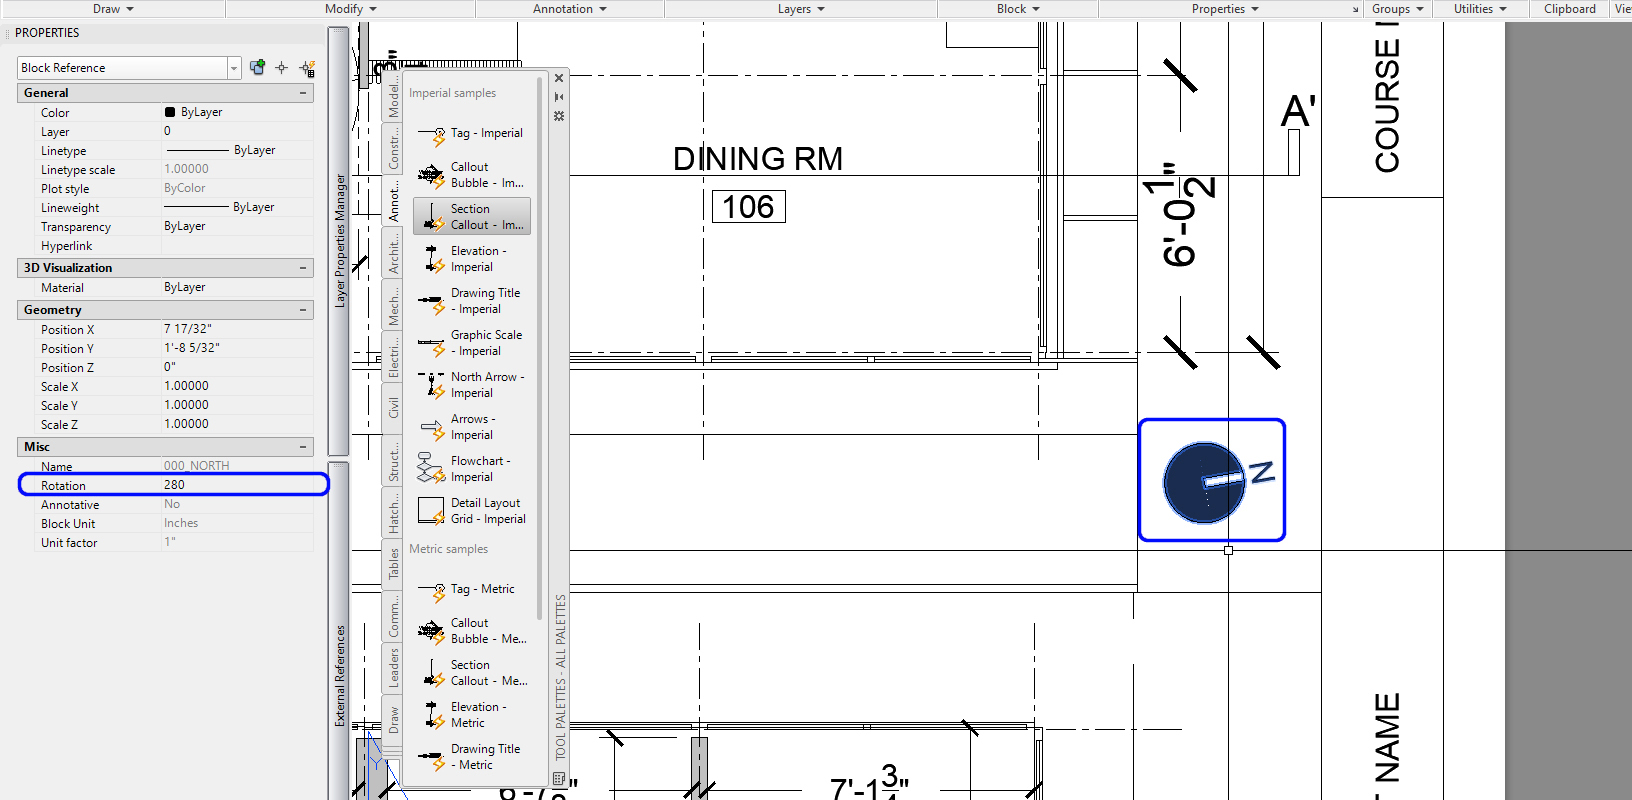
- [STEP 1] Draw a north arrow in the paper space and make a block
- [STEP 2] Rotate the north arrow to match the information from Eames House plan images
- [STEP 3] Place the north arrow to Floor plans, Furniture plans, RCPs
(CO 2) Printing
Update the print setup for each layout
- [STEP 1] Open [PAGE SETUP MANAGER] by mouse right-click on each layout.
- [STEP 2] Click [Modify] to open [Page setup]
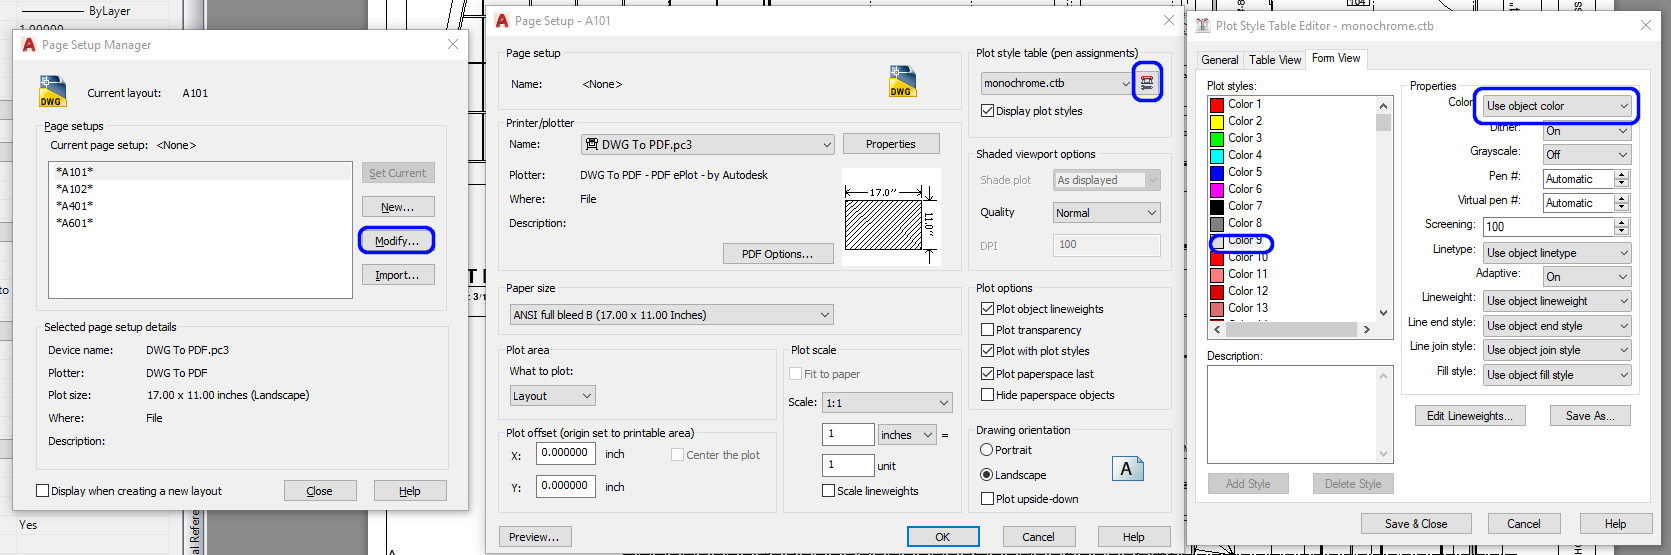
- [STEP 3] Plot style table is already set to Monochrome.ctb. The Monochrome style turns all layer colors to black. Since we don’t want our wall, floor, and ceiling thickness to be black, we need to customize the plot style.
- [STEP 4] Click the edit button next to the name
- [STEP 5] Click [Color 9] from [PLOT STYLES] and change to [USE OBJECT COLOR]
- [STEP 6] Click [SAVE & CLOSE]
- [STEP 7] If the color is not changed automatically on your paper space, use the [REGEN] command for the views.
Print a single sheet
- [STEP 1] Click a layout that you want to print
- [STEP 2] Press [CTRL+P] to open [PLOT]
- [STEP 3] Click [PREVIEW] from the [PLOT] window
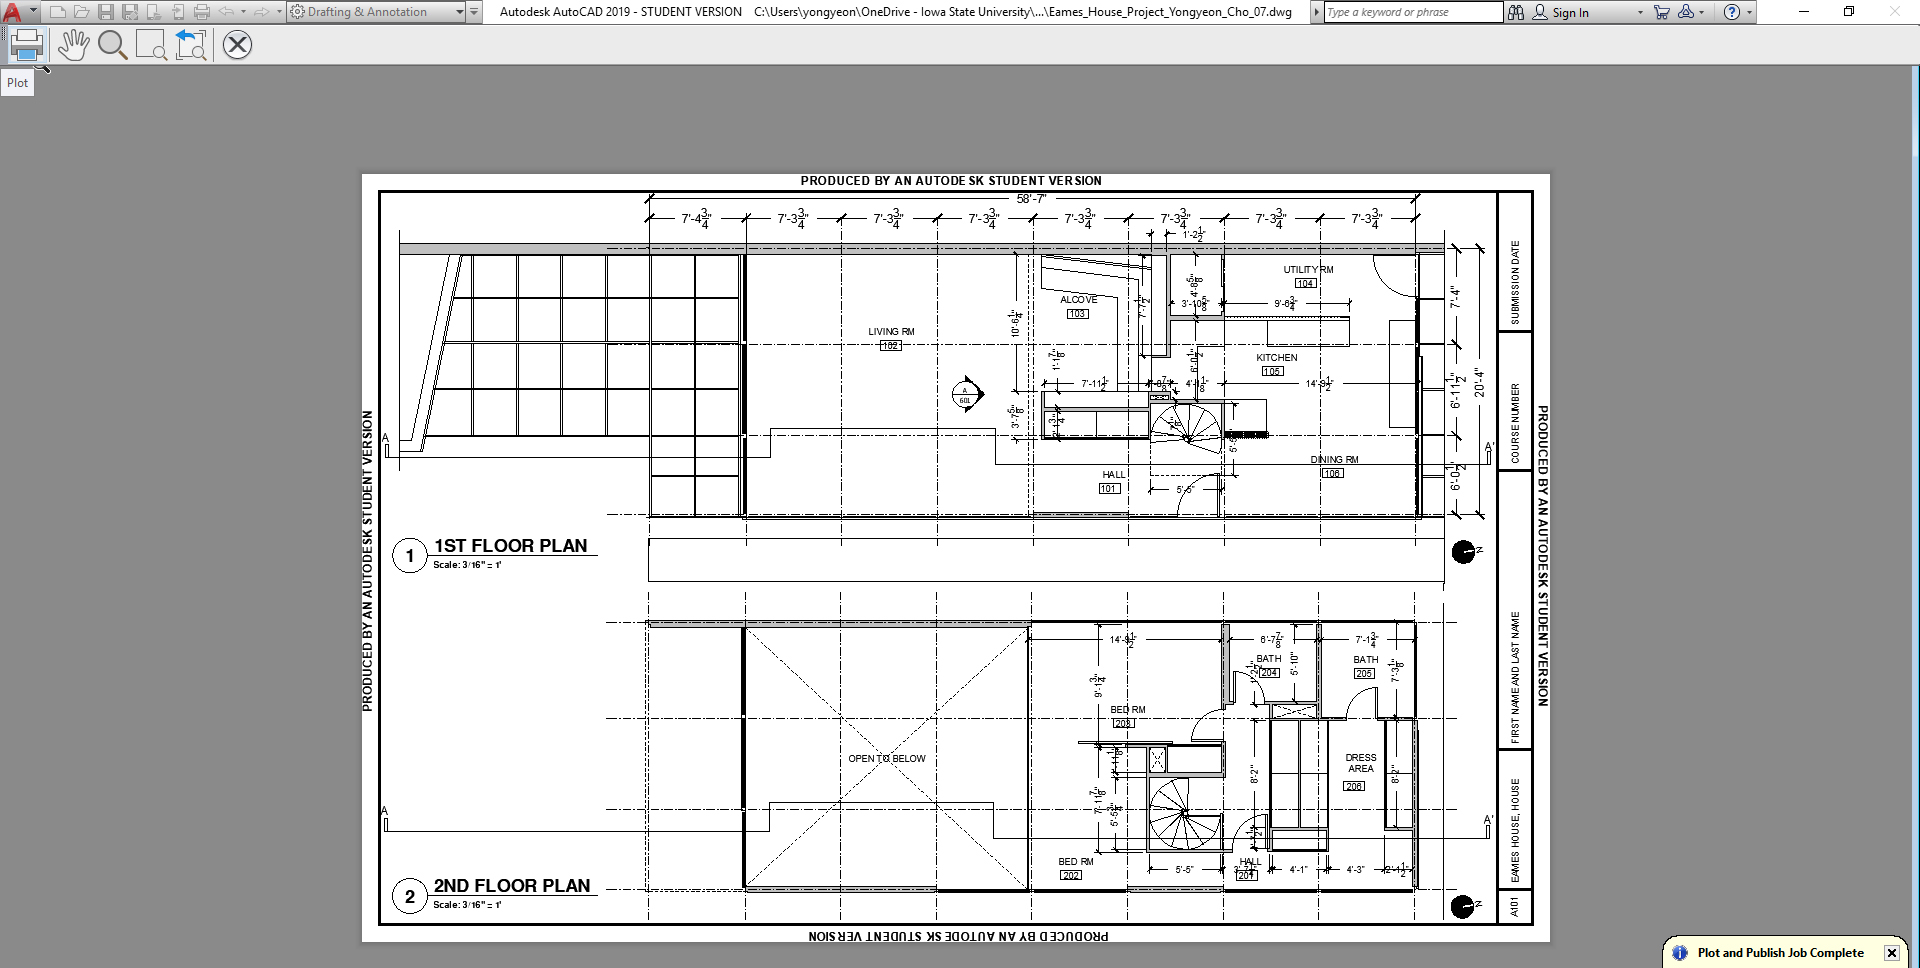
- [STEP 4] Click [OK] > find a location to save > click [SAVE]
Print multiple sheets at once
- [STEP 1] Click [Home] button > Select [Publish] to open [PUBLISH] window
- [STEP 2] Select the drawing model if it shows, and mouse right-click > click [Remove]
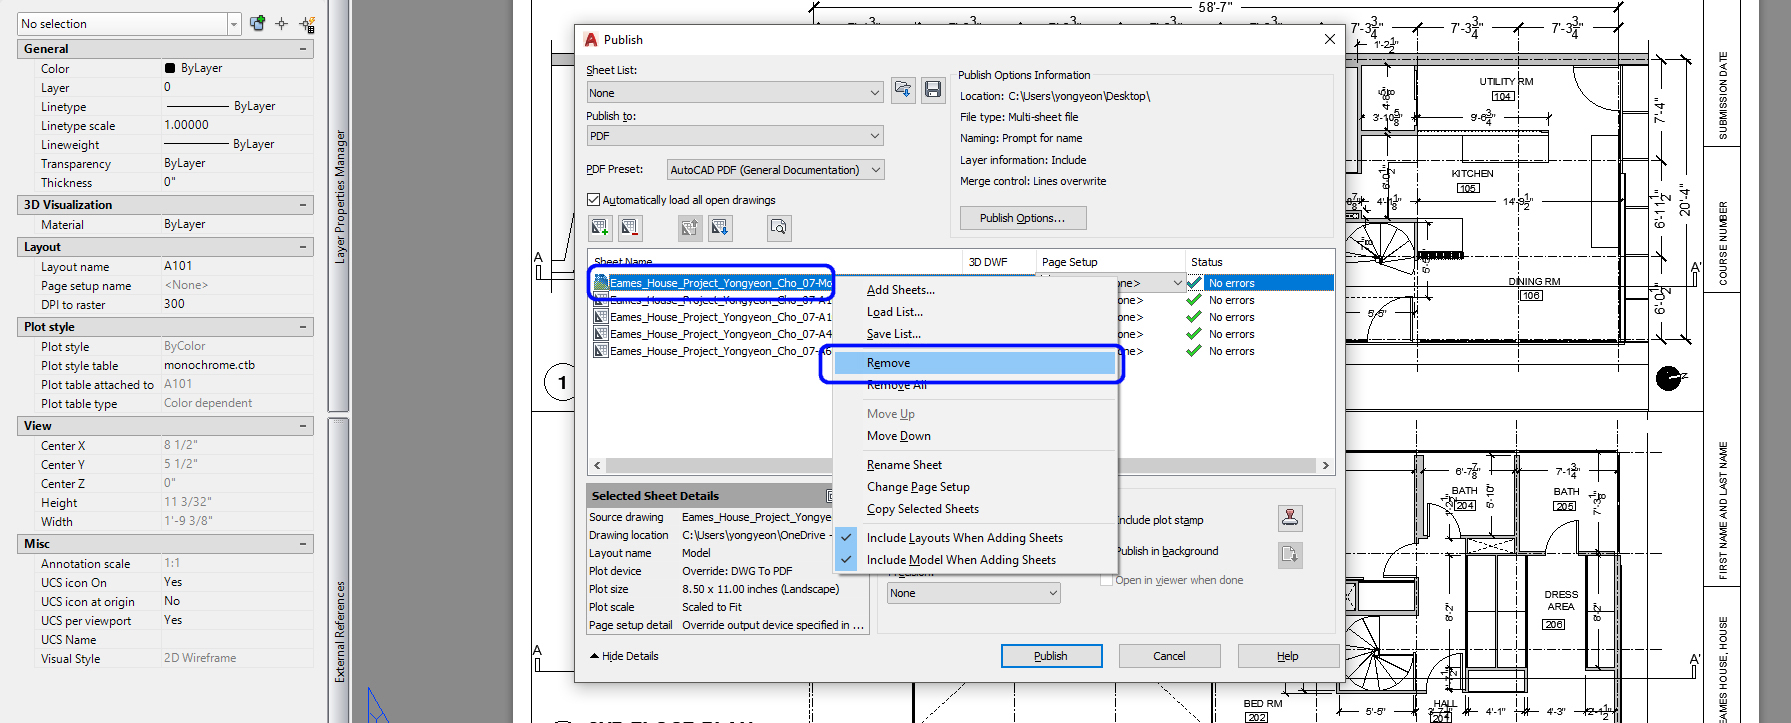
- [STEP 3] Click [PUBLISH]
- [STEP 4] Specify the file location to save > click [SELECT]
- [STEP 5] If you want to save the current list of sheets for later use, click [Yes]
- [STEP 6] Click [close], once a processing background job window popup
- [STEP 7] Wait until the completion message comes

SAVE the file before closing the application.
Save in a different location for the backup (e.g., a cloud folder)
