
Part Four. Advanced Rendering
Chapter 15. Vray for Sketchup
Upon completing this session, students will be able to:
- (CO 1) Be introduced to VRAY
- (CO 2) Understand Vray render and camera settings
- (CO 3) Understand Vray material settings
- (CO 4) Understand Vray lighting settings
- (CO 5) Understand the Final render and save the image
 Session Highlights
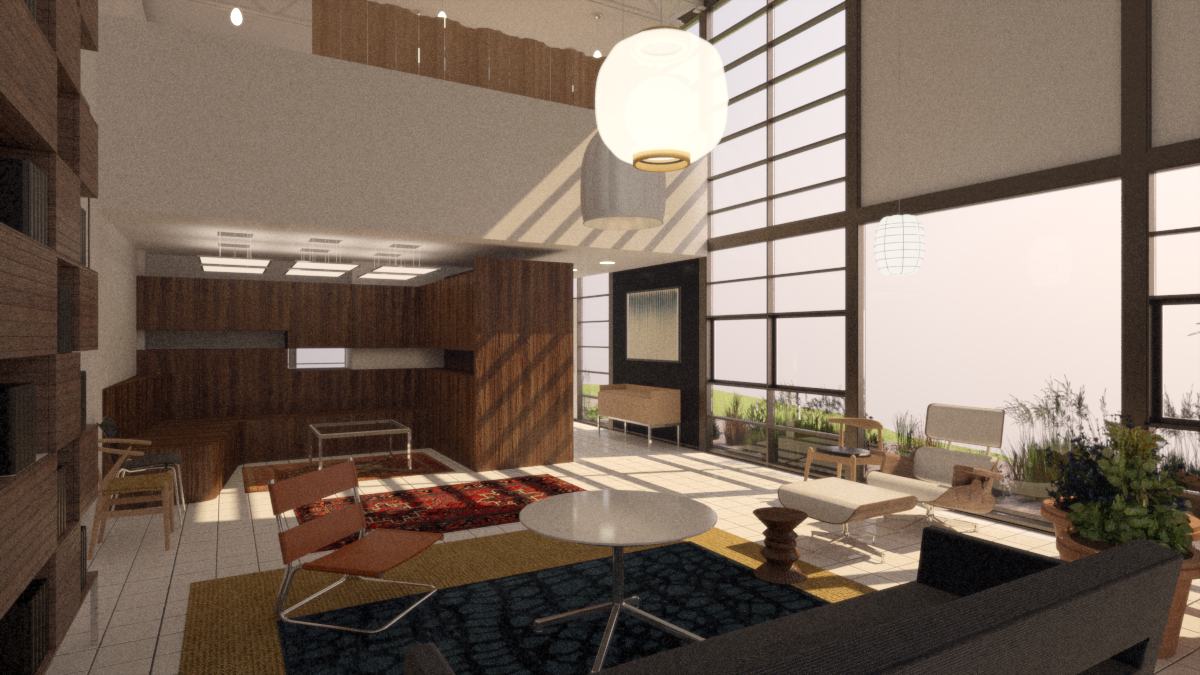
At the end of the session, students will be able to create the graphics below.
 Lecture Contents
(CO1) Be introduced to VRAY
V-RAY is a computer-generated render plug-in for 3D computer graphics software (3Ds Max, Revit, Rhinoceros, SketchUp, & more). This application is used for video game production, industrial design, product design, architecture, and the interior design industry.
Chaos Group developed V-RAY in 1997. This rendering engine uses Global Illumination algorithms, including path tracing, photon mapping, irradiance maps, and directly computed global illumination.
Watch these Quick Start Tutorials from ChaosTV.
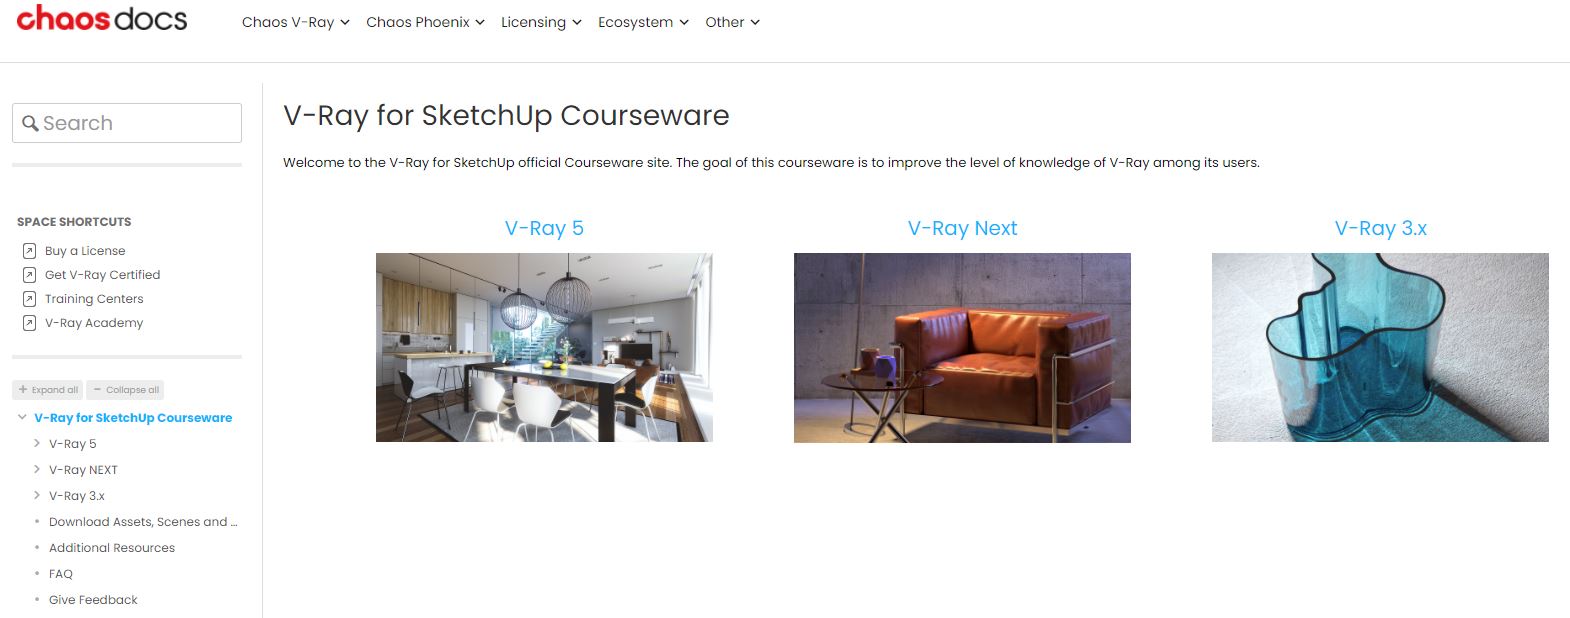
For additional resources, please refer to the V-Ray for SketchUp Courseware site.
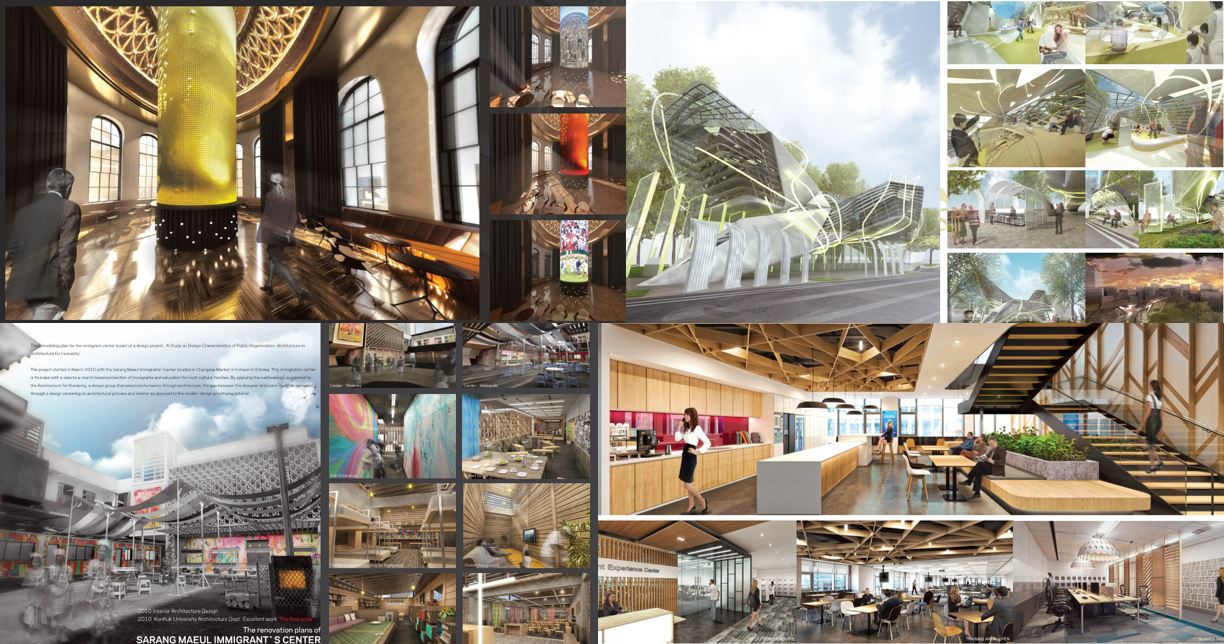
Rendering Examples
V-RAY trial installation for one month
You may be able to download and use the trial version for one month after you purchase the trial version via the Chaosgroup website.
- [STEP 01] Go to Chaosgroup website
- [STEP 02] Sign up Chaosgroup if you don’t have an account, then Log in to the website
- [STEP 03] Click TRY on the top right corner of the screen
- [STEP 04] Click Download V-Ray for SketchUp trial
- [STEP 05] Select and download V-Ray for your appropriate SketchUp version
- [STEP 06] Open Sketchup and Confirm Extensions
Watch this video guide: How to Download and Install V-Ray for Sketchup Pro – Easy, Quick, Free Trial Version by jbdtube.
(CO2) Understand Vray render and camera settings
Before you start to render using V-Ray, please watch this video to learn how to ready your SketchUp model.
To learn more about the key steps, please watch this video as well: The Key Steps to Rendering Interiors with V-Ray for SketchUp
V-RAY interface in SketchUp
For more information about the interface – refer to this V-Ray Sketchup Interface guide
- Toolbar
 This toolbar includes the most commonly used tool for users. There are three floating toolbars in version 3.
-
- V-Ray for SketchUp – Asset Editor, Render button, Realtime render button, Batch Render, Show Frame Buffers, lock the scene for real-time render
- V-Ray Lights
- V-Ray objects
- Asset Editor

Asset Editor is the most frequently used interface that you will work with. You can create, save, open, and adjust the settings in this window.
- You can deal with materials, lightings, objects, and render settings. Also, you can start to render and open frame buffers to see the results.
To open the material library, click a small arrow on the left side of the material Asset Editor.
To open advance edit mode, click a small arrow on the right side of the Asset Editor.
- You can deal with materials, lightings, objects, and render settings. Also, you can start to render and open frame buffers to see the results.
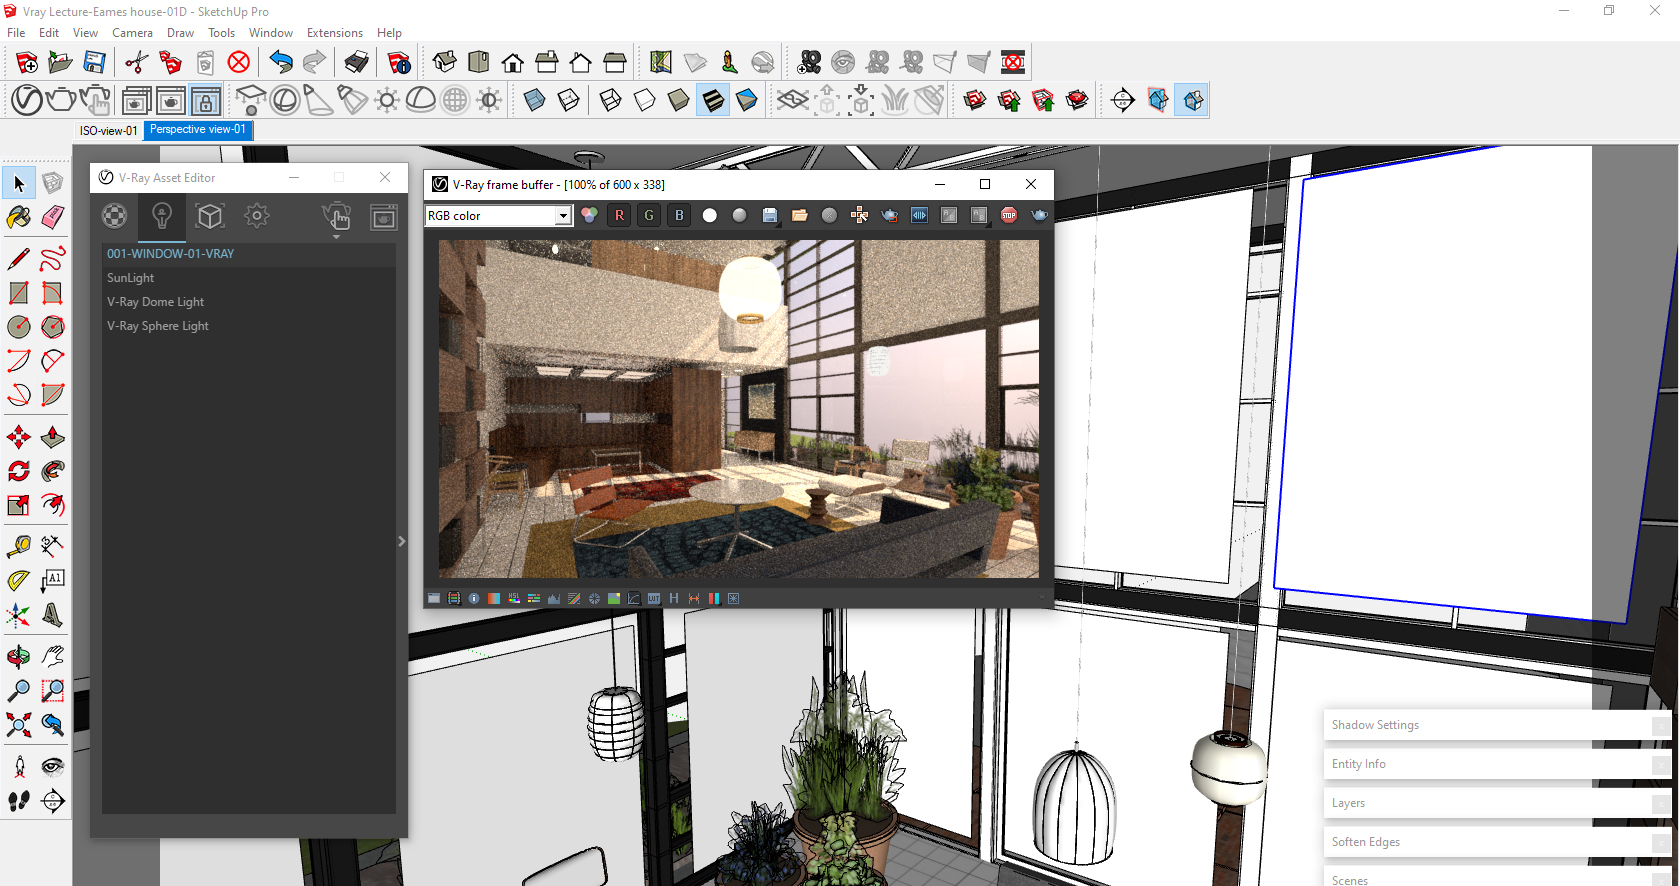
- Frame buffer
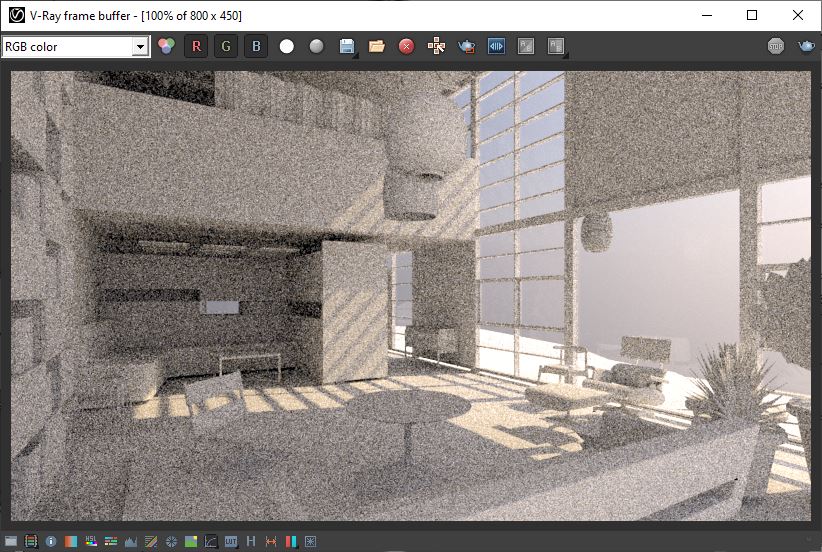
Frame Buffer window allows you to see the render process and result and save the render results in different image formats, such as JPG, PNG, TIFF, and more. Additionally, you can adjust the rendered image with various tools, like exposure level, white balance, hue/saturation, levels, and curve.
Render setting for a REALTIME V-RAY RENDER – a preview mode
How do we prepare your SketchUp model for a V-RAY rendering? It depends on your process of work. For example, if you directly build all of the models in the SketchUp file and apply the materials while modeling, you can use the V-RAY at any time, even at the beginning of the modeling. Using a completed Revit model for better rendering results, you can use V-RAY after building all of the models and then applying materials and lighting through V-RAY. This tutorial will demonstrate how you create a rendering based on the Eames House 3D model from the Revit model. I only added SketchUp Glass on the model. In the previous lecture, I showed how to import the Revit model to the SketchUp model and apply the SketchUp material. Please refer to the previous lecture for the information.
Download this file for your practice: Vray Lecture-Eames house-01A-Lecture ready.skp
- [STEP 01] Be ready for your SketchUp model for a rendering. You need to complete the 3D model in detail. The model can be completed from Revit or directly from SketchUp.
- [STEP 02] Set your camera view to render. It is always wise to set the camera view, a scene, first before rendering.
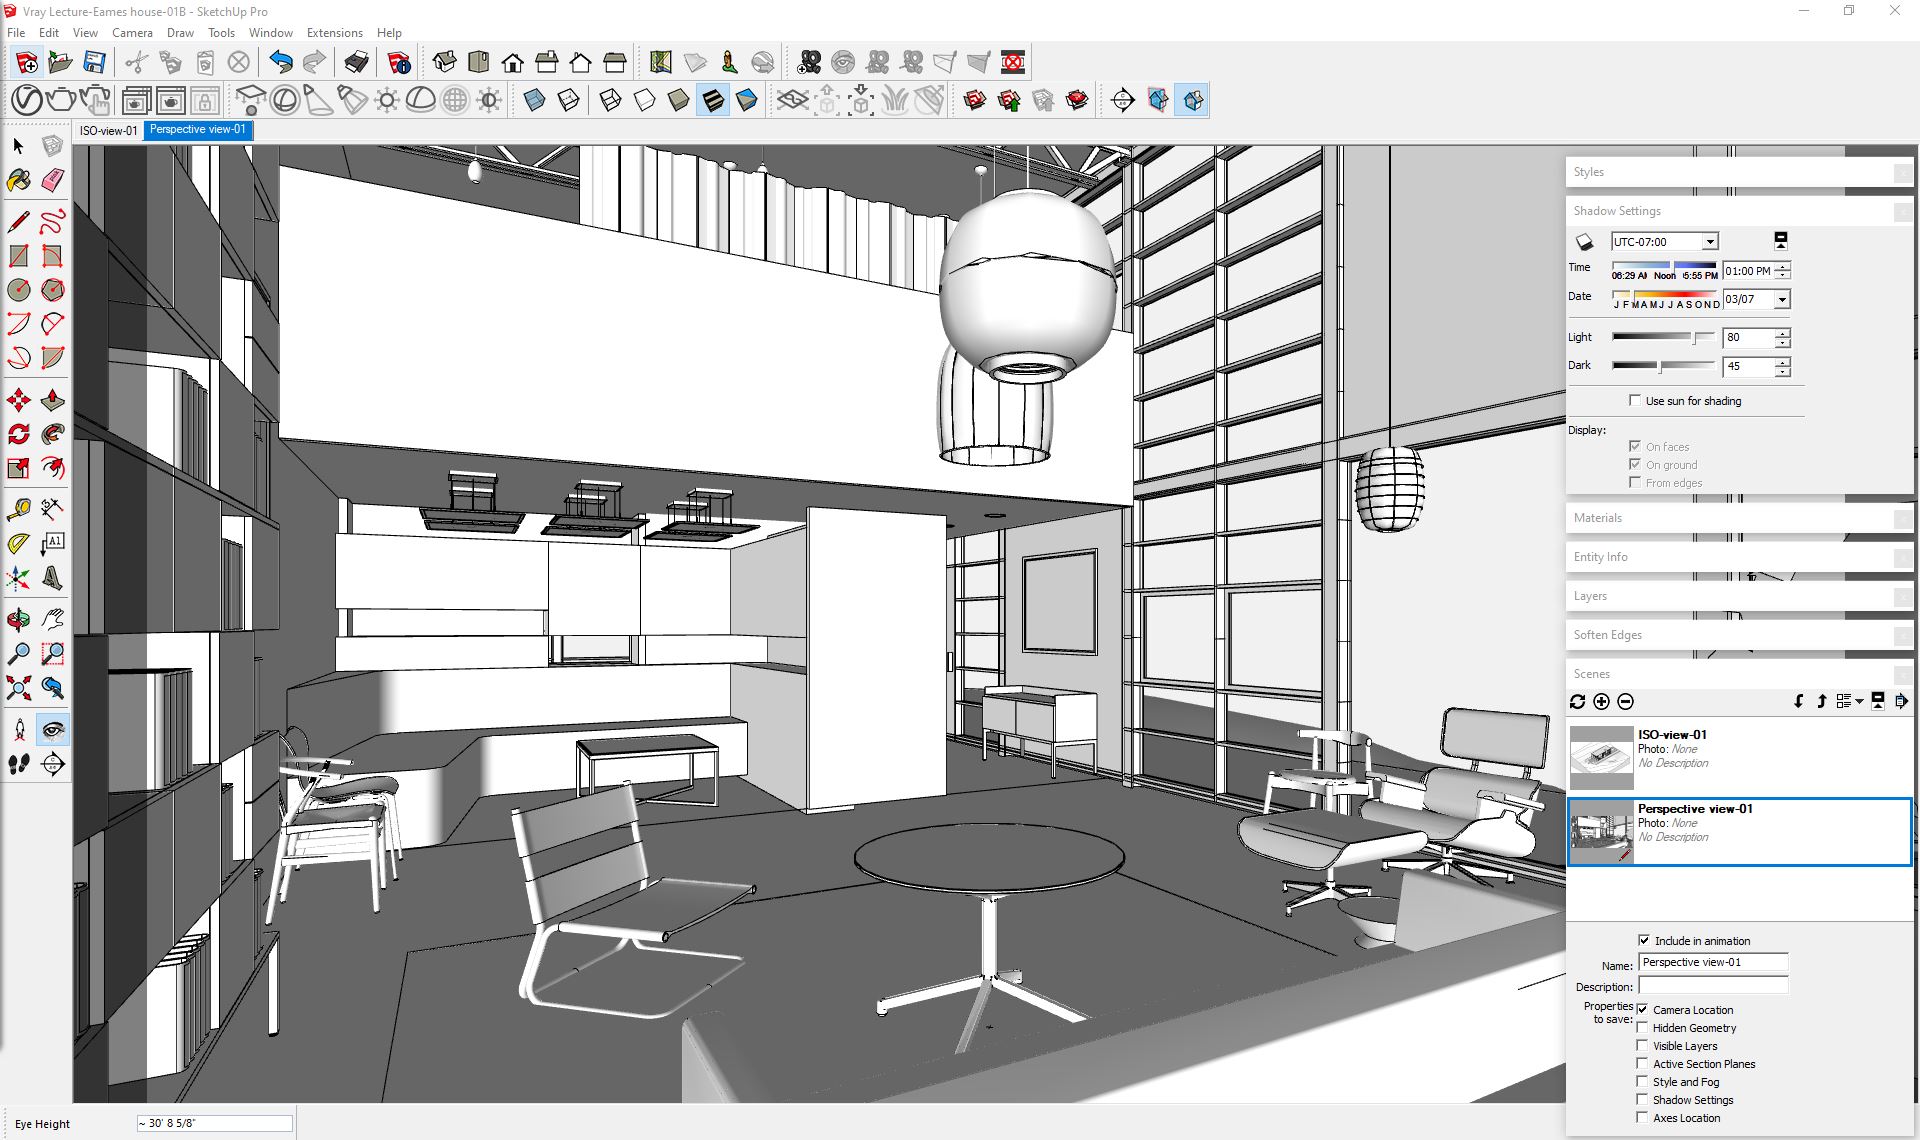
- To set the view, you can use [Position Camera], [Look around], and [walk] tools for the proper position of the view.
- Use the [Zoom] tool to set the right camera angle (typically, 50 degrees to 90 degrees, I prefer 72 degrees).
- You can use the [Two-point perspective] tool under the [Camera] menu to create the right camera angle. Most professional renders use a 2-point perspective for the final render to make all vertical lines straight up.
- Use [Add scene] under [View] > [Animation] to save the view. You can rename the scene by opening [Scene manager].
- Make sure your sun/shadow setting is what you want for the rendering.
- [STEP 03] Realtime render for a preview.
- Open [Asset Editor] from the toolbar.
- Click [Settings] on the [Asset Editor].
- Click [Render with V-RAY interactive], the icon with hand to start a real-time render.
- Make sure [Interactive] under Render is on.
- Click [Lock Camera Orientation] on the toolbar.
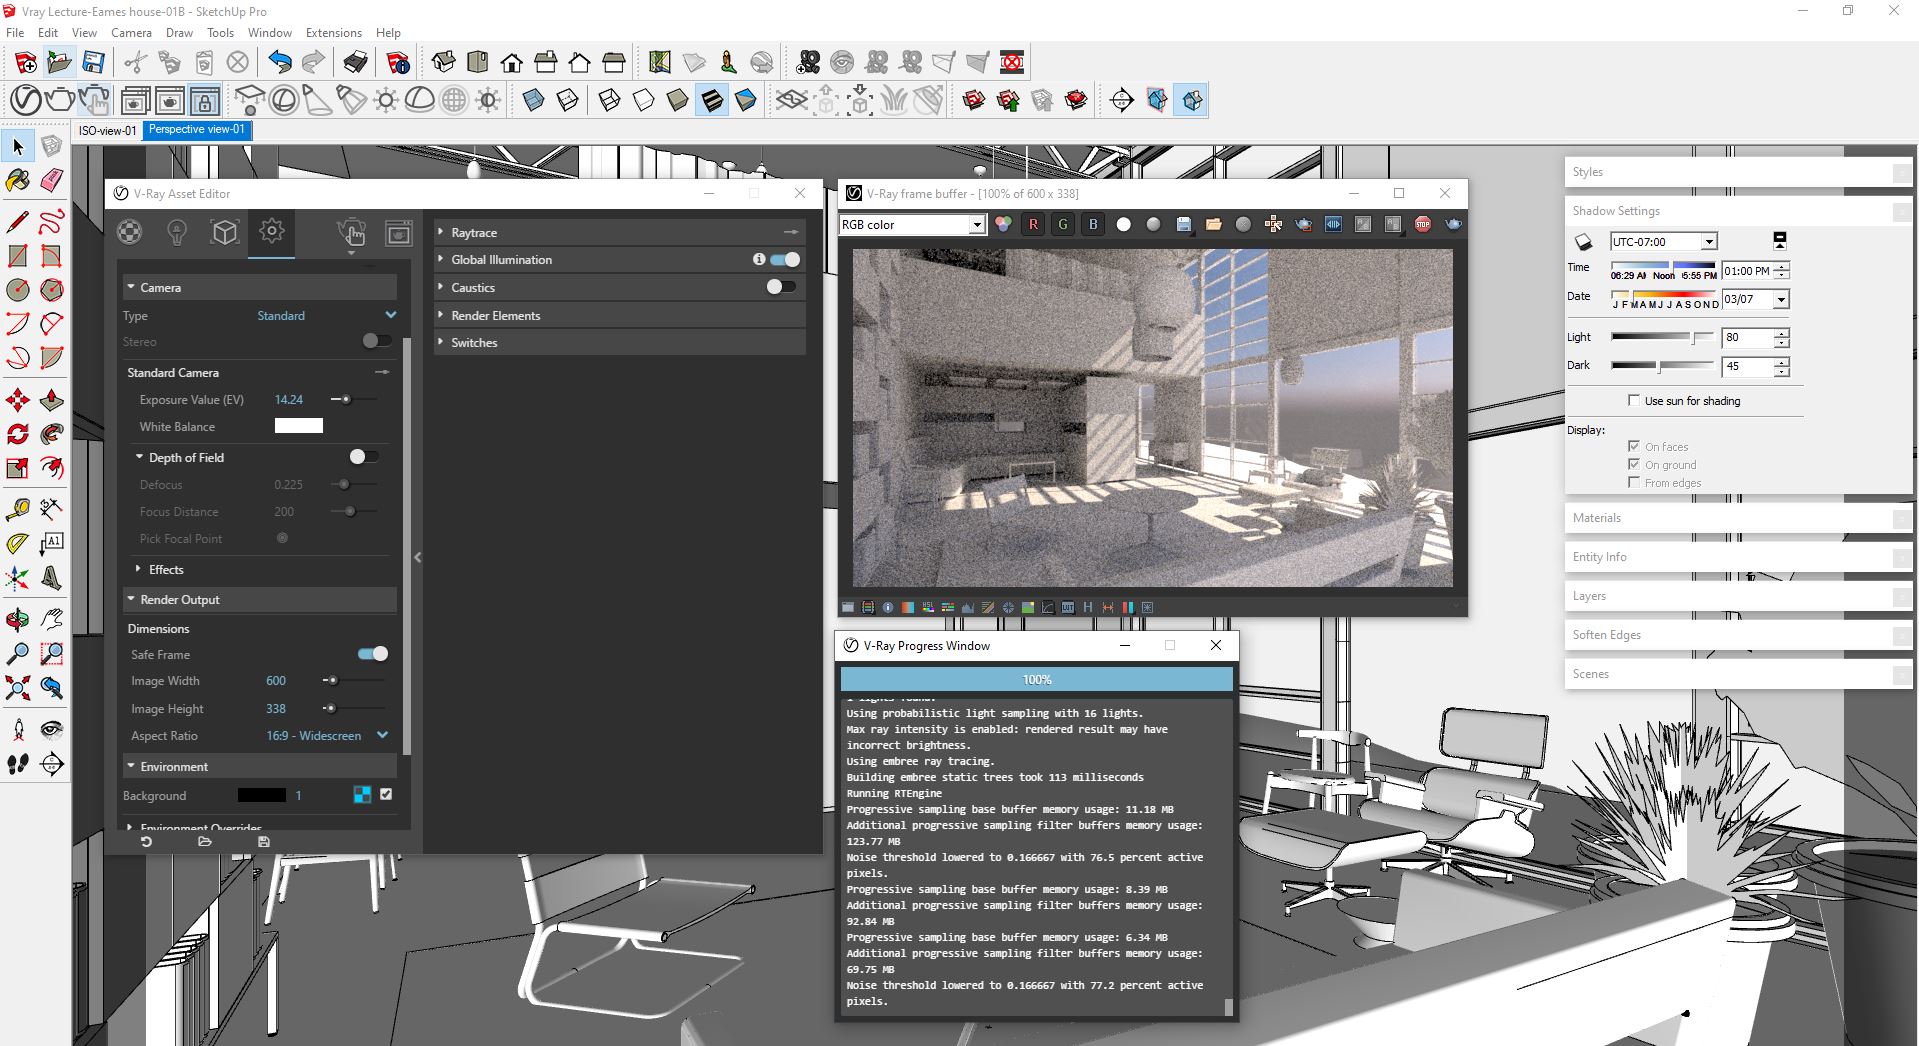
- Try to modify the render settings,
- Check [Safe Frame] is on.
- Exposure Value (EV) to be 14. It is for exterior or bright interior space. If it is a night view or dark interior space, use 9.
- Adjust White Balance – if you want the warm color of the image, add blue-ish color.
- Adjust Vignetting – 0.3 – not to make too much of this effect.
- Render Output to 600X338 to save the preview render time.
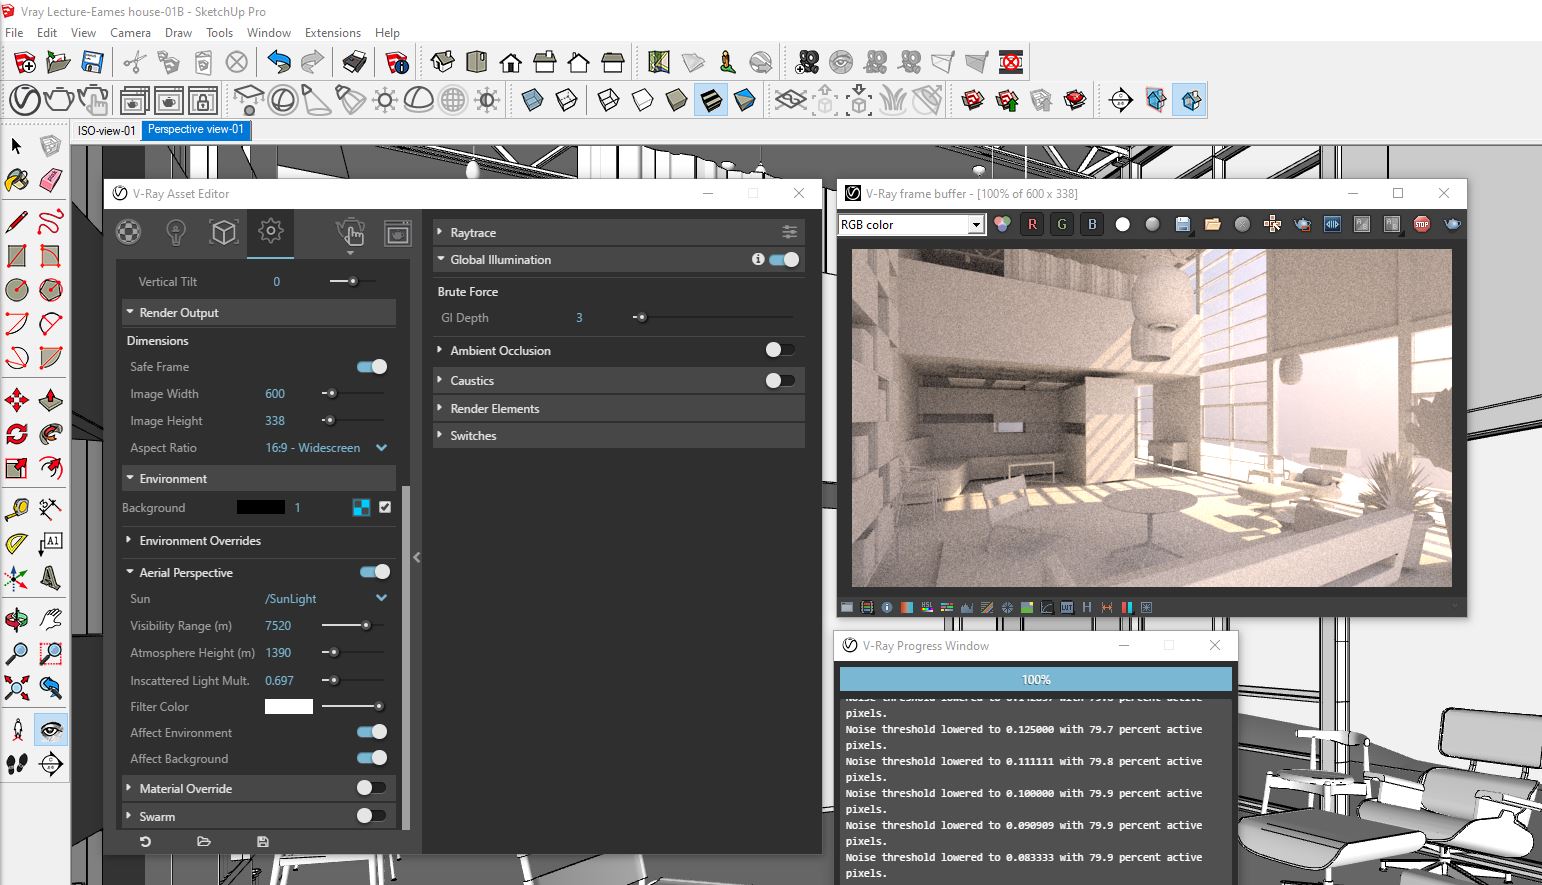
- Add/adjust [Aerial Perspective] for a more realistic image.
- Add [GI] and [Reflection] under Environment.
- Add [Ambient Occlusion] to darken the overlapped edges, which makes more volumetric rendering.
(CO3) Understand Vray material settings
V-Ray provides many advanced settings for realistic and artistic renderings. There are at least three ways to apply V-Ray material.
Tip 1. Material name properly. For example, 001-GL-EX-01, 001-CPT-RED-01, or 002-WD-DARK-FUR-01
For more information, refer to this Materials in V-Ray tutorial.
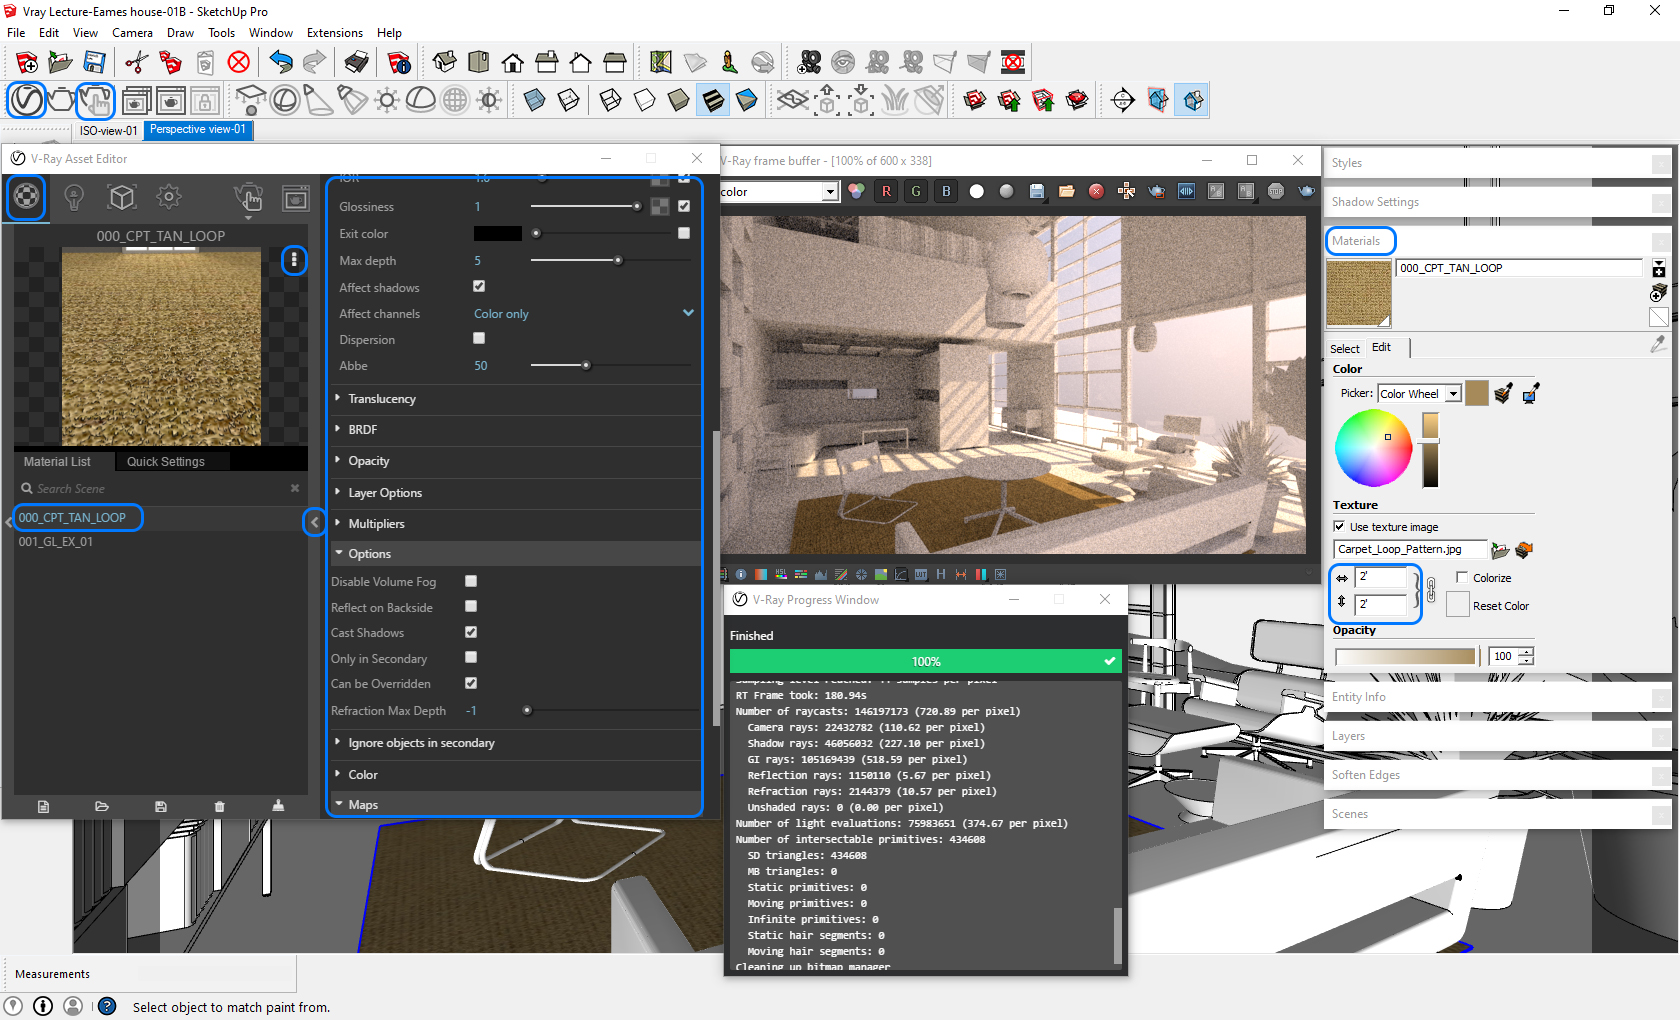
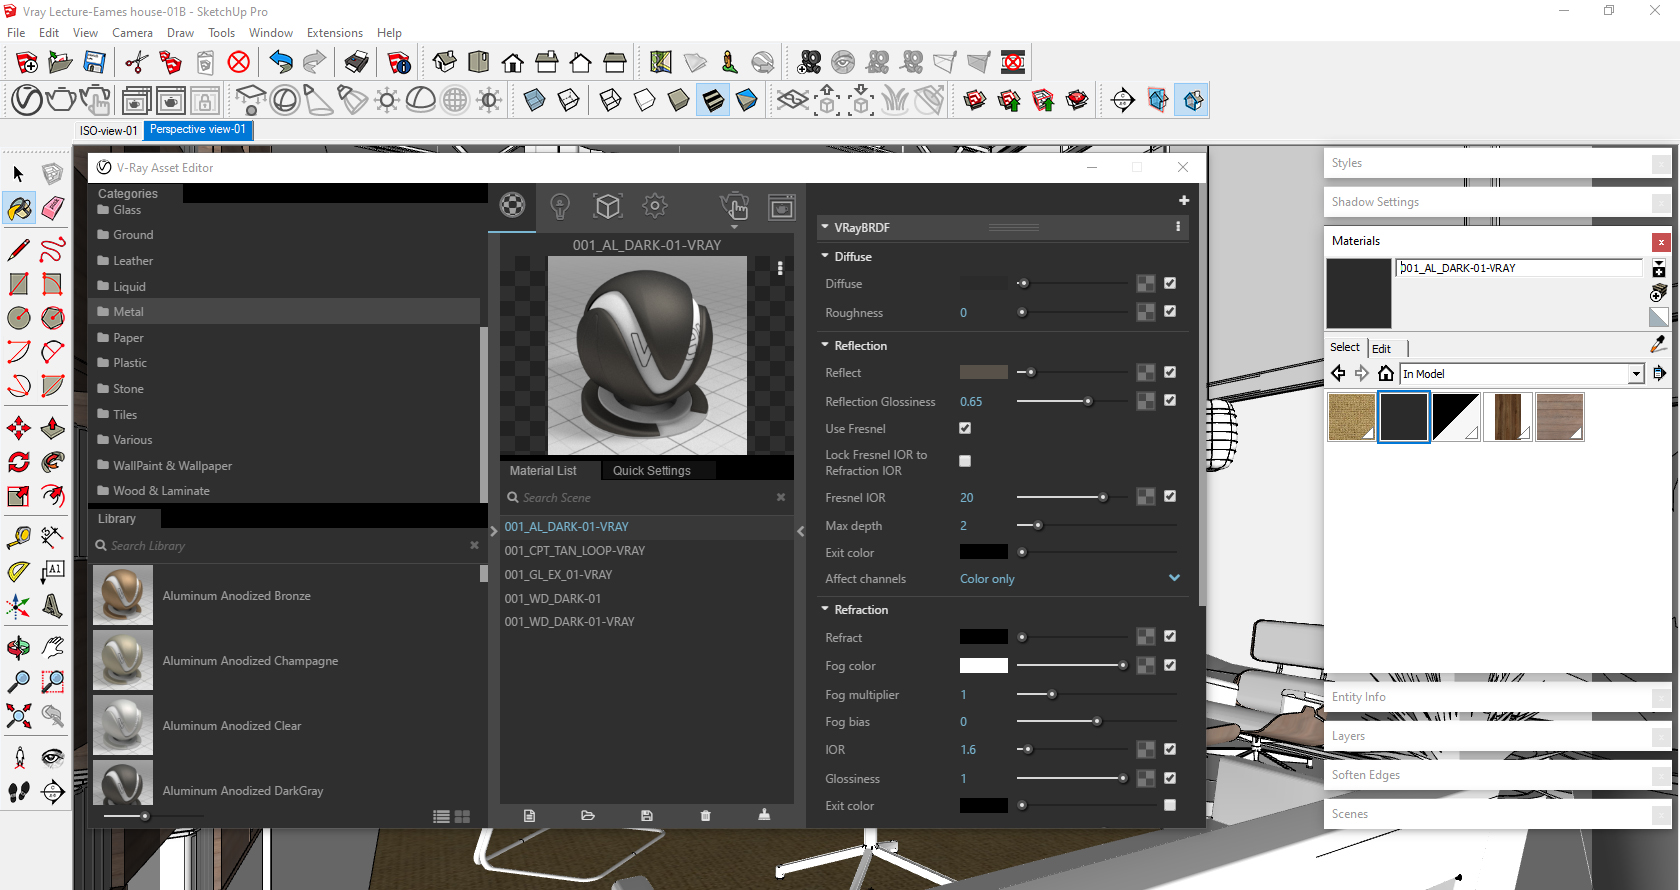
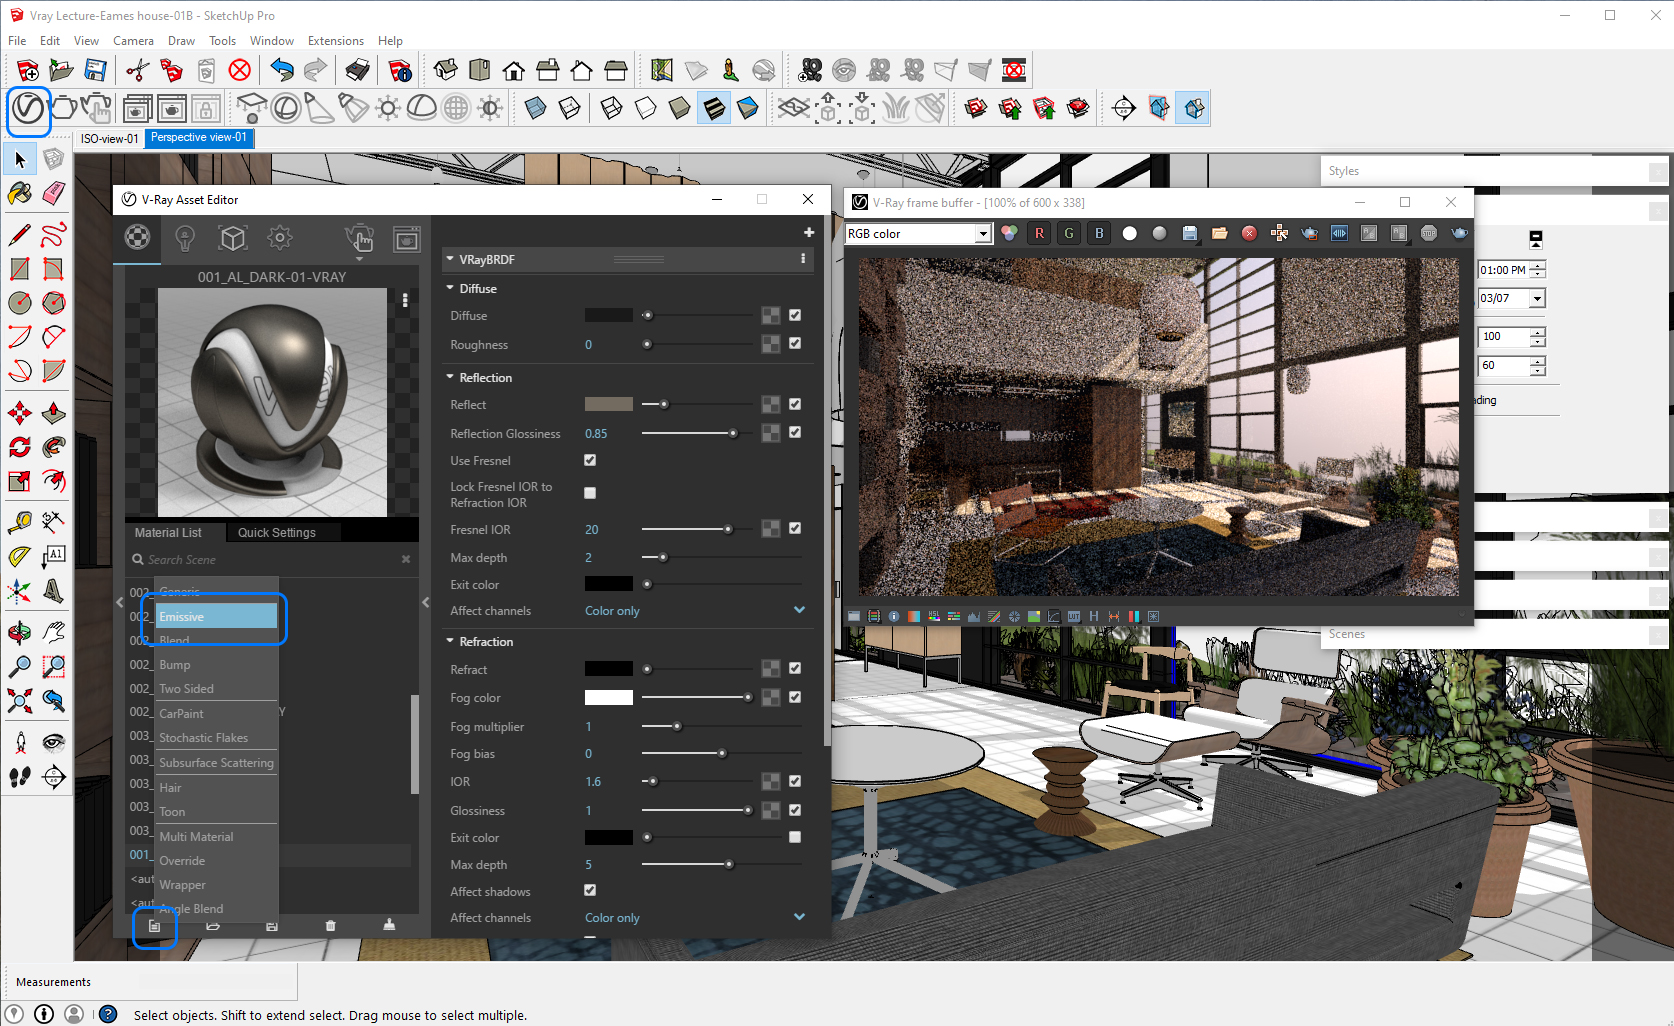
[METHOD 1] Use a SketchUp material and update V-Ray material properties
This way is helpful if you know how to add/edit the material properties. Suppose your SketchUp model already has the SketchUp materials that you want to use for your project. In that case, you can update the material in Asset Editor by editing Reflection, Refraction, Bump, Displacement, and more.
- [STEP 01] Click the [Paint Bucket] tool, shortcut [b] on the keyboard, hold the [ALT] key on the keyboard, and select the SketchUp material that you want to update.
- [STEP 02] Click [V-Ray Asset Editor] on V-Ray Toolbar, and confirm that the material that you selected is activated. Click the small arrow button on the right side of the Asset Editor to open the advance editor. It is optional to activate the interactive render how it changed.
- [STEP 03] Now you can edit the VrayBRDF for Diffuse (bitmap image), reflection (Black-0% reflection, White-100% reflection), Reflection Glossiness (1-clear reflection, 0-diffused reflection), Reflection (Black-0% transparency, White-100% transparency), and IOR (find more information in this Metal Shaders tutorial).
Additionally, you can edit the Map for Bump texture– add images (the same image, it would better result in a Black and White image) or Displacement texture (more advance – longer render time). - [STEP 04] If you want to change the image scale on the SketchUp materials panel. You also can change the preview mode from generic to floor, wall, fabric, or Ground.
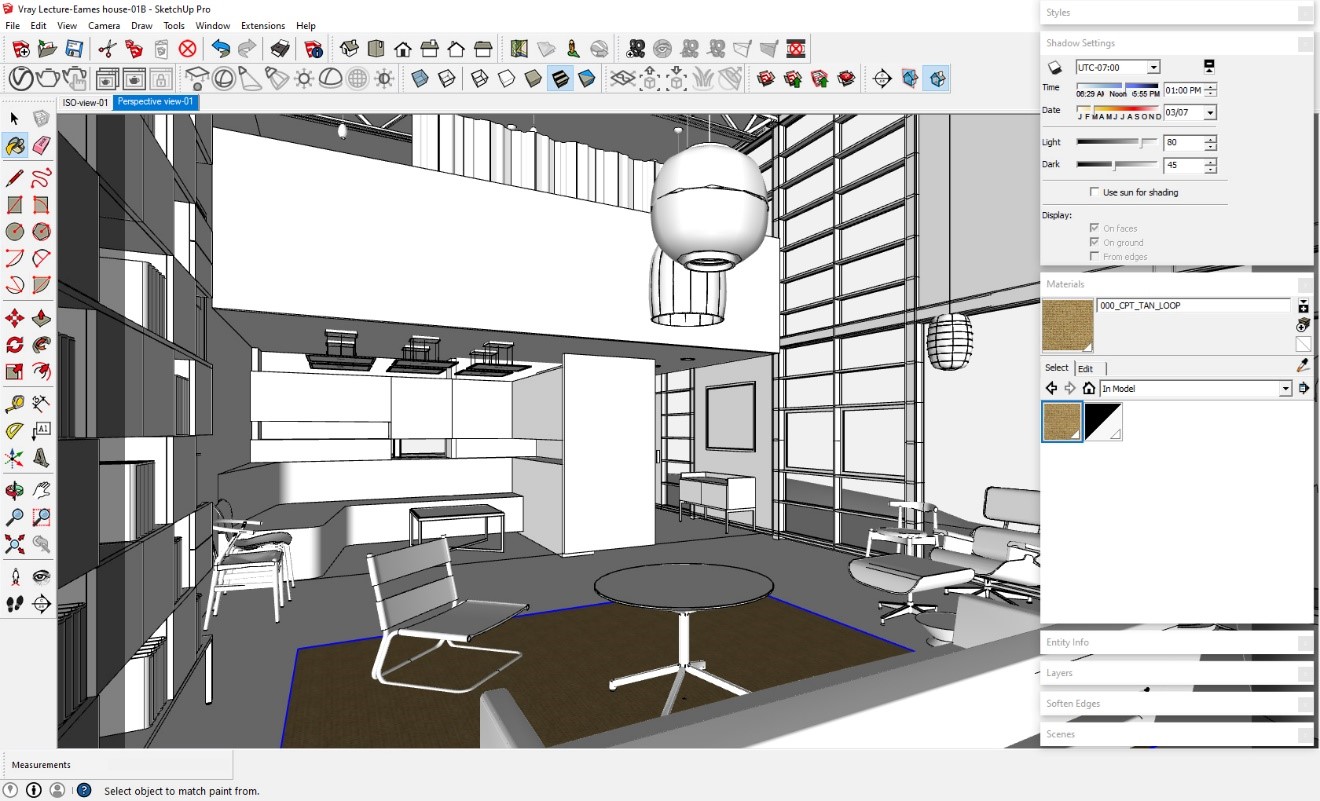
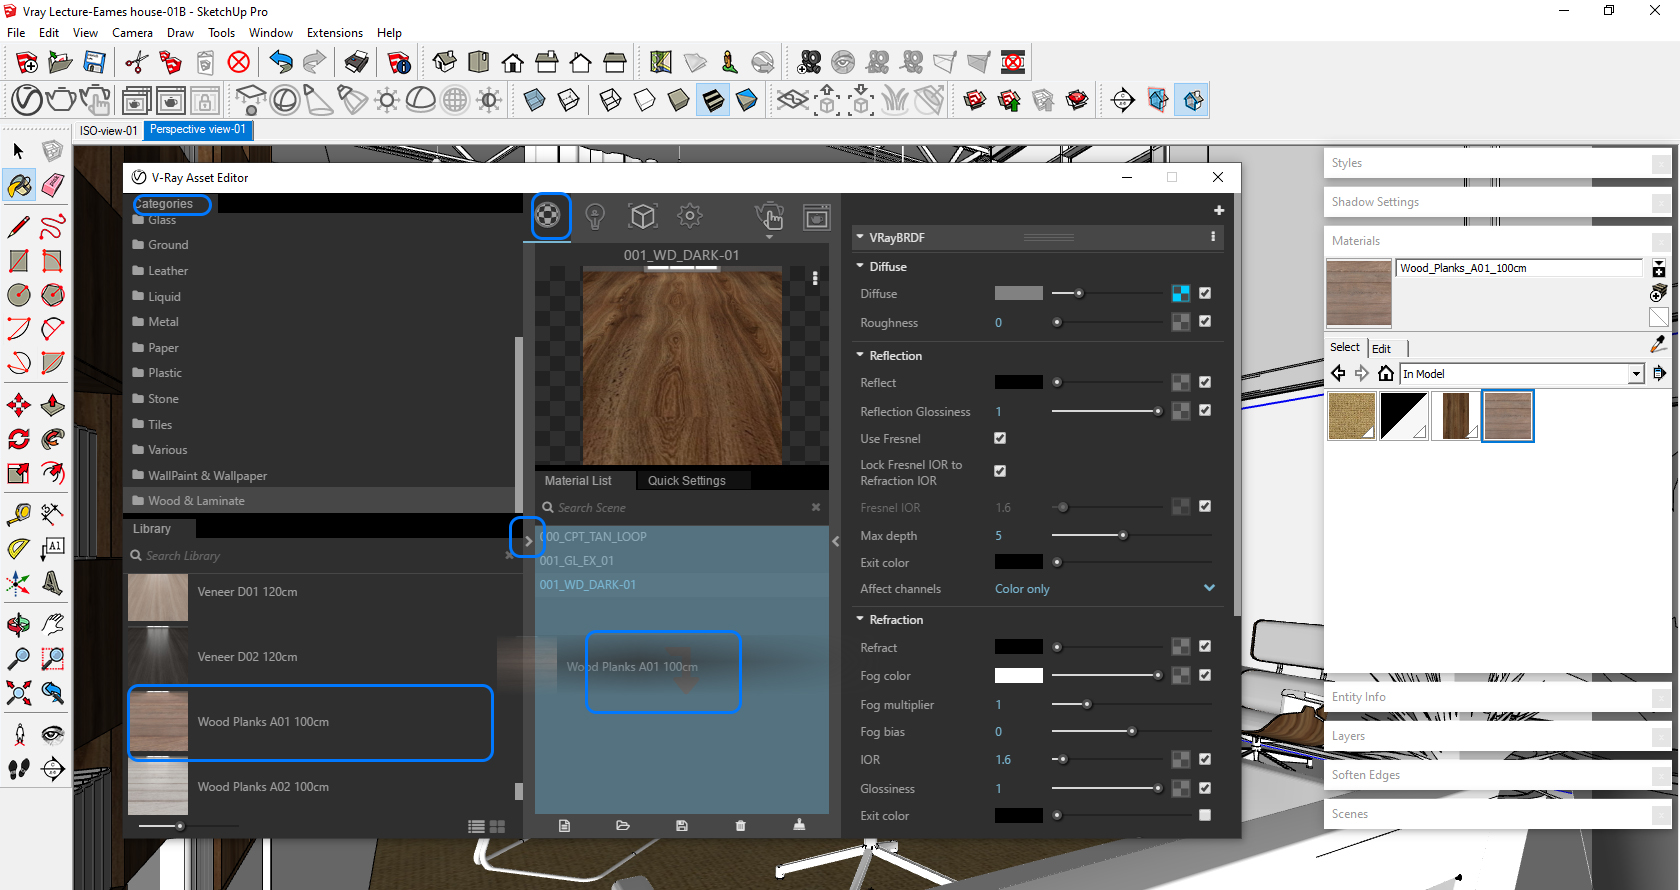
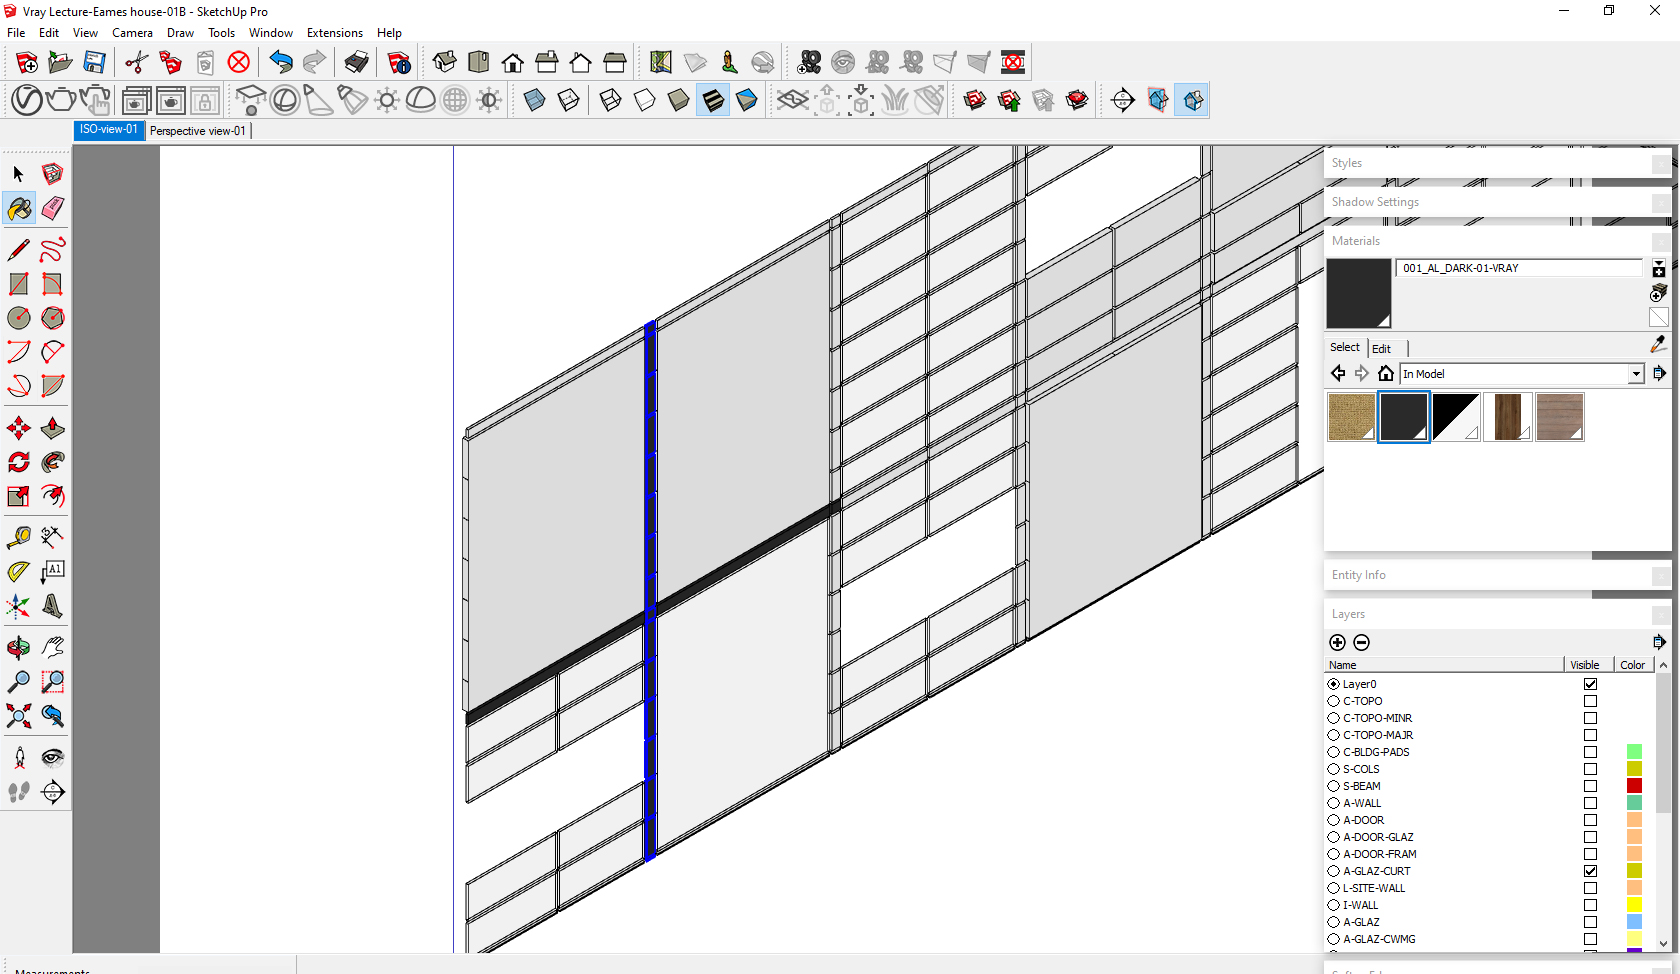
[METHOD 2] Select an object with a SketchUp material and replace it with a V-Ray material from the library
This method is helpful if you don’t have any knowledge to edit the material properties. You can use this method if your SketchUp model has a material already applied and you want to reply with V-Ray material from the library.
- [STEP 01] Click the [Paint Bucket] tool, shortcut [b] on the keyboard, hold the [ALT] key on the keyboard, and select the SketchUp material that you want to update.
- [STEP 02] Select V-Ray material
- Click [V-Ray Asset Editor] on V-Ray Toolbar
- Click the small arrow on the left side of the panel to open the V-Ray material library
- Click one of the categories to see the material. You can search for material from the library
- Select one material from the library, drag and drop the V-Ray material to the Material List on the Asset Editor
- Rename the V-Ray material by mouse-right click
- Adjust the material properties if you want – diffuse, reflection, bump, and more
- [STEP 03] Replace the old SketchUp material with the new V-Ray material
- Mouse right-click on the old SketchUp material and select [Select Objects In Scene]
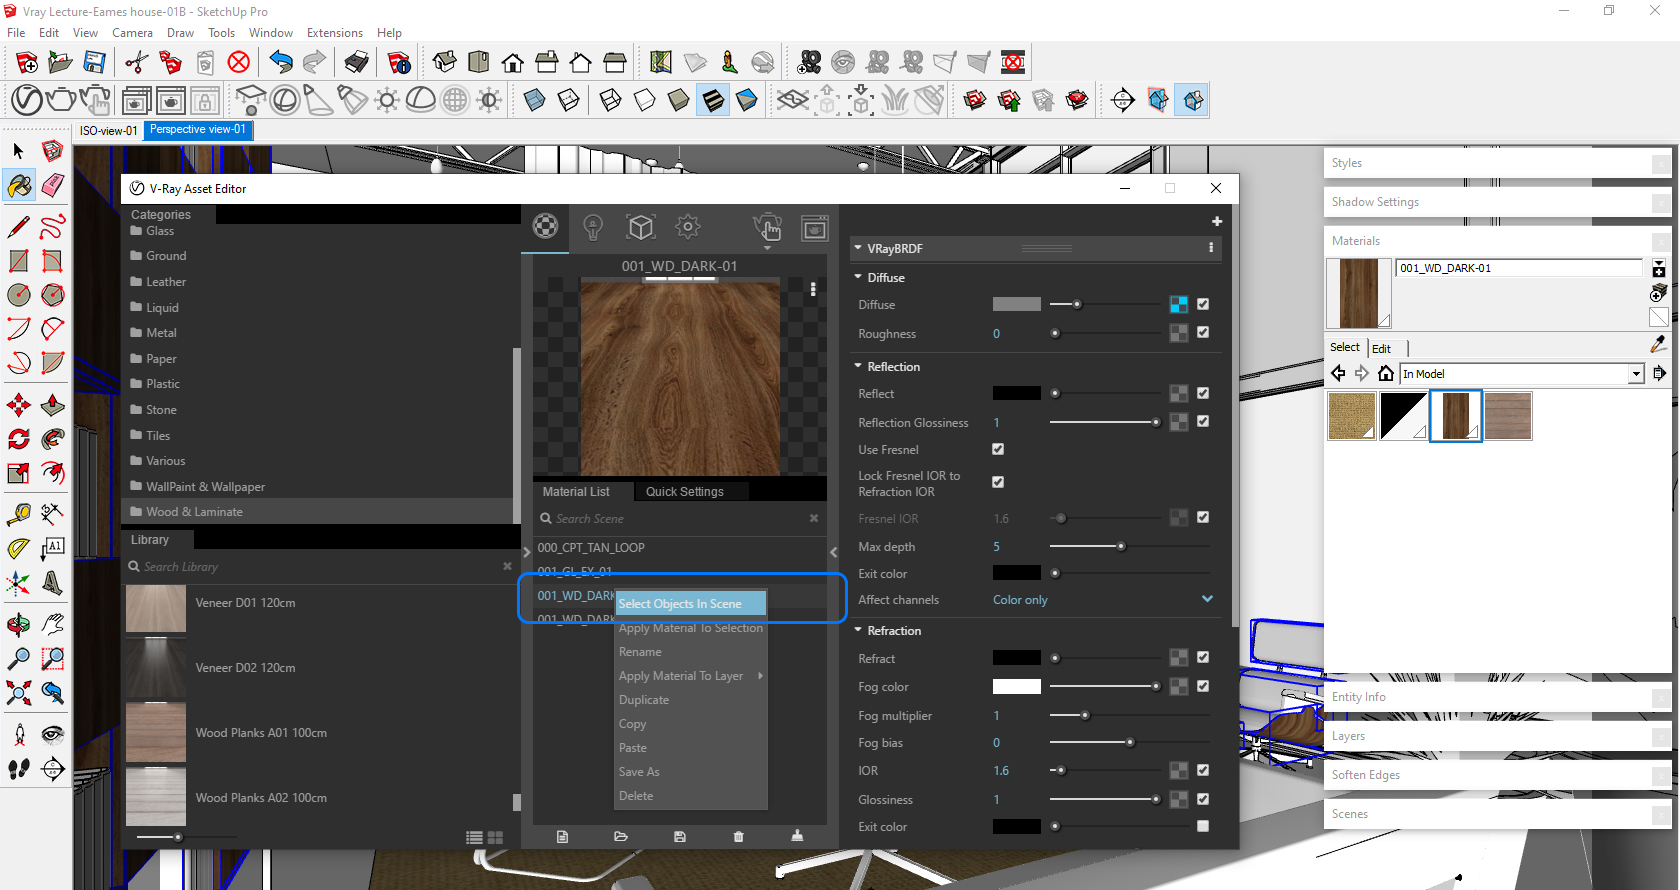
- Mouse right-click on the new V-Ray material and select [Apply Material To Selection]
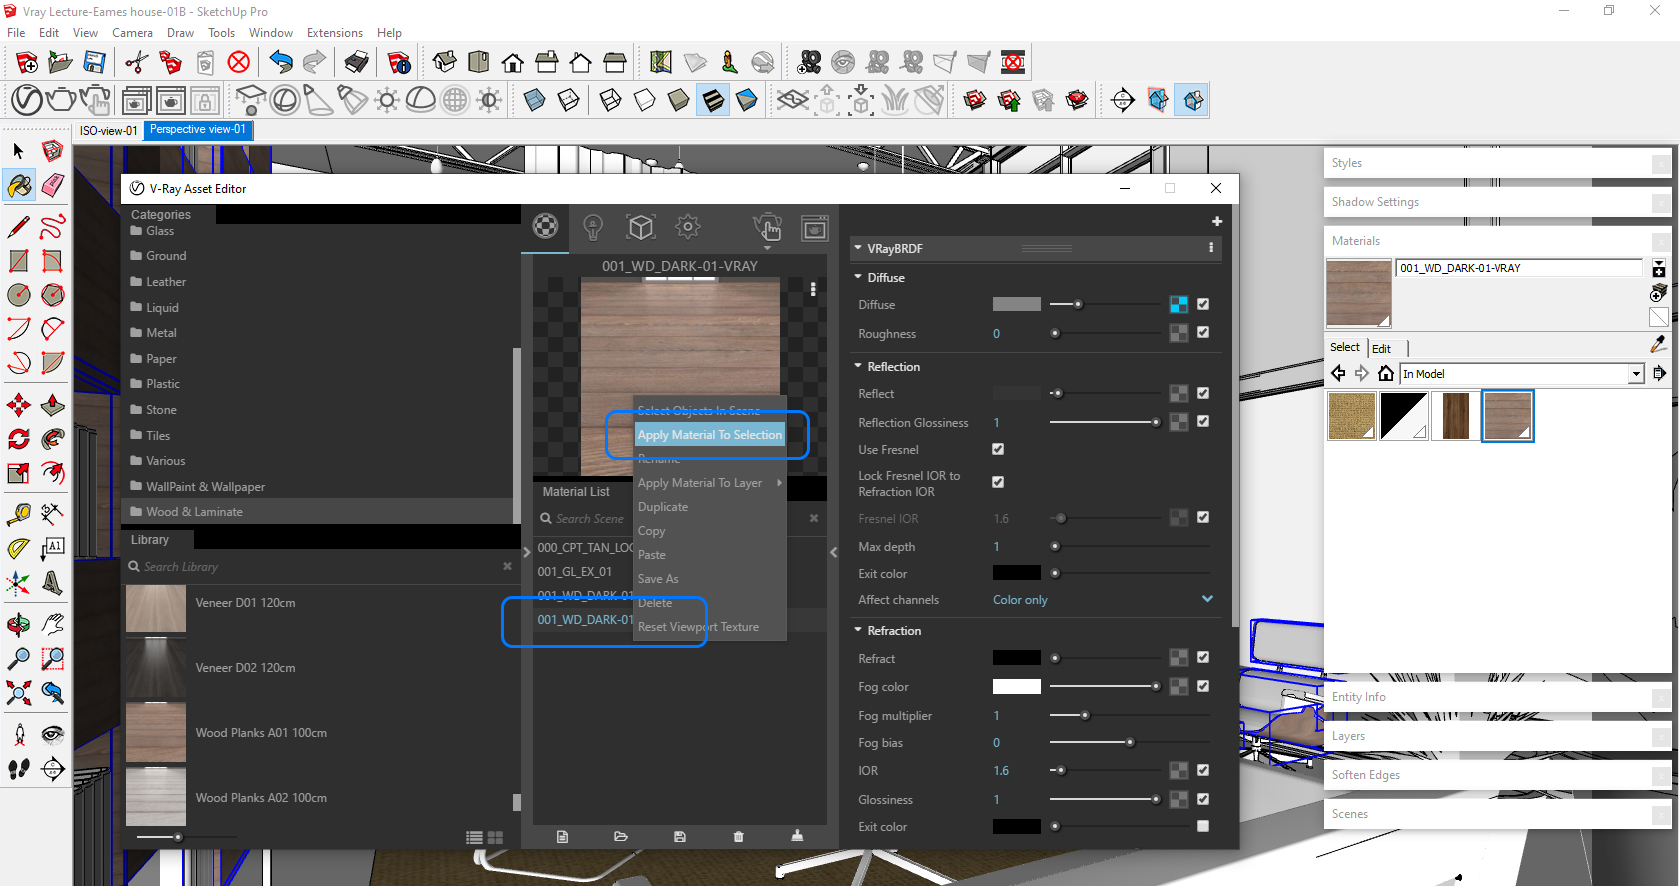
- Adjust the material properties (size of texture, color, reflection, bump, and more) with the interactive render if needed.
- [Optional] You may remove the old SketchUp material to clean up your material selections.
- Mouse right-click on the old SketchUp material and select [Select Objects In Scene]
[METHOD 3] Start from scratch
If your SketchUp model does not have SketchUp material to start, you can use this method.
- [STEP 01] Select V-Ray material
- Click [V-Ray Asset Editor] on V-Ray Toolbar
- Click the small arrow on the left side of the panel to open the V-Ray material library
- Click one of the categories to see the material. You can search for material from the library
- Select one material from the library, drag and drop the V-Ray material to the Material List on the Asset Editor
- Rename the V-Ray material by mouse-right click
- Adjust the material properties if you want – diffuse, reflection, bump, and more
- [STEP 02] Close [V-Ray Asset Editor]
- [STEP 03] Apply the V-Ray material using the [Paint Bucket] tool. Even though you apply a material using Paint Bucket, the material contains V-Ray material properties.
You may use layers/tags for selecting the material that you apply the selected materials
(CO4) Understand Vray lighting settings
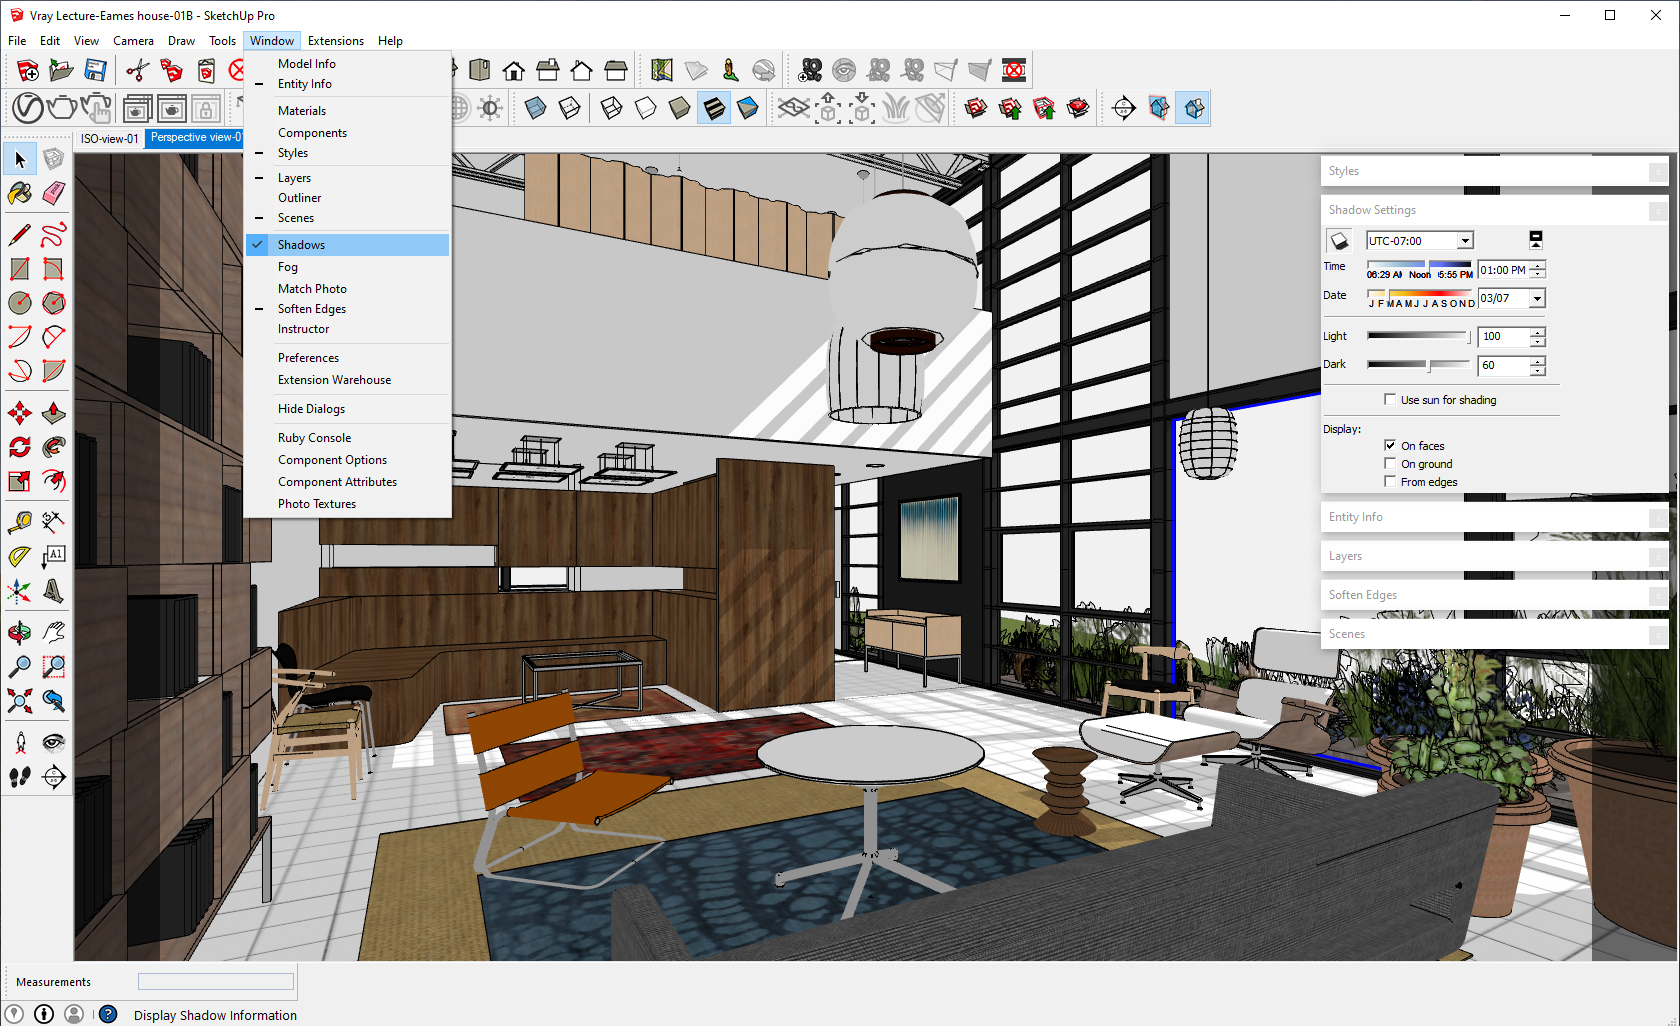
Set sun and sky
Before we work on artificial lightings, understanding sun orientation and adjusting the sky is necessary. V-Ray recognizes SketchUp Sun orientation. To see the current building orientation and sun relation setting, open the [Shadow Setting] panel and check [Show/hide Shadow] to see the direction of the sun is suitable for your rendering. If you want to change the sun’s direction, you may change the building orientation, time zoon, time, and date.
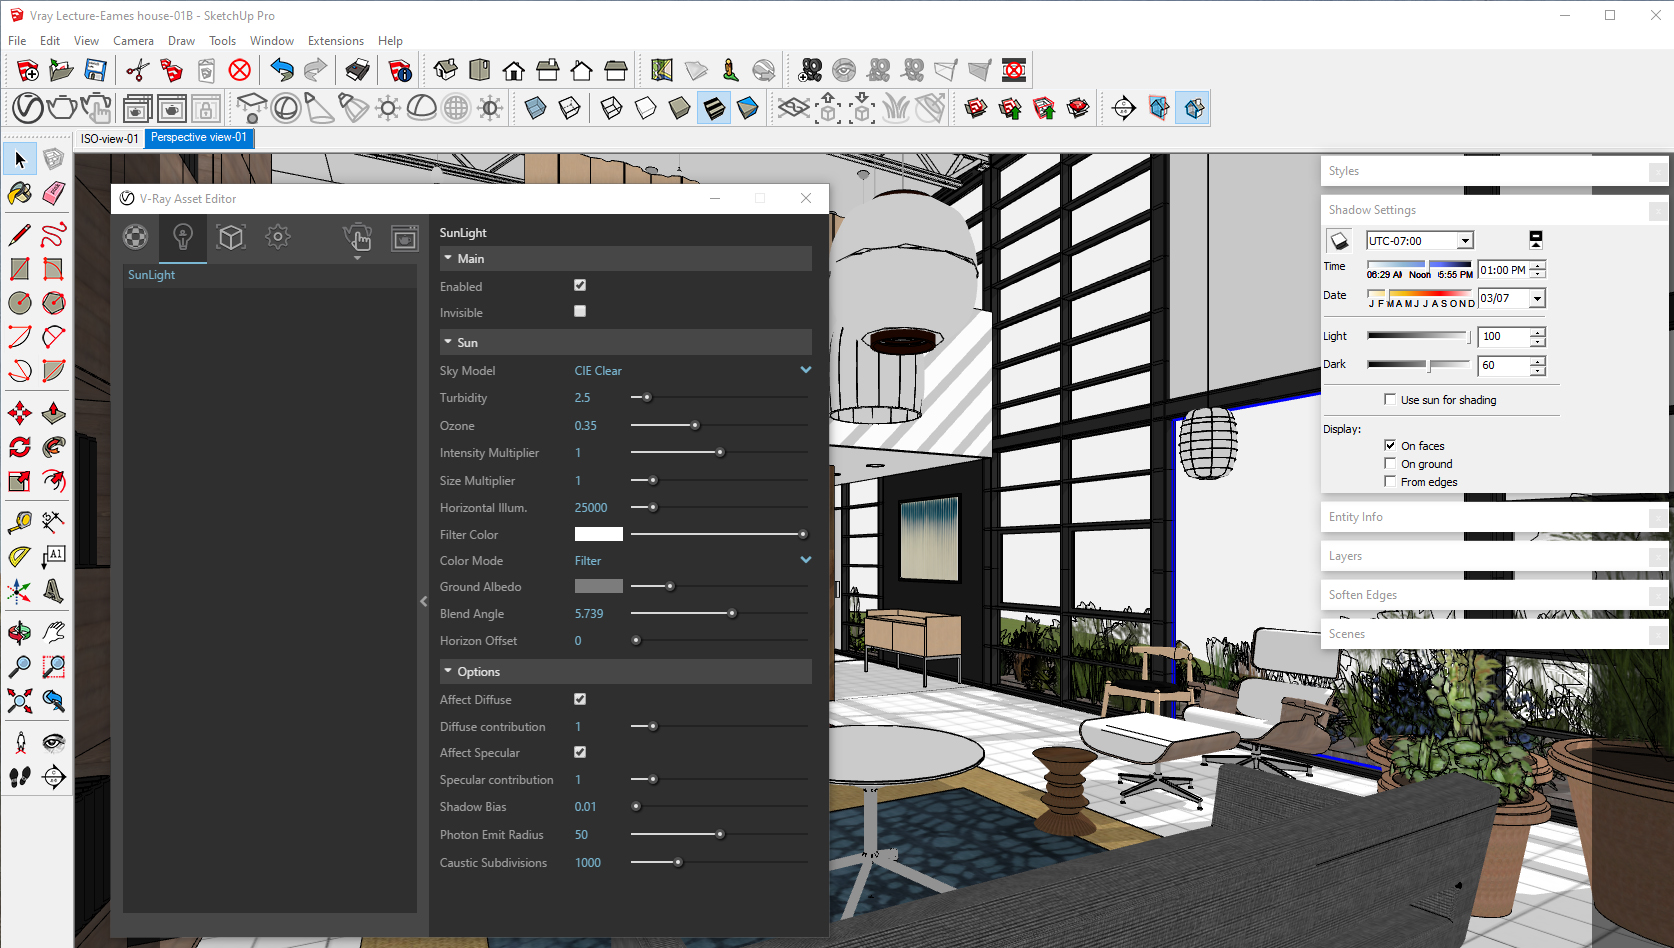
In Asset Editor, you can control the Sun settings. For example, you can change the Sky model, change the color of the sky, the intensity of the sun, the density of ozone, and more.
Self-illuminated materials – Lighting source
To express self-illuminated material like a lighting source or lighting shade, you can add [Emissive] on a V-Ray material.
- [STEP 01] Click [V-Ray Asset Editor], click [Add material] on the left bottom of the panel, click [Emissive] on the menu, change the material name.
- [STEP 02] Adjust the [Emissive] properties (Color, Intensity, Transparency, and more)
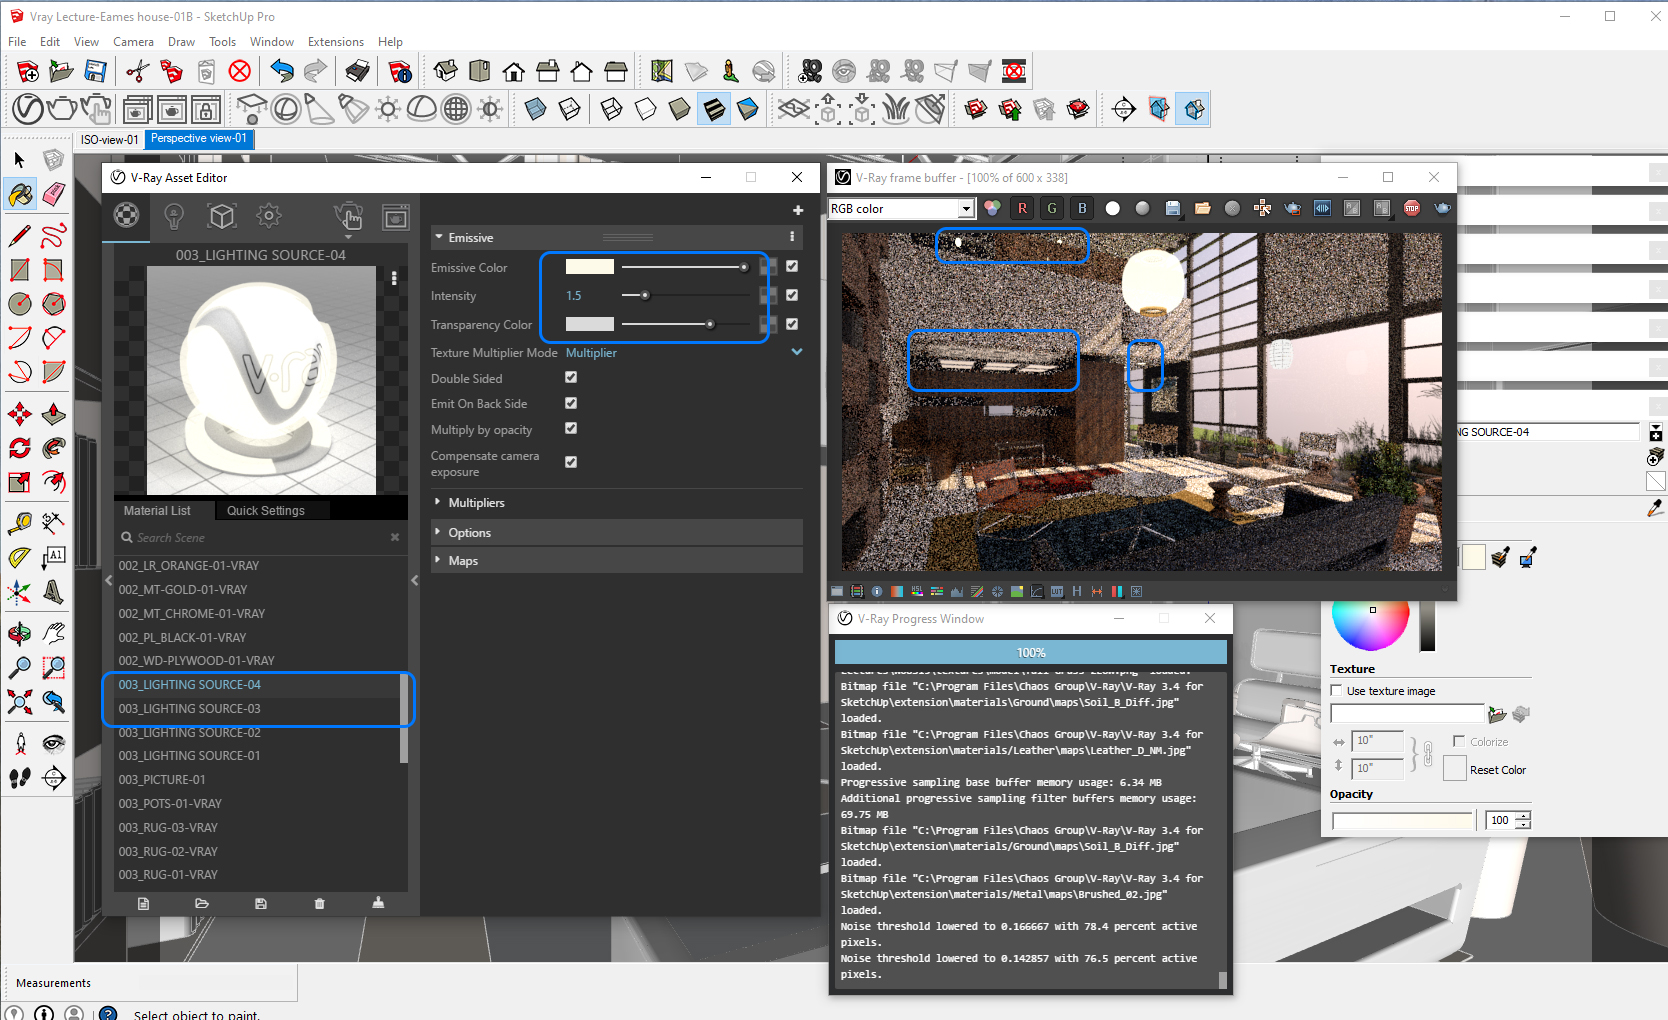
- [STEP 03] Apply the emissive material to the object using the [Paint Bucket] tool on SketchUp.
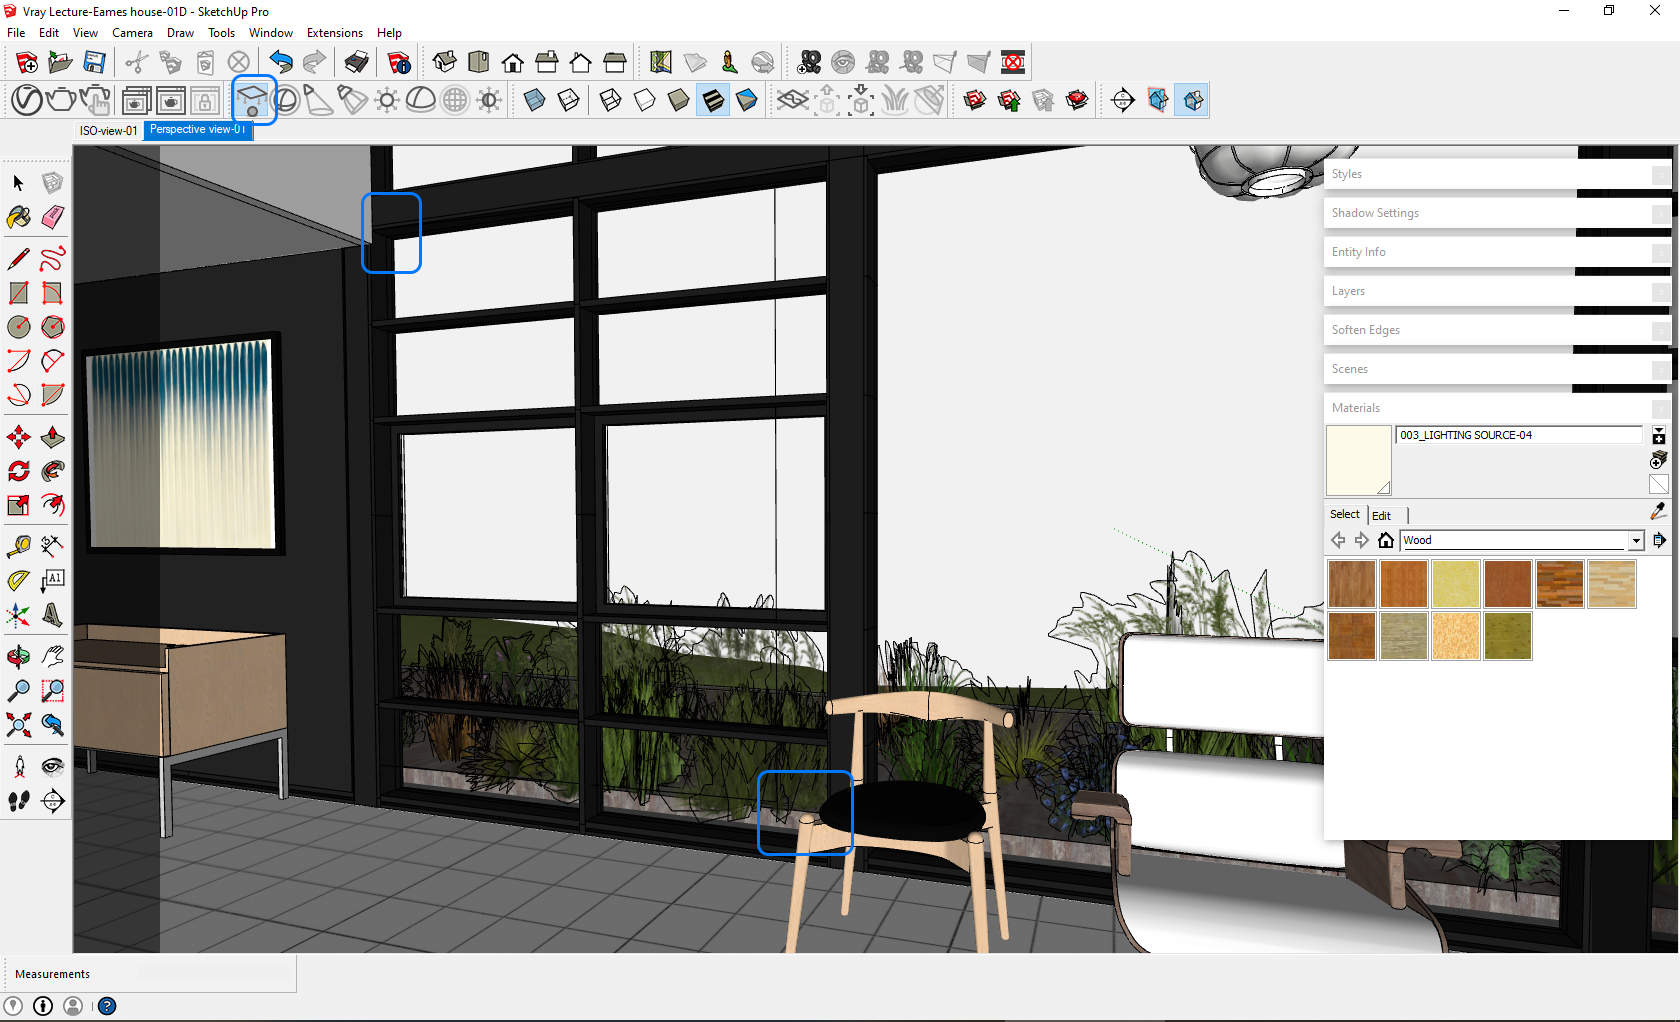
Add V-Ray lighting source – Rectangular for windows
This tip is a trick of V-Ray rendering. Adjusting the intensity of the Sun on V-Ray is not enough to illuminate the interior space. V-Ray users add Rectangular lighting sources on windows to make the space brighter and better render results. This may minimize the noise effects on the render results.
- [STEP 01] Click [Plane Light] on the V-Ray toolbar, draw the rectangular shape on a window. You may not perfectly fit the plane to a window. A slightly smaller size of plane light works better.
- [STEP 02] Open [V-Ray Asset Editor], Click the [Lights] on the top menu, Rename the lighting more recognizable, open the advanced property change, adjust the color, intensity, and check [Invisible] to hide the lighting source.
Then you can do a test render of how it results.
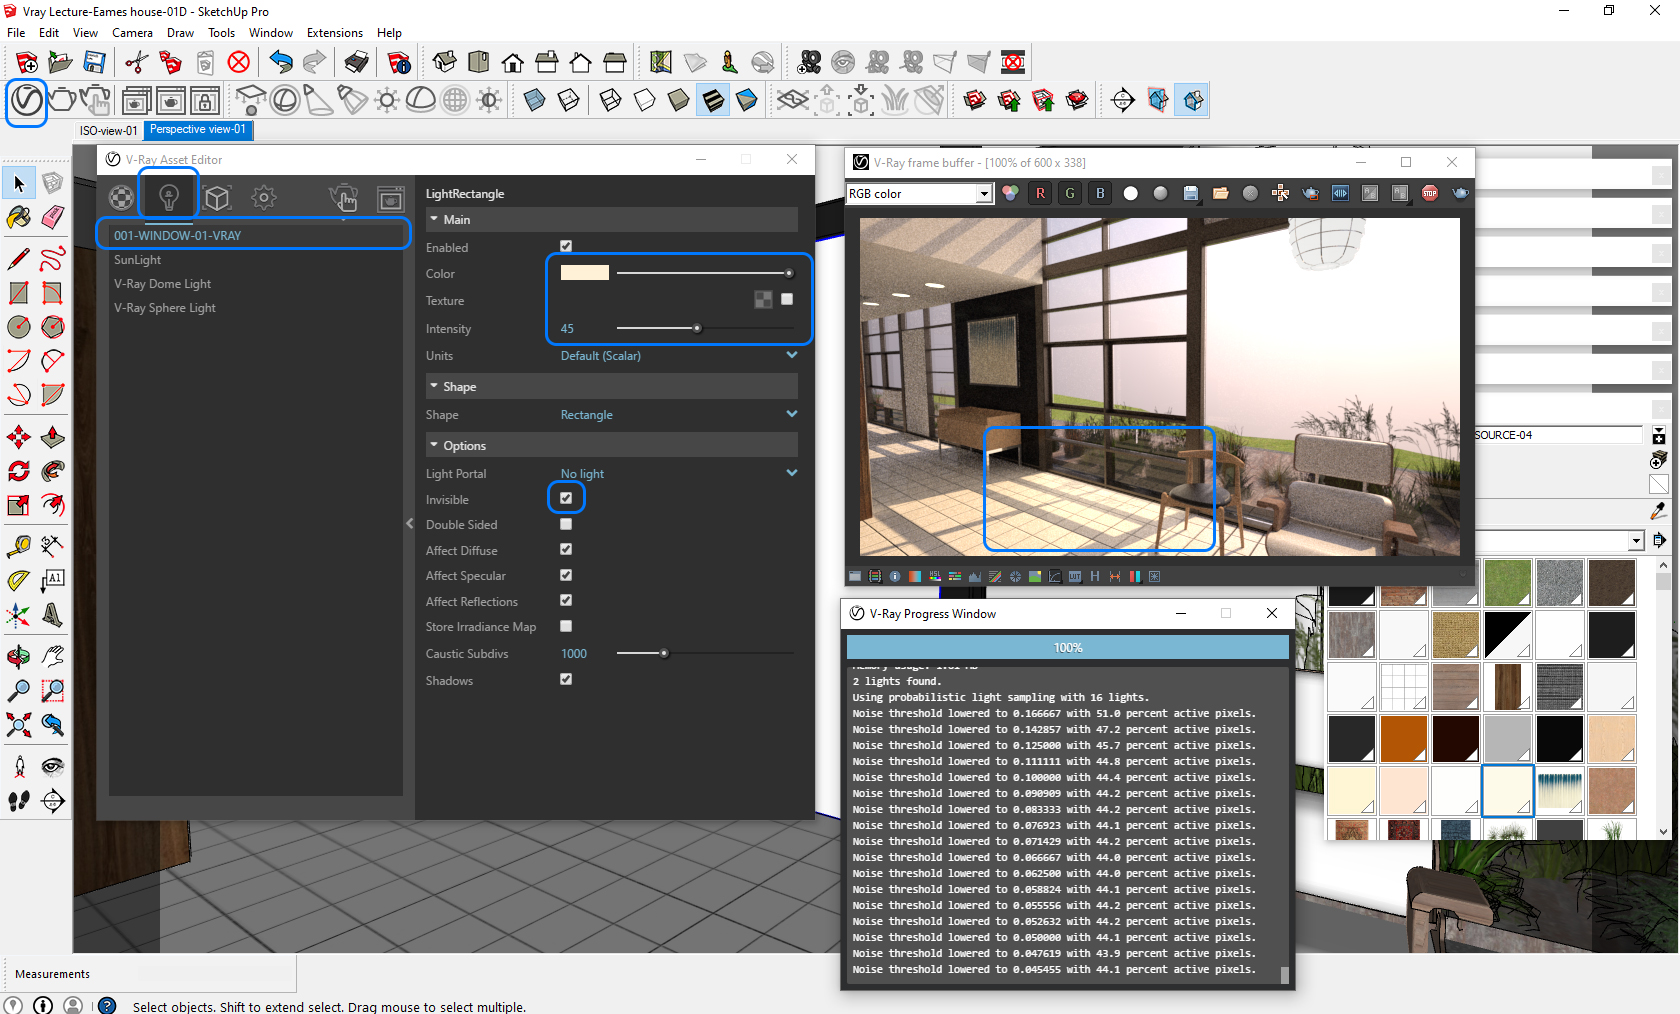
- [STEP 03] Copy the plane lighting for other windows in the SketchUp model. You may adjust the size of the plane lights with scale. The copied plane lights will have the same lighting properties as the original resource.
Confirm the result on the test interactive render.
Tip. You can use a [Plane light] for a rectangular shape lighting surface. You can use [Sphere light] for the round surface/spherical shape of an object.
Add V-Ray lighting source – IES lighting
V-Ray lights support a .ies file which contains the lighting profile/footprint for a light. If you use IES lighting in V-Ray, your rendering will look more realistic.
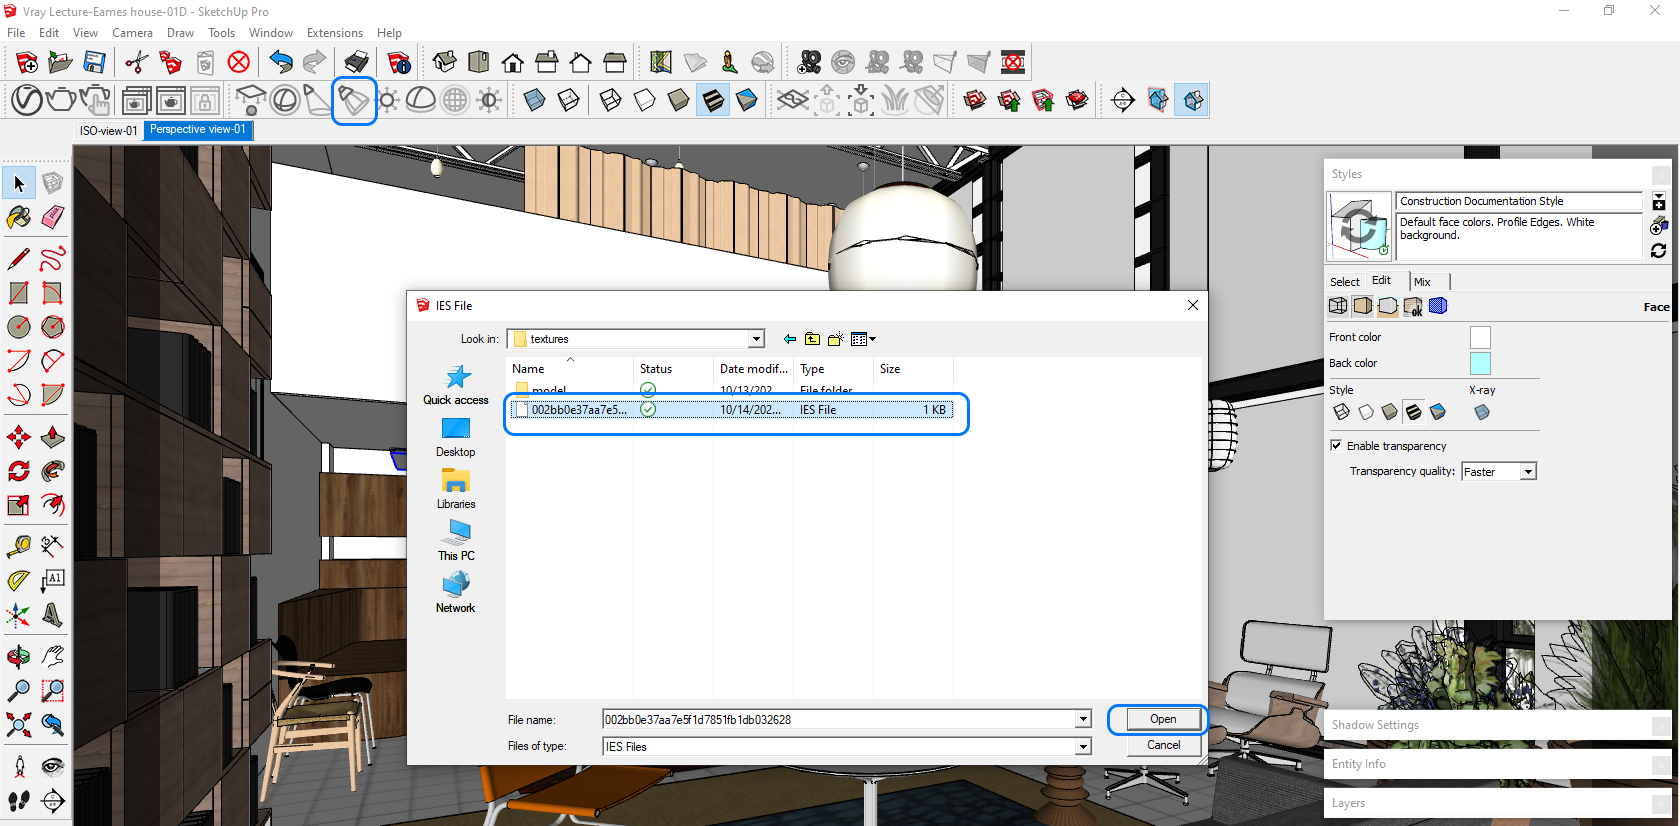
- [STEP 01] You must download/be ready for a .ies file first for adding an IES lighting.
You can download IES sources from the IES Library website or from lighting manufacturer websites. - [STEP 02] Once you download a .ies file, click [IES Light] on the V-Ray toolbar. It will ask where the ies file is. Select the file to add to the model.
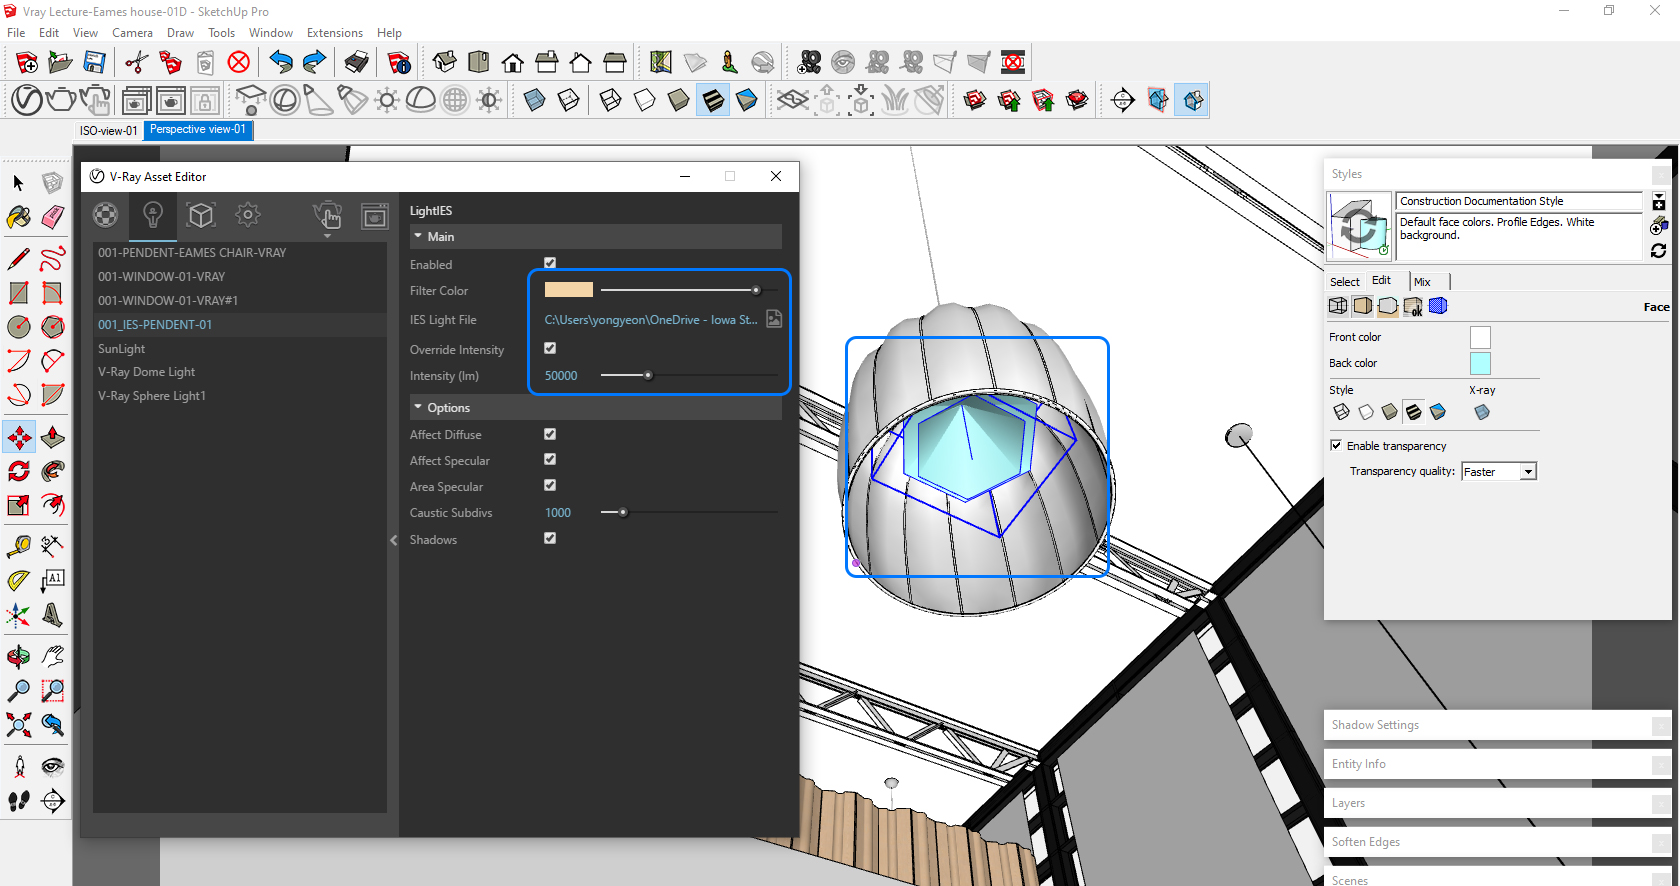
- [STEP 03] Once you place the IES light in the model, you can position it as you wish. Then open [V-Ray Asset Editor], rename the light more recognizable, and open the advanced setting to change the color and intensity. After you change the setting, test it with interactive rendering to check it looks right.
(CO5) Understand the Final render and save the image
Final render setting
Once your SketchUp model, materials, and lights are ready for a final render, you can turn off the [Interactive] render and turn on [Progressive] and click [Render with V-Ray]. It may differ from the Interactive render, so may need some adjustments to get things right. For example, often, you need to adjust the Exposure Value and Aerial Perspective. You will get a JPG, PNG, or TIFF file from this final render for your post-production, known as photoshopping. The final render will take a few minutes to a few hours depending on the size of the image and the complexity of the model (more points), material settings (reflectivity, bump, displacements), and number of lighting sources.
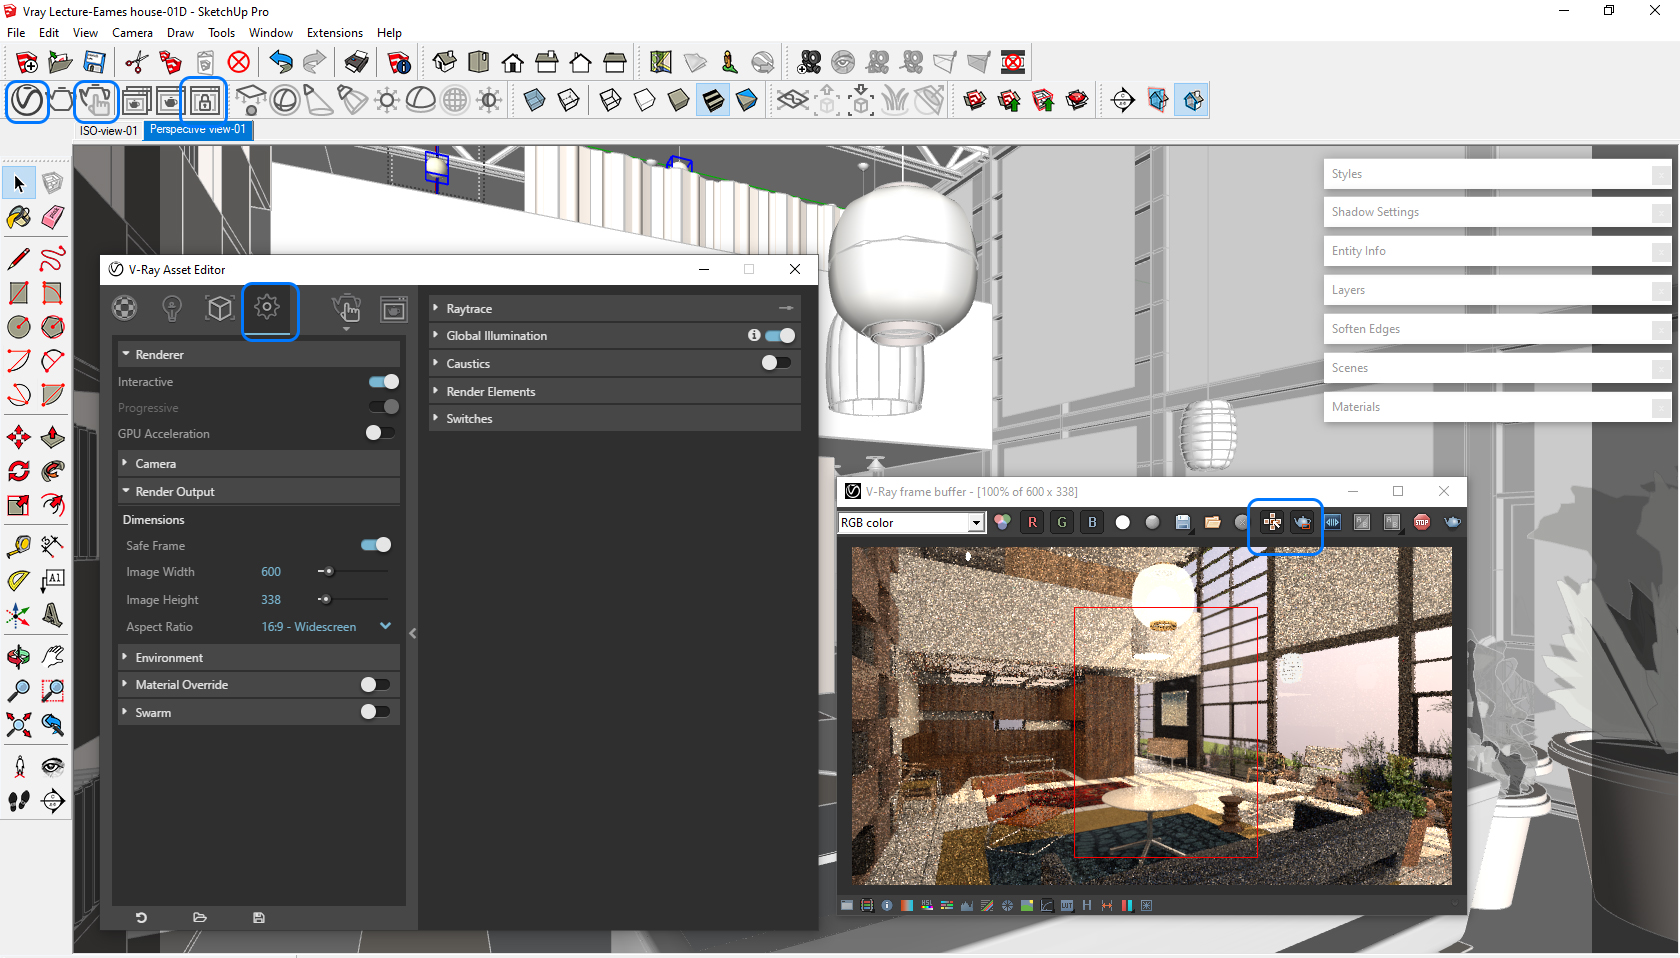
- [STEP 01] Make sure all settings are suitable for your final render. I recommend testing the V-Ray render with a small rendering with draft quality to confirm the settings.
For a preview of the final render, you can use [Regin Render] and [Track Mouse] to see the desired area of the rendering.
- [STEP 02] Render setting.
- Turn off [Interactive] under Render and turn on [Progressive].
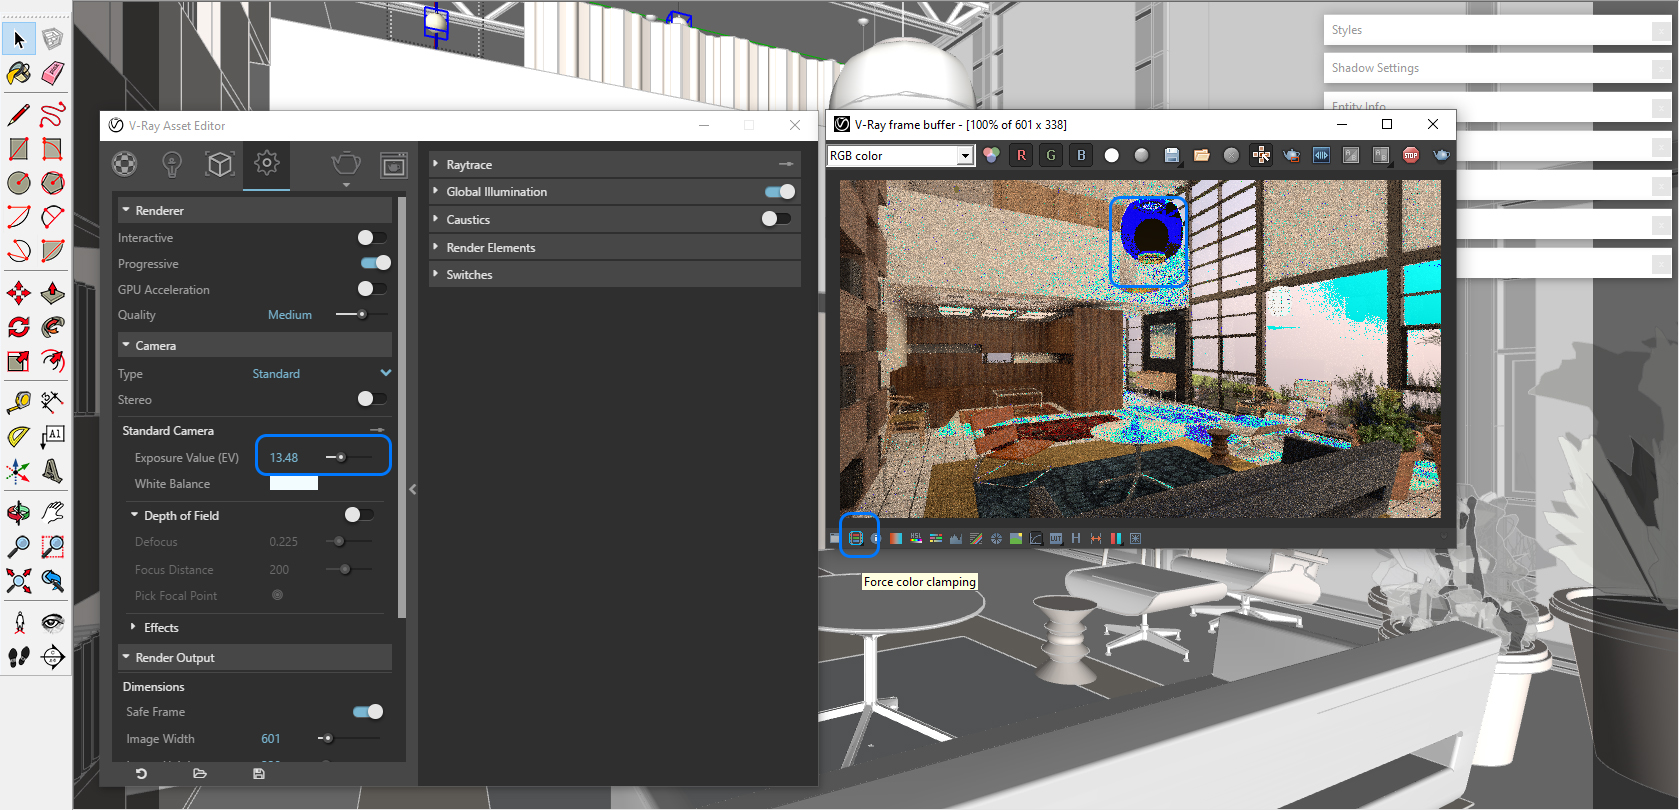
- Adjust Exposure Value under Camera on the Asset Editor for the best result. You can confirm the [Force Color Clamping] tool on the Frame buffer to check too bright area avoid the blue color area.
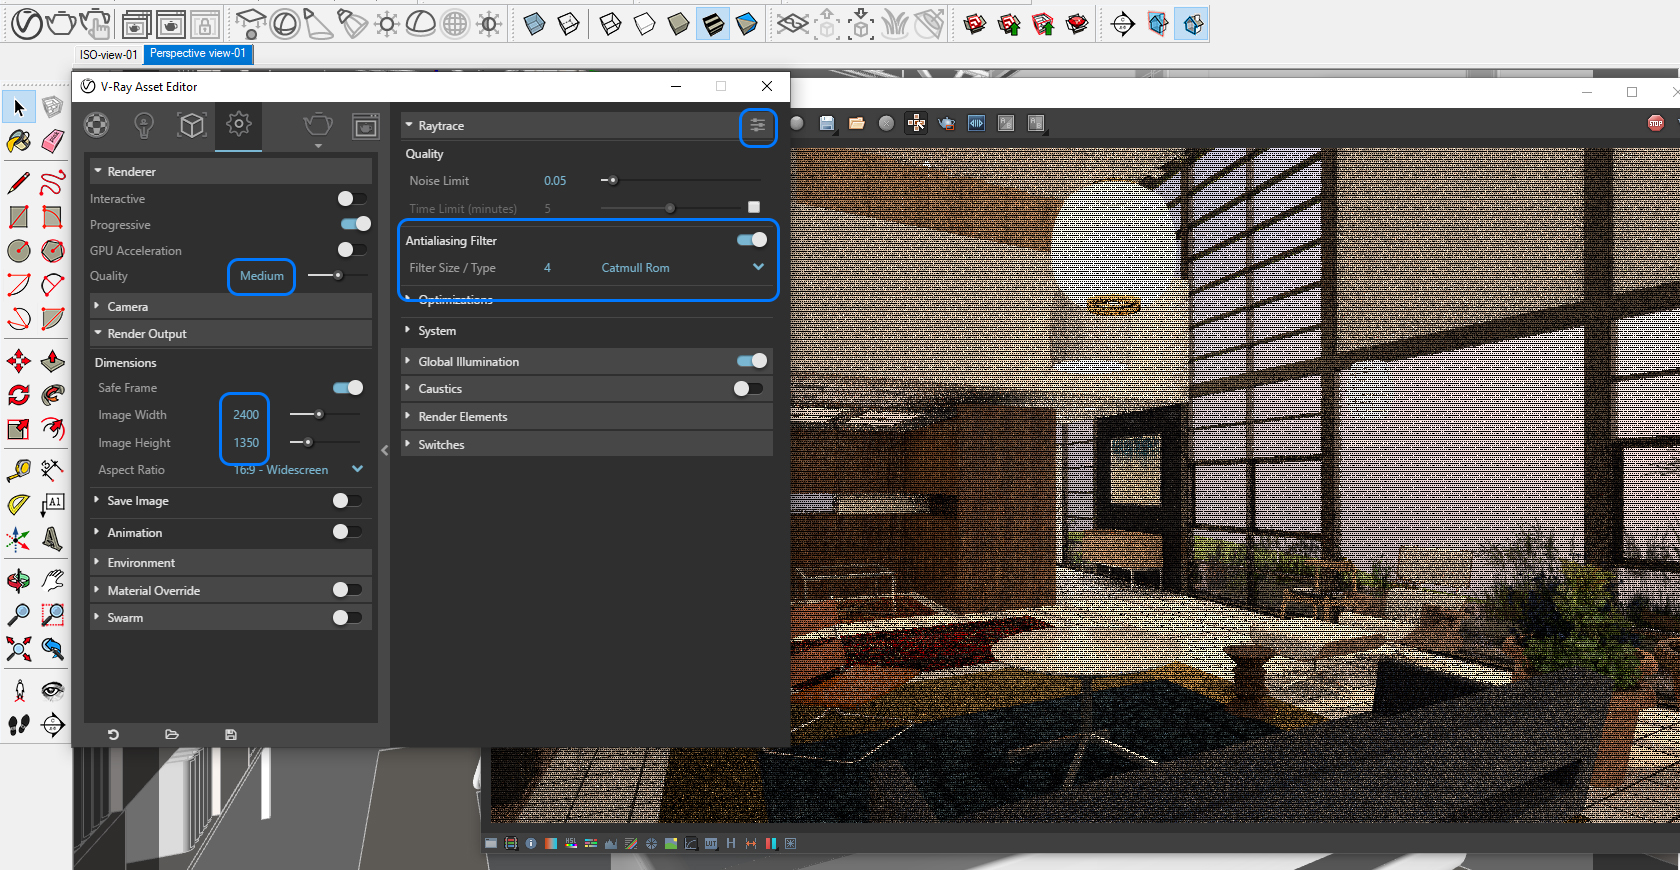
- Change Render size and ratio – Typically, you can render 2400 pixels x 1350 pixels for a digital presentation. For a print version presentation like panel presentation, you can render 4800 pixels x 2700 pixels.
- Change render quality to Medium. Based on the instructor’s experience, Medium quality would be acceptable for a final render. It can save much more time.
- You may turn on Caustics if you render any water-like elements.
- Change Antialiasing Filter under Raytace to [Catmull Rom] with value 4.
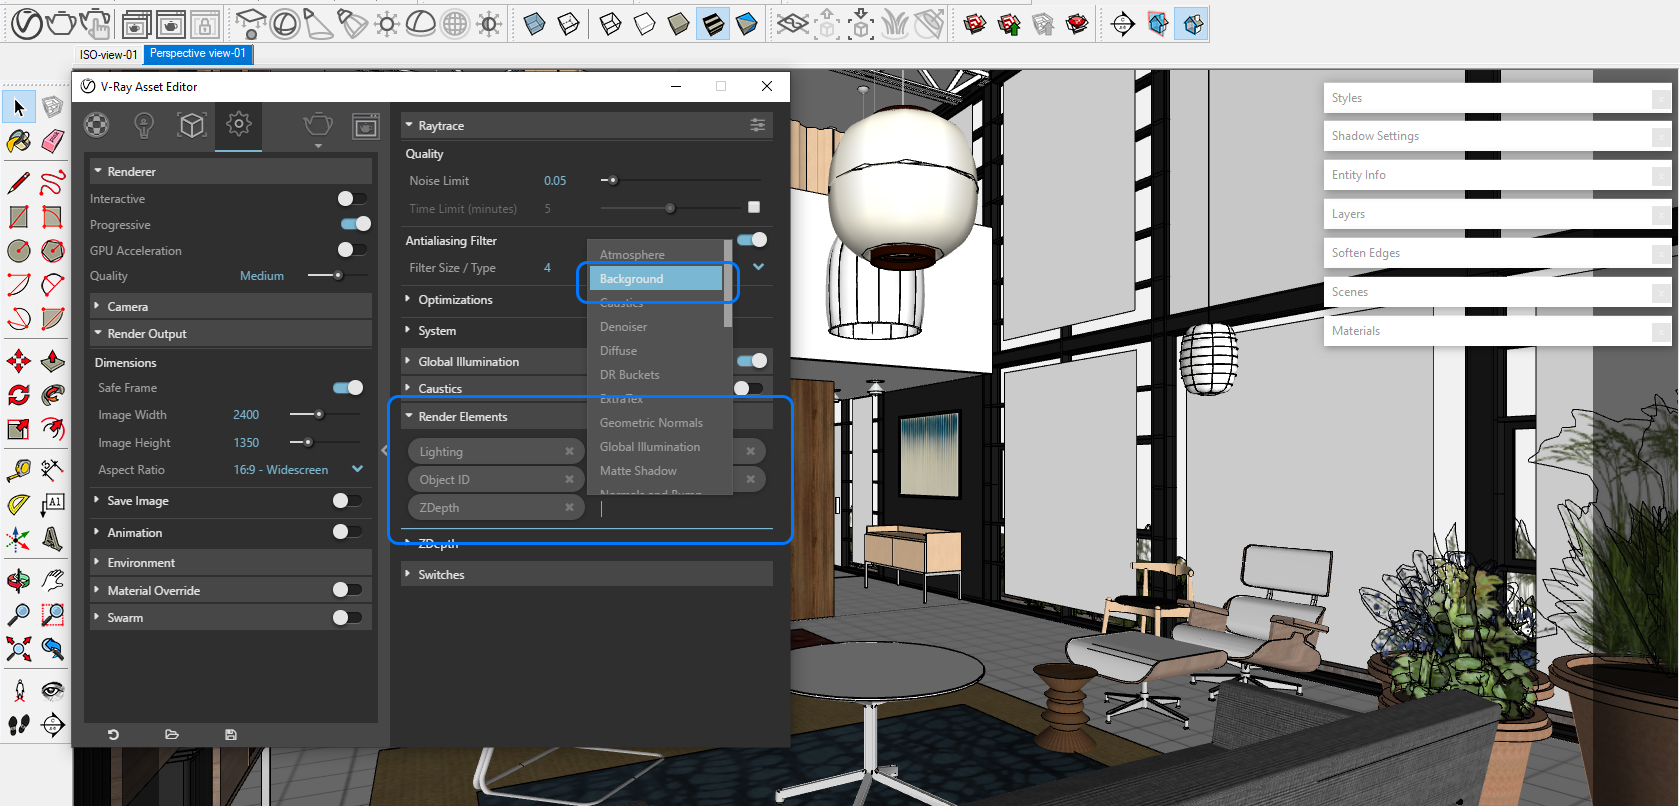
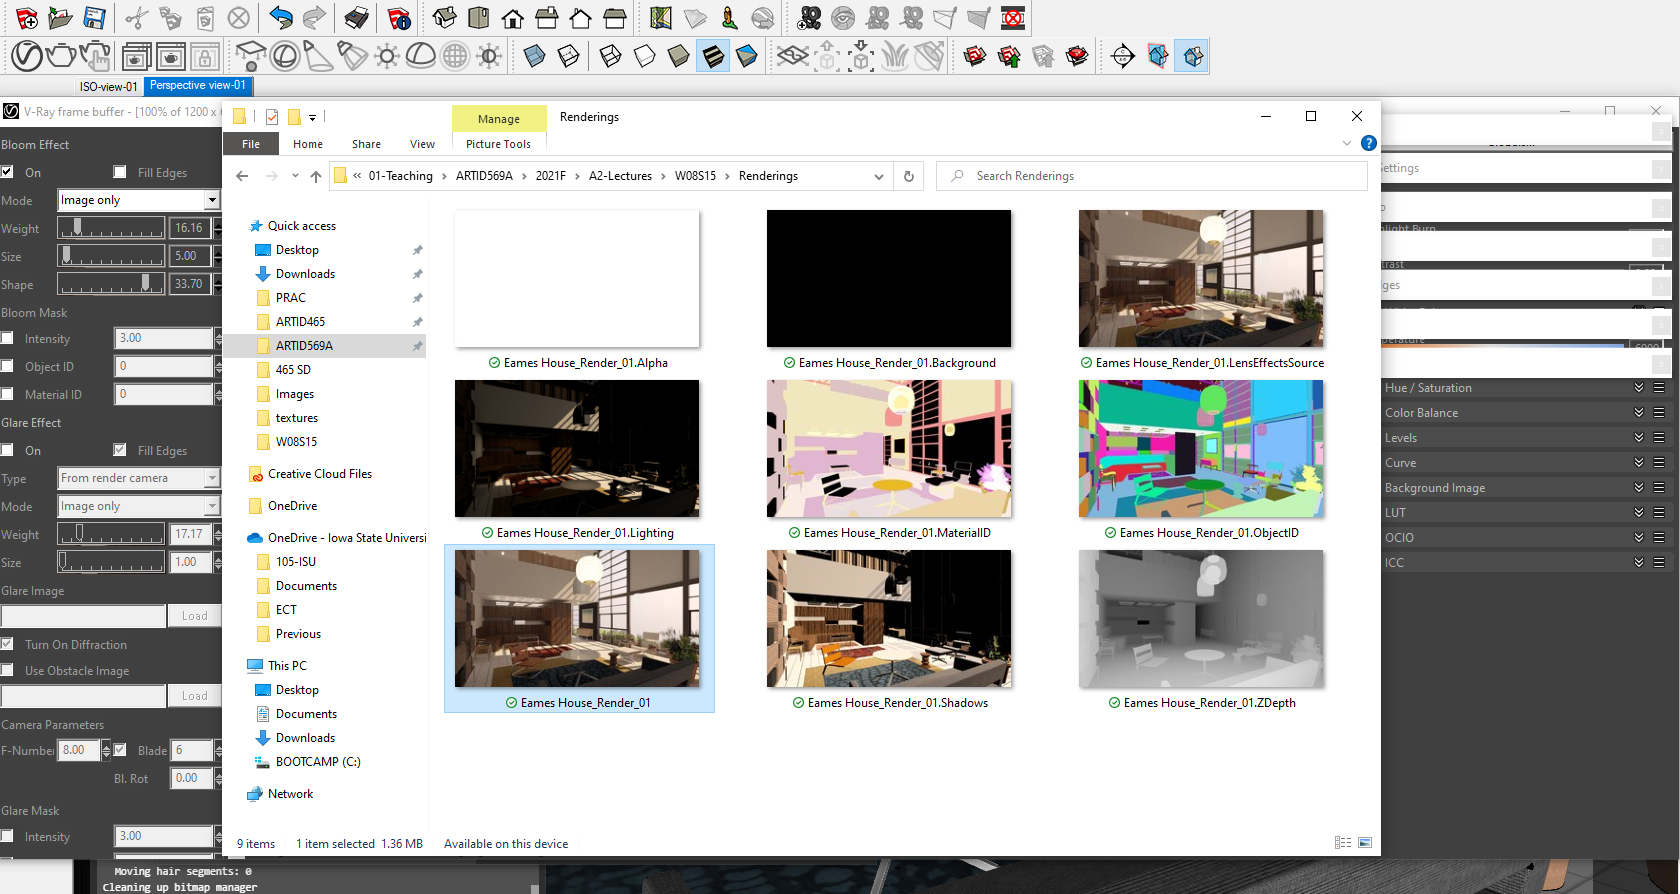
- Consider adding Render Elements, for example, Background, Material ID, Object ID, Shadow, Lighting, and ZDepth for your post-production of the rendering. Once you add these elements, you will get the separated imaged files with the original rendered image file.
- [STEP 3] Click [Render with V-Ray] button.
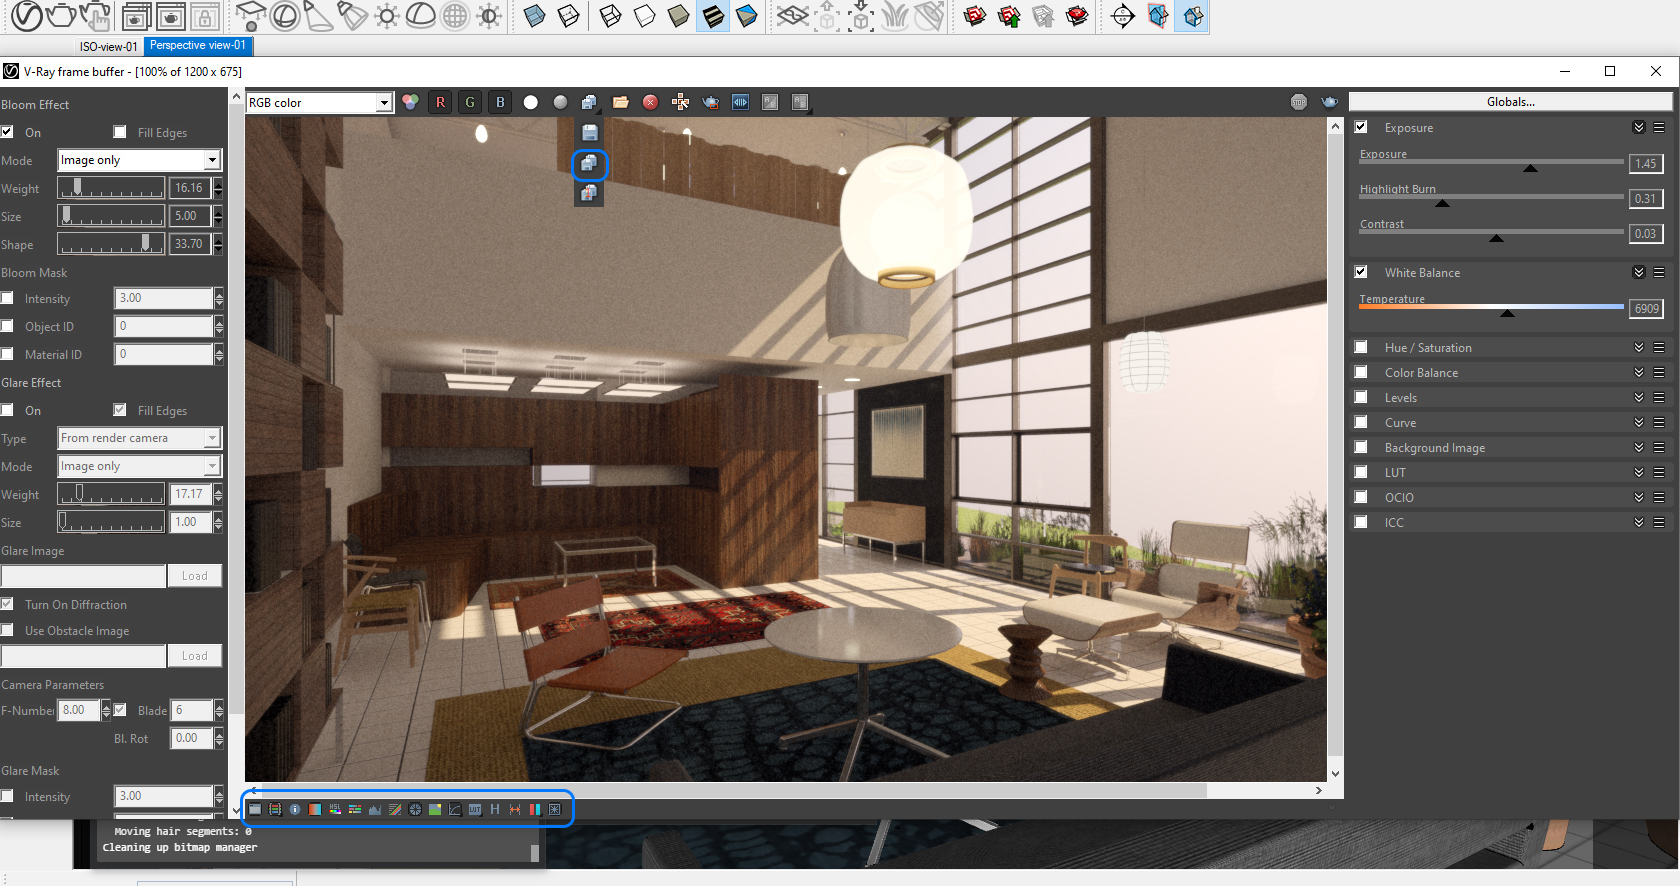
- [STEP 4] After the render is finished, you can modify the final image with [Correction Control] and [Lens effect settings].
- [STEP 5] Click [Save current channel] to save the rendered image shown in the frame buffer. If you want to save all render elements that you added, press the [Save current channel] and release the click on [Save all image channels to separate files].
- [STEP 6] Save the image – if you want to save the rendered image with the background (sky) image, save it in JPG format. If you want to save the rendered image without the background (sky) image, save it in PNG format. If you don’t want to get the highest image quality, save in TIFF format.
 References
Chaosdocs. (n.d.). V-Ray 5 for Sketchup – User Interface. Chaos Help. Retrieved December 24, 2021, from https://docs.chaos.com/display/VSKETCHUP/User+Interface
Chaosdocs. (n.d.). V-Ray 5 for Sketchup – Materials. Chaos Help. Retrieved December 24, 2021, from https://docs.chaos.com/display/VSKETCHUP/Materials
Chaosdocs. (n.d.). V-Ray 5 for Sketchup – Metal Shaders IOR. Chaos Help. Retrieved December 24, 2021, from https://docs.chaos.com/display/VMAYA/Metal+Shaders+IOR
Chaosdocs. (n.d.). V-ray for sketchup courseware. Chaos Help. Retrieved December 24, 2021, from https://docs.chaos.com/display/CWVRAY3SU?_cldee=Y2hveW9uZ3llb24xOTgzQGdtYWlsLmNvbQ%3D%3D&recipientid=lead-9fe0a2503f2fe911a9a2000d3ab31ad6-a6a05ee3862d45eb930031eebf34be26&utm_source=ClickDimensions&utm_medium=email&utm_campaign=TrialNurture_Sketchup&esid=50f67145-8ac7-43cb-b27f-292608675a26
ChaosTV. (n.d.). Chaos Group TV playlists. YouTube. Retrieved December 24, 2021, from https://www.youtube.com/c/ChaosGroupTV/playlists
Furrer, J. (n.d.). IES Library: Browse. Retrieved December 24, 2021, from https://ieslibrary.com/en/browse#ies-002bb0e37aa7e5f1d7851fb1db032628
jbdtube. (February 4, 2020). VideoGuide – How to Download and Install Vray for Sketchup Pro, Easy, Quick, Free Trial Version. YouTube. Retrieved December 24, 2021, from https://www.youtube.com/watch?v=f_5g2ZLblZE
SketchUp School. (June 8, 2018). Vray for SketchUp — Getting Started (How to Create Your First Photorealistic Rendering). YouTube. Retrieved December 24, 2021, from https://www.youtube.com/watch?v=1mUAUmqCvBk
SketchUp School. (December 4, 2019). The Key Steps to Rendering Interiors with Vray for SketchUp. YouTube. Retrieved December 24, 2021, from https://www.youtube.com/watch?v=8B0Sen0ZRr8&list=RDCMUCdv_VnYKlu_gaZa7rpXifEg&index=5
