5.4 Figured Bass Notation: Tutorial
Figured Bass
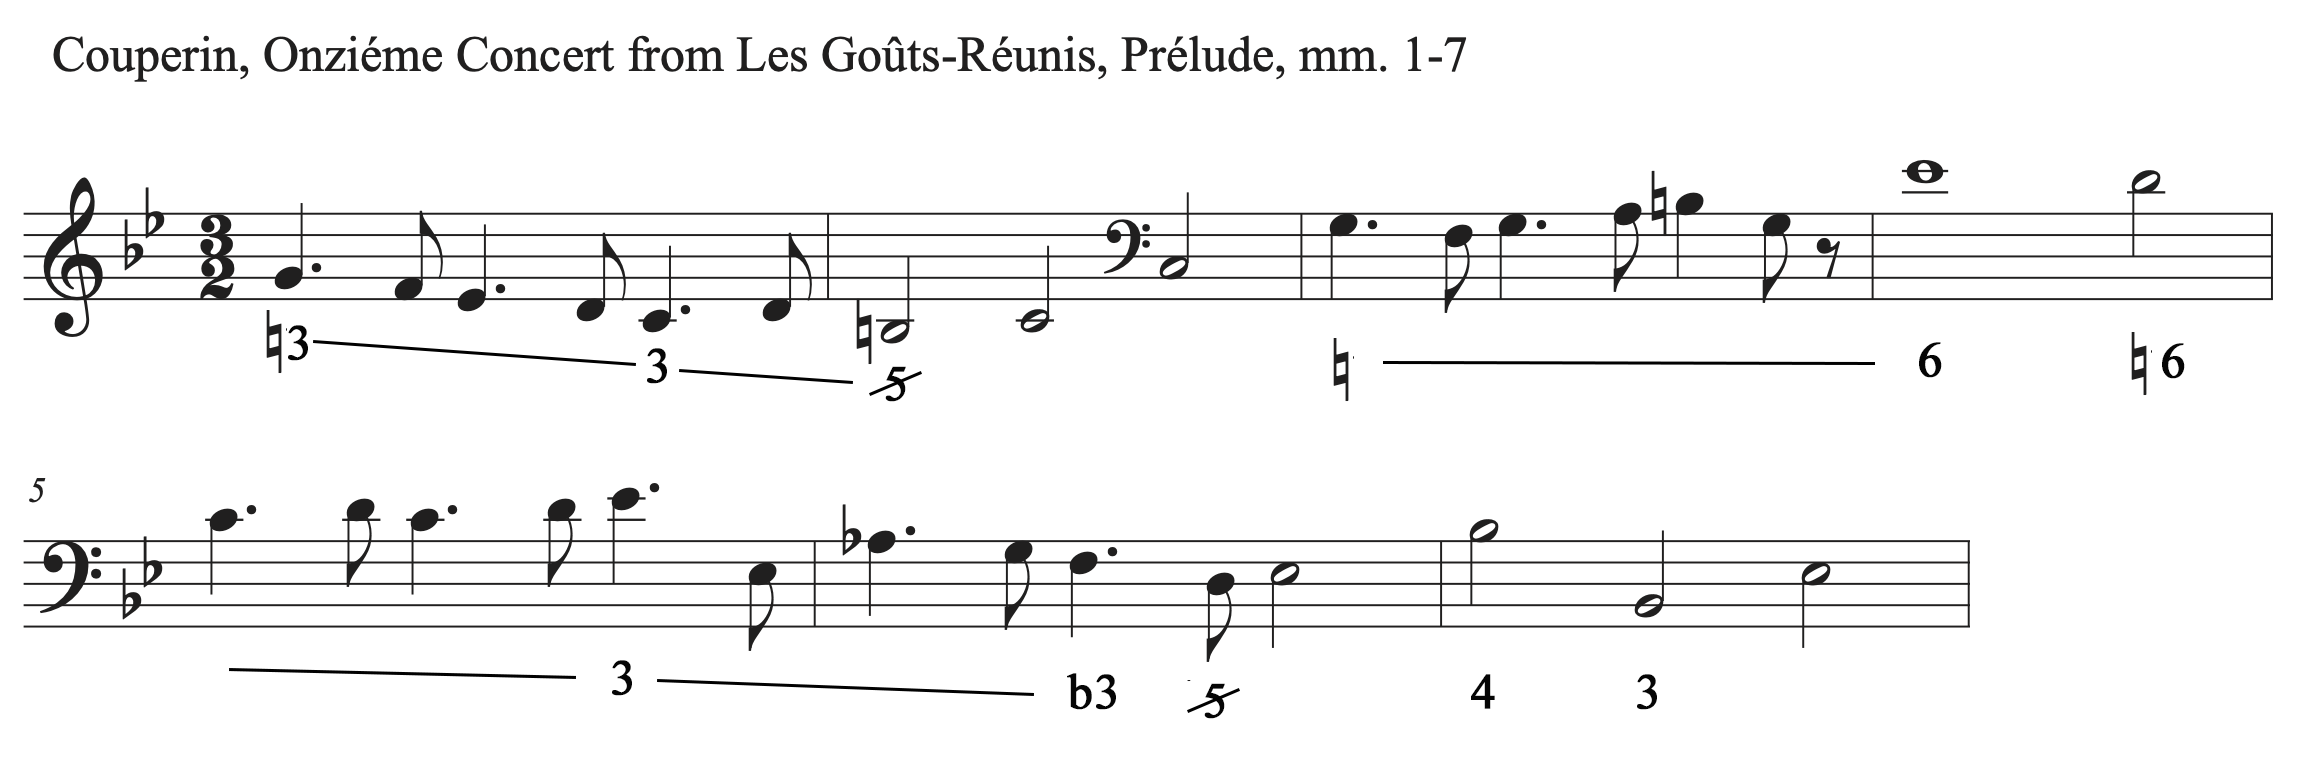
Like lead sheet symbols, figured bass symbols are a way to symbolize chords in music. Figured bass, also known as thorough-bass, is a keyboard notation system. While lead sheet chord symbols are most often written over a melody, in figured bass, numbers and symbols are written under the bass line of the keyboard part in order to let the musician know which intervals to play above the bass. The performer would “realize” the figured bass symbols by improvising within the indicated chords. Figured bass shares many similarities to lead sheet symbols. While they both tell a musician what basic notes to play, they allow the musician to be creative with elements like rhythm, articulation, dynamics, register, voicing, and melodic embellishments. The score and recording below show an example of what figured bass looks and sounds like in music.

The Art of Figured Bass
Baroque music is sometimes seen as uninteresting. The expression markings and articulation and dynamic marking found in modern scores provide a lot of direction to the modern performer. Those marking were generally not part of baroque musical scores, so modern performers sometimes see baroque music as expressionless. Performance practice for period instruments and period music allows us to better understand the music of an older time period. Baroque music is highly expressive and elaborate, despite the lack of markings in the baroque scores. One of the elements that contributed greatly to drama and expression in baroque music was the art of realizing figured bass through improvisation. The keyboard player was a vital part in a baroque ensemble, and the expressive art of realizing figured bass is something that modern musicians often don’t get to experience. Listen to the following two examples of Winter from Vivaldi’s Four Seasons. The first recording is a modern orchestra. The second is a baroque ensemble. Listen to how including the keyboard player in the second example adds drama to the music.
Figured Bass Symbols
Figured bass indications include numbers and symbols. The numbers given under a bass pitch represent the intervals that should be played above the bass pitch. These intervals form the triads and seventh chords we use in music. All notes played above the bass are in the key unless a symbol is given that would add an accidental to a specific interval above the bass. If there is no symbol listed under a bass pitch, a root position chord on the given bass pitch is assumed. This differs from lead sheet symbols because lead sheet symbols assume a chord continues until the next given lead sheet symbol. If a chord continues in figured bass, a dash symbol can be included between chords.
Triads
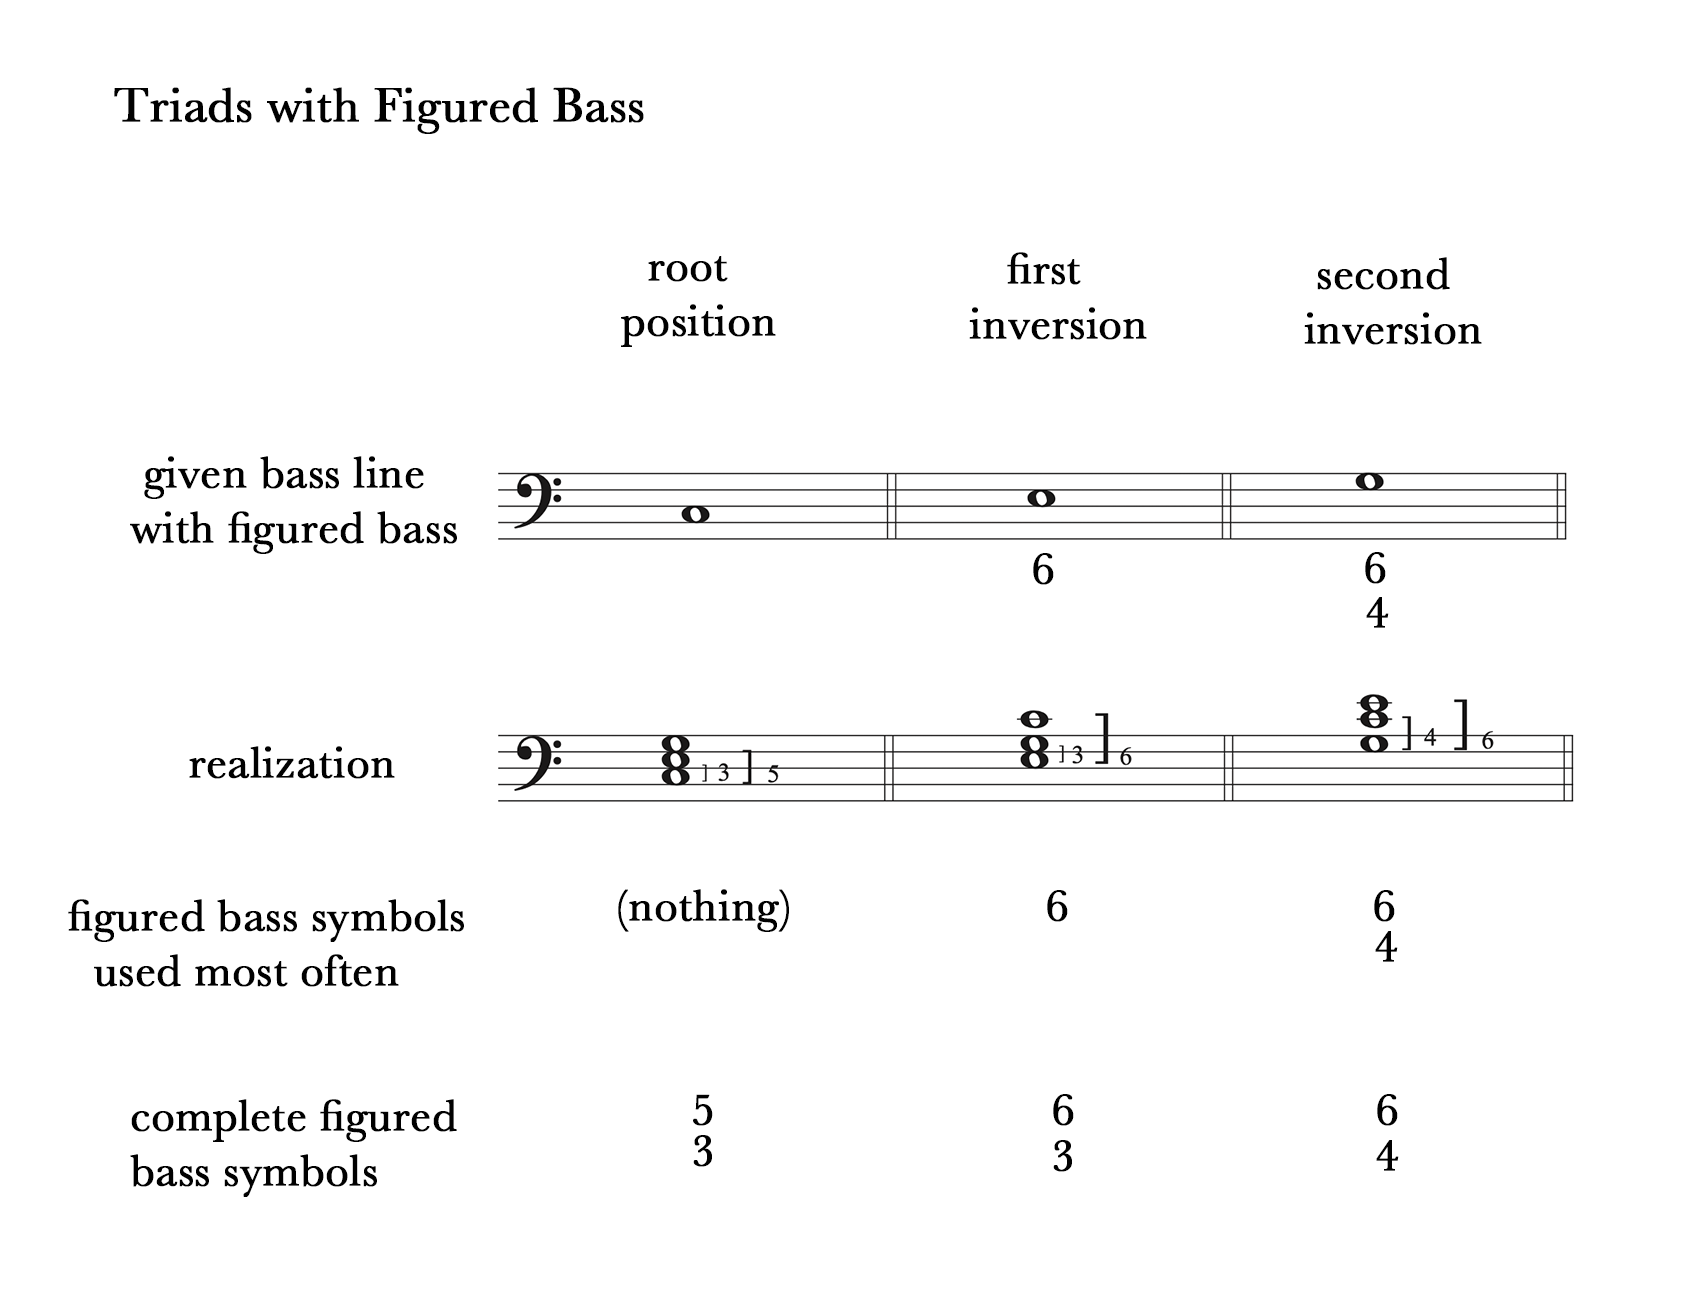
Look at the symbols used for triads to see how figured bass works.
 Let’s look at the root position chord first. You’ll notice that in the given bass line, there are no symbols under the bass pitch in the first bar. When there is nothing under a bass pitch, you assume that the chord is in root position. If you look at the realization for the root position chord, you can see that the interval from the bass pitch (C) to the 3rd of the chord (E) is a 3rd and the interval from the bass pitch of the chord (C) to the 5th (G) is a 5th. While we don’t normally see a figure bass symbol written under a root position chord, the complete name for the chord would be 5/3 due to the intervals created by each pitch above the bass. So, you could see 5/3 listed under the bass pitch of a root position chord.
The second chord is in first inversion. It has a 6 written under it. If you look at the realization for that chord you will see that 6 is used as the shorthand for a chord that has a 3rd above the bass and a 6th above the bass. When realizing figured bass always remember to count each number starting from the bass pitch. A 3rd above the bass pitch E is G. A 6th above the bass pitch E is C. Those intervals create a first inversion chord. It’s most common to just write 6 under a first inversion chord, but you could also see the complete label: 6/3.
The third chord in the example is a second inversion chord. It has a 6 and 4 written under it. If we start from the bass pitch G and count up a 4th, we get C. If start at the bass pitch G and count up a 6th, we get E. That forms a triad in second inversion. Both numbers are included in a figured bass symbol for a triad in second inversion.
Summary for symbolizing triads with figured bass:
- Always count intervals up from the bass pitch when realizing figured bass
- Memorize:
- Root position symbol: 5/3, but most often nothing is listed
- 1st inversion symbol: 6, which stands for 6/3
- 2nd inversion symbol: 6/4
Seventh Chords
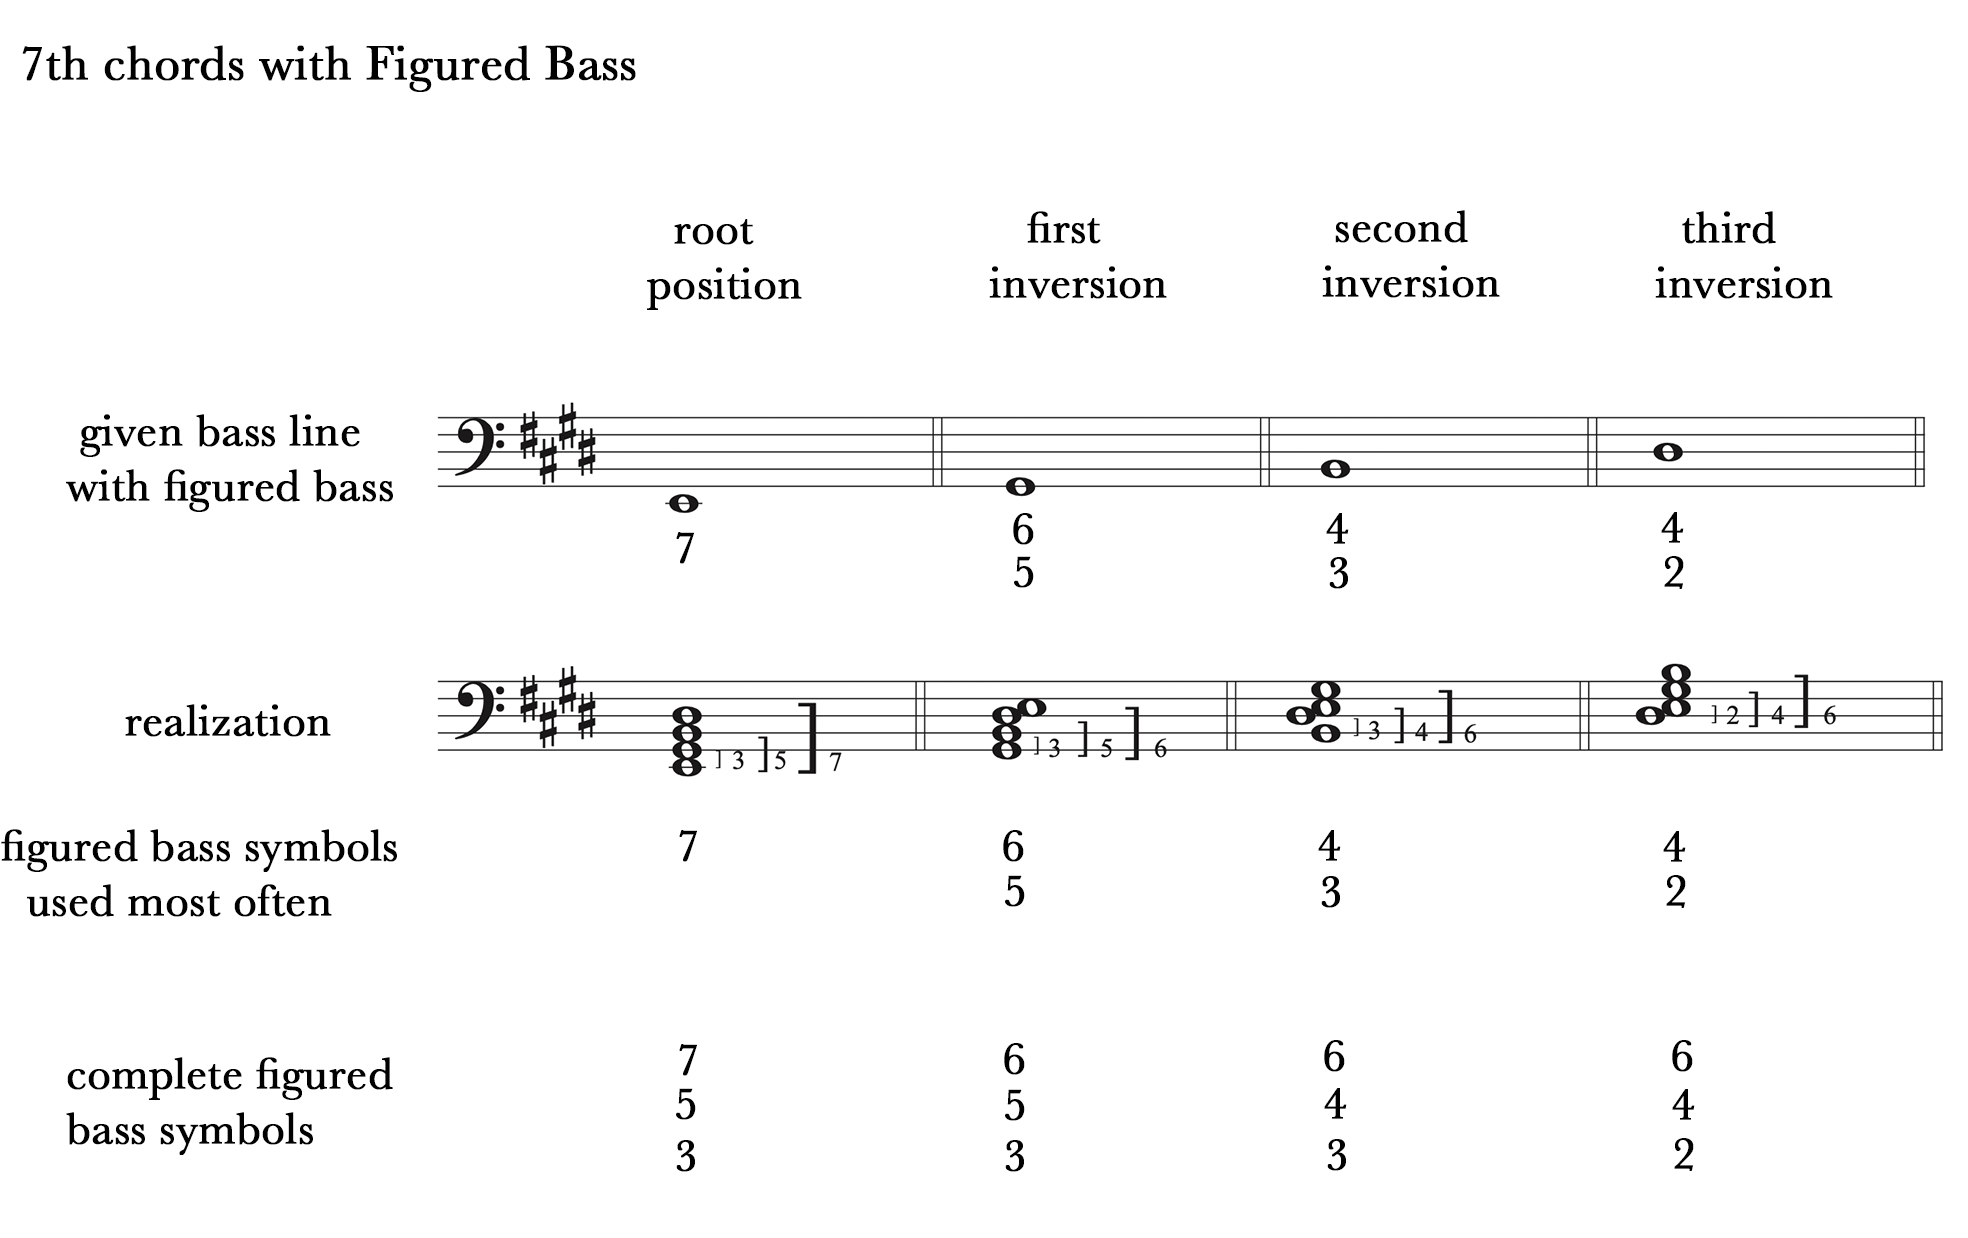
Seventh chords are named in the same way using figured bass. Look at the following examples.

Look at the root position 7th chord. There is a 7 under the given bass pitch. That implies a root position 7th chord. If we look at the realization, we can see the intervals above the bass that form that chord. A 3rd above the bass pitch E is G#. A 5th above the bass pitch E is B. A 7th above the bass pitch E is D#. While the complete symbol for a 7th chord in root position is 7/5/3, it is more common to see just 7 listed under the bass pitch.
The second chord implies a 7th chord in first inversion. A 6/5 is written under the bass pitch. Look at the realization to see the intervals in this chord. The bass pitch is G#. A 3rd above G# is B. A 5th above G# is D#, and a 6th above the G# is E. The complete symbol for a 7th chord in first inversion is 6/5/3, but it is more common to see the numbers 6 and 5 listed under a first inversion 7th chord.
The third chord in the example implies a second inversion 7th chord. The complete symbol for a second inversion 7th chord is 6/4/3. We can see those intervals above the bass in the realization. While 6/4/3 is the complete symbol, it is more common to see the numbers 4/3 listed under the bass for a second inversion 7th chord.
The last chord in the example implies a third inversion 7th chord. The complete symbol for a third inversion 7th chord is 6/4/2. We can see those intervals above the bass in the realization. While 6/4/2 is the complete symbol, it is more common to see the numbers 4/2 listed under the bass for a second inversion 7th chord.
Summary for symbolizing seventh chords with figured bass:
- Always count intervals up from the bass pitch when realizing figured bass
- Memorize:
- Root position 7th chord symbol: 7, which stands for 7/5/3
- 1st inversion symbol: 6/5, which stands for 6/5/3
- 2nd inversion symbol: 4/3, which stands for 6/4/3
- 3rd inversion symbol: 4/2, which stands for 6/4/2
Accidentals in Figured Bass
In the examples we’ve look at so far, all notes have been in the key signature. However, in music, we often see accidentals used to alter chords. Any accidentals that are included in the score above the bass must be indicated in the figured bass symbols. If the bass pitch has an accidental added to it, we do not include an indication for that accidental in the figured bass label because figured bass symbols indicate intervals above the bass. The bass is the given note and not included in figured bass numbers.
Flats
Flats in figured bass are symbolized by writing a flat sign next to the figured bass number for the interval that contains the flat in the music.

In the first example, you see the number 6 and 3 under the bass pitch, both of which have flats on them. 6/3 implies a first inversion triad. You count up a 3rd from the bass pitch F to get A, then add a flat to get Ab. Then, you count up a 6th from the bass pitch F to get D, and add a flat to get Db. The second example shows the same process using a root position 7th chord.
Natural signs
Natural signs in the music are also included in the figured bass next to the number for the interval that contains the natural sign in the music.
 In the first example, you see a natural sign under the bass pitch without a number. Accidentals that written alone always apply to the 3rd above the bass. So, the 3rd (E) is raised from Eb to E natural in the first example because of the natural sign under the bass pitch. In the second example, the numbers 4/2 imply a 7th chord in 3rd inversion (complete symbol 6/4/2) and the natural sign is written next to the 4. When building the chord, you count up a 4th from the bass pitch Ab and get Db. Then, add a natural sign to that note to get D natural.
Sharps
There are 3 ways to raise a pitch in figured bass notation. A sharp sign can be used next to the affected interval number, a plus sign can be used next to the affected interval number, and the affected interval number can have a slash through it.

In the first example, the lone sharp under the bass applies to the 3rd of the chord, so you raise the C to C#. The second example shows the use of sharp signs in figured bass notation, the third example shows the use of slashes through the numbers to indicate sharps, and the last example uses plus signs to indicate raising the pitch. Notice that in the last example, the bass pitch is sharp. That is not symbolized in the figured bass. Only accidentals in notes above the bass are included in figured bass symbols because those symbols refer to notes at specific intervals above the bass, not the bass note itself.
Summary for symbolizing accidentals using figured bass:
- Accidentals that are above the bass must be included next to their interval numbers in figured bass symbols. An accidental on the bass pitch does not affect the figured bass symbols.
- Symbols for flats: flat signs
- Symbols for naturals: natural signs
- Symbols for sharps: sharp signs, plus signs, or slashes through the numbers
- An accidental without a number always applies to the note that is a 3rd above the bass.
Figured Bass and Keyboard Spacing
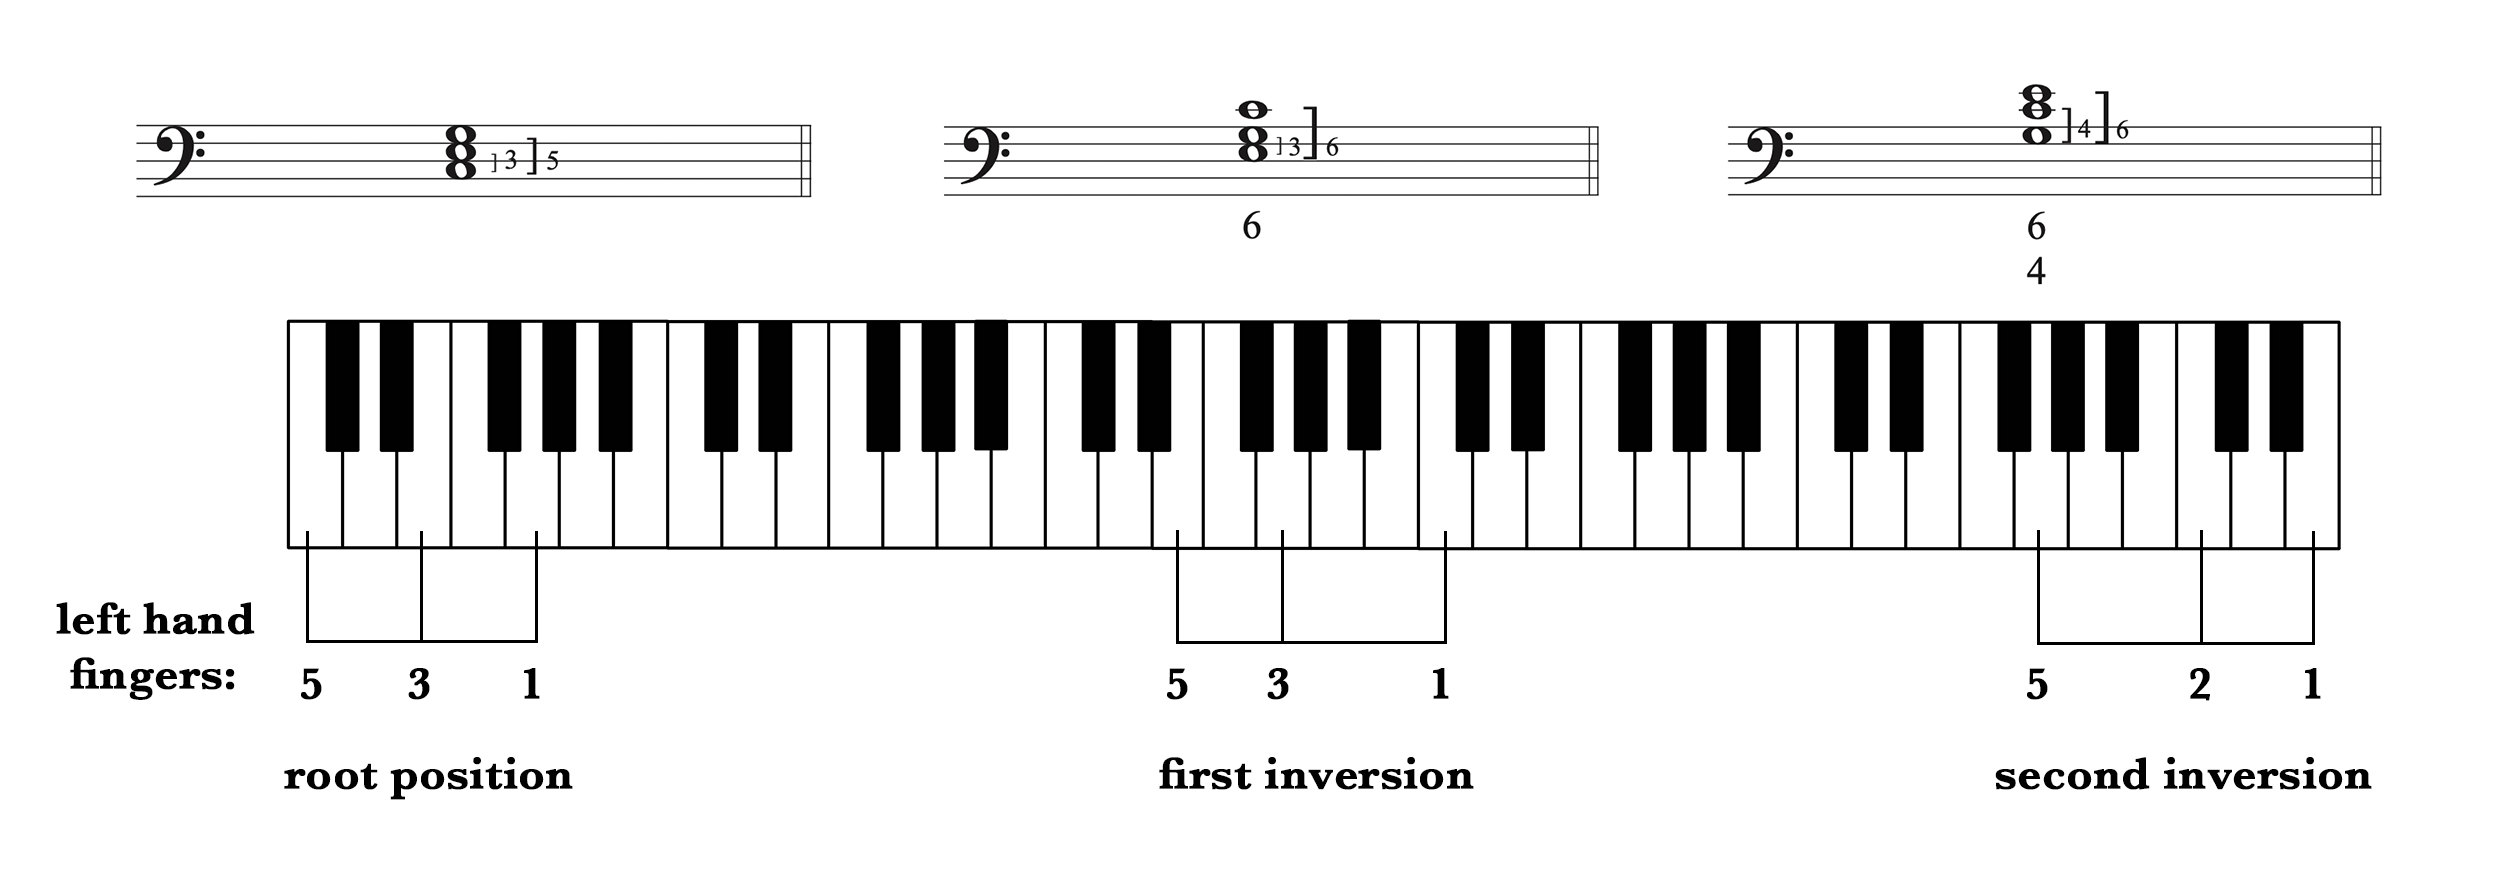
Figured bass was designed as an effective tool for keyboard playing because the number system serves as a shorthand for finger placement on the keyboard. Look at the following example.

Imagine that you were playing a piece on the keyboard with only a bass line and figured bass notation. Seeing nothing under the bass pitch would imply the intervals 5/3 above the bass. You would place your left hand with your pinky on the bass note and then on every other note (finger position 5 3 1). The position of the chord on the staff looks like the hand position on the keyboard. Any root position chord would have that basic hand position on that keyboard. For a first inversion chord, the hand pattern changes along with the figured bass pattern. The position of the notes on the staff looks like the position of the left hand when playing them on the keyboard. So, when you saw a 6 in the music, you’d know to move your hand to that position with your pinky on the bass note. The pattern shifts again for a chord in second inversion, but again, it matches the position of the hand on the keyboard. Figured bass notation is effective for keyboard playing because it quickly lets you see the position of the notes on the keyboard that are implied by the figured bass symbols. With practice, a player’s understanding of how the notes implied by the figured bass symbols relate to their positions on the keyboard, would allow them to go beyond blocked chords and would allow them to improvise freely within the boundaries of a particular chord.
Realizing Figured Bass
Once you know how figured bass works, it’s important to be able to realize figured bass from a given bass pitch and figured bass symbols.
Guidelines for Realizing Figured Bass
- Look at the figured bass numbers. If a shortened version of the complete number is given (which is common), write out all numbers so that you don’t miss any notes. For example, if you see 6, know that it stands for 6/3. If no number is given, remember that means 5/3 (a root position chord).
- Starting with the bottom figured bass number, count up from the bass pitch to find that interval above the bass. If accidentals are included on that number, make sure to look at the key signature before applying the necessary changes to the note.
- Look at the next higher figured bass number and count up from the bass pitch to find that interval above the bass, also looking for accidentals and checking the key signature.
- Continue until all numbers have been
Look at the following examples. Apply the guidelines above to the given bass pitch with figured bass to realize the figured bass. Then, see if your answer matches the realization included for each example.

Writing Figured Bass Symbols Under Chords
Another skill to develop is the ability to write a figured bass symbol for a chord that has been notation on the staff.
Guidelines for writing figured bass symbols
- Rewrite the notes in the chord so that they are in the closest possible position to the bass pitch, eliminating all double tones. Make sure not to change the given bass pitch.
- Count up from the bass pitch to the closest pitch above it, and write down the interval number. If there is an accidental on that pitch, make sure to include it along with the number.
- Count up from the bass pitch to the next closest pitch above it, and write down the interval number. Again, make sure to include accidentals.
- Continue to count up to each pitch, notating their interval numbers and accidentals until all pitches have been accounted for.
- Write the interval number, including accidentals, under the bass pitch in order of highest on top to lowest on the bottom. If there is a shortened, more often used version of the figured bass symbol, you can change your numbers to the shortened version. However, you must include all accidentals in the figured bass symbols, so cannot eliminate any numbers from the label that include accidentals.
Look at the following examples. After each chord, you’ll see a bar with the chord placed in its closest possible position with all doubled tones removed. Each interval above the bass is notated, including necessary accidentals.

Though most, if not all, of the music you are working on probably does not include figured bass symbols, there are ways to use the concepts of figured bass in music today. The spirit of figured bass lies in the idea of improvisation over a given bass line. Analyze the music you are currently practicing or studying, noting the triads and seventh chords used. Write out the bass line for a passage in your piece and write figured bass symbols below. Then, sit down at a piano and feel and hear how that notation translates into keyboard spacing. Once you have learned the basic chord progression, try improvising to change things like the rhythms and voicing of notes in the chords. Be creative and see how that changes your perspective of the music. When you play it as written, or reflect on what you have learned through experimenting with improvisation created from figured bass notation.

